Updating Let’s Encrypt SSL Certificates for the Avi Controller

Updating Let’s Encrypt SSL Certificates for the Avi Controller

Again, you’ll need the fullchain.pem file but with the appended DST Root CA X3 certificate that was prepared in this article.

Navigate to Templates and then under Security, click on the SSL/TLS tab.

First we need to import each of the CA certificates in the chain before we import the certificate for the Avi Controller.

Again the certificates in the fullchain.pem file in order are

Subscriber Certificate
R3 Certificate
ISRG Root X1 Certificate
DST Root CA X3 Certificate

Click on CREATE, Root/Intermediate CA Certificate. Then import each certificate individually starting from the bottom. Click on Validate and then Import.

Do this again for the other two certificates, the ISRG Root X1 certificate and then the R3 intermediate certificate. Once done, you’ll see the following.

The Subscriber certificate is done differently.

Click on CREATE, Controller Certificate. Then give the certificate a name, click on the Import option and browse to the fullchain.pem file and also the privkey.pem file. A passphrase is not required as Let’s Encrypt does not create a passphrase. Click on Validate and then Import.

Once done, you’ll see the following.

Now that we’ve imported the Let’s Encrypt CA certificates, we can proceed to change the SSL certificate used by the Avi Controller for HTTPS web management.

Navigate to Administration, Settings, Access Settings, then click on the pencil icon.

Delete all of the current certificates in the SSL/TLS Certificate box and then select the new Subscriber certificate that we imported earlier, in my case I named it star-vmwire-com.

Once you press Save, you can close the browser session and open up a new one to start enjoying secure connections to your Avi Controller.

Advertisement

Updating Let’s Encrypt SSL Certificates for NSX-T Manager

Updating Let’s Encrypt SSL Certificates for NSX-T Manager

Updating NSX-T Manager to use a CA signed SSL certificate is a little bit different from how we updated the vCenter certificate. It requires interacting with the NSX-T API.

First lets import the certificate into NSX-T. Again, you’ll need the fullchain.pem file but with the appended DST Root CA X3 certificate that was prepared in this article.

Navigate to System and then under Settings, click on the Certificates link.

First we need to import each of the CA certificates in the chain before we import the certificate for NSX-T Manager.

Again the certificates in the fullchain.pem file in order are

Subscriber Certificate
R3 Certificate
ISRG Root X1 Certificate
DST Root CA X3 Certificate

Click on IMPORT, Import CA Certificate. Then import each certificate individually starting from the bottom, make sure to deselect the Service Certificate slider, as we are not using these certificates for virtual services.

Its important to import bottom up as this enables NSX-T to check the issuer for subsequent certificates that you import. So import in reverse order of the fullchain.pem file. Start importing with this order

DST Root CA X3 Certificate
ISRG Root X1 Certificate
R3 Certificate
Subscriber Certificate

Once you’ve imported all three of the CA root and intermediate certificates – DST Root CA X3 certificate, ISRG Root X1 CA and the R3 CA certificate, you can then import the Subscriber Certificate *.vmwire.com last, once all done you’ll see the following.

Summarized in the following table.

Order in fullchain.pemName in NSX-TIssued By
Subscriber Certificatestar-vmwire-comR3
R3 CertificateR3ISRG Root X1
ISRG Root X1 CertificateISRG Root X1DST Root CA X3
DST Root CA X3 CertificateDST Root CA X3DST Root CA X3

You’ll need the certificate ID for the certificate star-vmwire-com to use to update the NSX-T Manager certificate.

Click on the ID column of that certificate and copy the ID to your clipboard.

Now you’ll need to open a tool such as Postman to make the change.

First lets validate that our certificate is OK by using this GET against the NSX-T API, paste in the certificate ID into the URL.

GET https://nsx.vmwire.com/api/v1/trust-management/certificates/21fd7e8a-3a2e-4938-9dc7-5f3eccd791e7/?action=validate

If the status is “OK”, we’re good to continue.

Next use will POST the certificate ID against the following URL.

POST https://nsx.vmwire.com/api/v1/node/services/http?action=apply_certificate&certificate_id=21fd7e8a-3a2e-4938-9dc7-5f3eccd791e7

Once done, close your NSX-T Manager browser session, and enjoy using a CA signed certificate with NSX-T.

Updating Let’s Encrypt SSL Certificates for vCenter Server

Updating Let’s Encrypt SSL Certificates for vCenter Server

I prefer to use wildcard certificates for my environment to reduce the number of certificates that I need to manage. This is due to Let’s Encrypt limiting their certificates to 90 days. This means that you’ll need to renew each certificate every <90 days or so. Using a wildcard certificate reduces your operational overhead. However, vCenter does not support wildcard certificates.

After you’ve prepped the fullchain.pem file according to the previous article, you can now update the vCenter SSL certificate using vCenter’s Certificate Management tool.

Navigate to Menu then Administration and click on Certificate Management.

Under the Machine SSL Certificate, click on Actions and choose Import and Replace Certificate.

Select the Replace with external CA certificate (requires private key).

Copy the section for the Subscriber Certificate part into the Machine SSL Certificate box, and then the rest into the Chain of trusted root certificates box.

Copy the contents of the privkey.pem file into the Private Key box.

Once you click on Replace, vCenter will restart its services and you can open a new browser window to the FQDN of vCenter and enjoy a secured vCenter session.

Preparing Let’s Encrypt SSL Certificates for vCenter, NSX-T Manager and Avi Controller

The Let’s Encrypt DST Root CA X3 certificate is missing from the fullchain.pem and chain.pem files, therefore errors such as the following prevent certificates from being imported by VMware appliances such as NSX-T and vCenter.

This post summarizes how to fix this issue.

Let’s Encrypt is a great service that provides free SSL certificates. I recently rebuilt my lab and decided to use SSL certs for my management appliances. However, non of the management appliances would accept the certificates issued by Let’s Encrypt due to an incomplete chain. This post summarizes how to fix this issue.

[Updated here]

TL;DR the Let’s Encrypt DST Root CA X3 certificate is missing from the fullchain.pem and chain.pem files, therefore errors such as the following prevent certificates from being imported by VMware appliances such as NSX-T and vCenter.

Certificate chain validation failed. Make sure a valid chain is provided in order leaf,intermediate,root certificate. (Error code: 2076)

Get your certbot tool up and running, you can read more with this link.

Grab your files from the /etc/letsencrypt/live folder for your vCenter certificate. My one is in /etc/letsencrypt/live/vcenter.vmwire.com

You should now have the following files.

cert.pem
chain.pem
fullchain.pem
privkey.pem

A note on Let’s Encrypt certificate chain. If you look at the Certification Path for Let’s Encrypt certificates, you’ll notice something like this.

figure 1.

vcenter.vmwire.com is issued by the R3 CA certificate. This is Let’s Encrypt’s Intermediate certificate.

R3 is issued by the DST Root CA X3 certificate. This is Let’s Encrypt root certificate.

Then the DST Root CA X3 certificate needs to be trusted by all of our management appliances, vCenter, NSX-T and Avi Controller.

What I found is that, this is not the case and trying to import a Let’s Encrypt certificate without the root certificate that issued the DST Root CA X3 certificate will fail. Here’s an example from NSX-T when importing the chain.pem certificate.

figure 2. Importing the chain.pem certificate to NSX

The chain.pem file contains the R3 certificate and the DST Root CA X3 certificate. When you open it in notepad++ it looks like this.

figure 3. chain.pem

So we have a problem. We need the certificate that issued the DST Root CA X3 certificate to complete the chain and pass the chain validation.

Lets take a look at Let’s Encrypt certificates on their website.

ISRG Certificate Hierarchy Diagram, as of December 2020

So looking up the chain, it appears that my certificate vcenter.vmwire.com corresponds to the Subscriber Cert, which is issued by R3. This confirms the assumptions above in figure 1. However, it looks like the R3 certificate is not issued by the DST Root CA X3 certificate but in fact another certificate named ISRG Root X1.

Lets test this theory and import each of the certificates in the chain.pem file individually using NSX-T.

After importing, you can see that this is in fact the ISRG Root X1 certificate that is issued by the DST Root CA X3 certificate. My assumption from figure 3. is then incorrect.

So what is the top certificate in the chain.pem file?

Lets’ import it and find out. Yup, its the R3 certificate.

So where is the DST Root CA X3 certificate that we need to complete the validation chain?

We can obtain this from the Let’s Encrypt website. Scroll all the way down to the bottom of that page and you’ll see the following:

Clicking on that link will get you the the following page with this link.

And we will get closer to our DST Root CA X3 certificate when we click on that link above.

Clicking on that link gets us to this page here.

Then clicking on that link will get us to this page here.

We can now grab our certificate with this link highlighted here.

When you click on this link, you’ll be able to download a file named 8395.crt, this is the DST Root CA X3 certificate that we need to complete the chain. However, it is in a .crt format but we need to work with .pem.

To convert a crt certificate to pem use the following command.

openssl x509 -in 8395.crt -out 8395.pem -outform PEM

Once we import it into NSX-T we can see that it is indeed our missing certificate.

Looking at all the certificates in NSX-T, it all looks good.

You can see from my terrible Apple Pencil skills that it all now looks good.

So how do we use all these certificates together?

Well, the easiest is to take the fullchain.pem file, this file contains the following certificates in the following order.

Subscriber Certificate
R3 Certificate
ISRG Root X1 Certificate

That means we just need to append our new DST Root CA X3 certificate to the bottom of the fullchain.pem file to get a valid chain. It will now look like this.

Subscriber Certificate
R3 Certificate
ISRG Root X1 Certificate
DST Root CA X3 Certificate

Once we import this new fullchain into NSX-T in goes through successfully.

Now that we have a working fullchain.pem, we can use that file or its contents to import these signed certificates into our management appliances.

Read on – the following articles summarize how to use these certificates with vCenter, NSX-T Manager and the Avi Controller.

Updating vCenter to use Let’s Encrypt certificates.

Updating NSX-T to use Let’s Encrypt certificates.

Updating Avi Controller to use Let’s Encrypt certificates.

How to update your Openfiler USB installation for better performance

Previously I wrote an article on How to install and run Openfiler on a USB key. I thought that everything was working fine but eventually found that NFS and CIFS performance was too slow. Upon reading a few forums and stumbling across this thread in particular, the reason was down to Openfiler requiring an update.

I have since tried to update the installation by running conary updateall at the CLI. Unfortunately, this installs an updated kernel (2.6.29.6-0.24.smp.gcc3.4.x86_64 (SMP)) and also a new ramdisk which makes all the hard work from the previous post defunct. This article shows you how to perform the update and then make a new initrd-usb-update.img to work with the new kernel.

So assuming you’ve made a successful USB key using the previous article, continue with the following to update your Openfiler installation and also make the updated Openfiler installation USB key bootable.

Update Openfiler

Let’s first update Openfiler.

  1. Log into the CLI as root
  2. Run

    conary updateall

  3. This will take a while as it downloads around 26 packages and installs them.
  4. Once complete insert the Openfiler CD into your drive and restart your system, making sure that it boots from CD.

Creating a new ramdisk that works with the new kernel

This part is more or less very much similar to the steps in the previous post, there are some minor additions that we need to make, but for completeness I’ve included all the steps here.

  1. Once Openfiler finishes booting from the CD type.

    linux rescue

  2. Go through the menus and select your region and keyboard and skip the automatic mounting of your installed OS. We will do this manually.
  3. When the prompt appears, create a directory to mount the USB key.

    mkdir /mnt/sysimage

  4. Now mount the / of the USB key onto /mnt/sysimage.

    mount /dev/sda2 /mnt/sysimage

    Note: your / partition may be /dev/sda3 instead, depending on how you setup your partitioning during the installation of Openfiler.

  5. Now mount the boot partition of the USB key onto /mnt/sysimage/boot.

    mount /dev/sda1 /mnt/sysimage

    Note: your / partition may be /dev/sda1 instead, depending on how you setup your partitioning during the installation of Openfiler.

  6. Make the /mnt/sysimage your working environment by changing your root location so you are working on the file system on the usb key.

    chroot /mnt/sysimage

  7. Copy the current initrd file to a temporary location where we can work on it.

    cp /boot/initrd-1 /tmp/initrd.gz

    Note1: now’s a good time to press TAB, there will now be two kernels, use 2.6.29.6-0.24.smp.gcc3.4.x86_64 as this is the updated kernel that was installed during the update.

  8. Gunzip the initrd.gz file

    gunzip /tmp/initrd.gz

  9. Make a temporary working directory

    mkdir /tmp/b

    We are using /tmp/b because /tmp/a already exists as the temporary working directory from the previous article.

  10. Go into the new working directory

    cd /tmp/b

  11. Extract the contents of the initrd file into /tmp/b.

    cpio –i < /tmp/initrd

  12. Now we edit the init file to load the USB and SCSI drivers for the new initrd-usb-update.img ramdisk.

    nano init

  13. Do a search for “mount –t proc /proc /proc” and add the following underneath this line. We want to load these USB and storage modules before any other modules that’s why these entries need to be at the top of the file. Note that there is a new module crc-t10dif.ko which is required by the new kernel to boot from USB and as such must be launch during init time.

    echo “Starting Openfiler on USB”

    echo “Loading scsi_mod.ko module”

    insmod /lib/scsi_mod.ko

    echo “Starting crc-t10dif.ko module”

    insmod /lib/crc-t10dif.ko

    echo “Loading sd_mod.ko module”

    insmod /lib/sd_mod.ko

    echo “Loading sr_mod.ko module”

    insmod /lib/sr_mod.ko

    echo “Loading ehci-hcd.ko module”

    insmod /lib/ehci-hcd.ko

    echo “Loading uhci-hcd.ko module”

    insmod /lib/uhci-hcd.ko

    echo “Loading ohci-hcd.ko module”

    insmod /lib/ohci-hcd.ko

    sleep 5

    echo “Loading usb-storage.ko module”

    insmod /lib/usb-storage.ko

    sleep 5

  14. Do a search for insmod /lib/scsi_mod.ko, insmod /lib/sd_mod.ko, insmod /lib/ehci-hcd.ko, insmod /lib/uhci-hcd.ko and /lib/crc-t10dif.ko and remove these duplicate entries from the rest of the file. We do not want these loaded again.
  15. Save the file and exit with CTRL X, then Y, or if you used vi then :wq!
  16. Now we need to copy all of the modules in Step 13 into our working directory.
  17. Go to the drivers directory

    cd /lib/modules/2/kernel/drivers

    Note2: just press tab to fill in this bit, there will now be two kernels, use 2.6.29.6-0.24.smp.gcc3.4.x86_64 as this is the updated kernel that was installed during the update.

  18. Copy all of the modules in Step 13 to /tmp/b/lib.

    cp scsi/scsi_mod.ko /tmp/b/lib

    cp scsi/sr_mod.ko /tmp/b/lib

    cp scsi/sd_mod.ko /tmp/b/lib

    cp usb/host/ehci-hcd.ko /tmp/b/lib

    cp usb/host/uhci-hcd.ko /tmp/b/lib

    cp usb/host/ohci-hcd.ko /tmp/b/lib

    cp usb/storage/usb-storage.ko /tmp/b/lib

    cp /lib/modules/2.6.29.6-0.24.smp.gcc3.4.x86_64/kernel/lib/crc-t10dif.ko /tmp/b/lib

  19. Now let’s package the contents of the working directory /tmp/b into our new initrd-usb-update.img.

    cd /tmp/b

    find . | cpio –c –o | gzip -9 > /boot/initrd-usb-update.img

  20. Now all we need to do is edit the /boot/grub/menu.1st file to tell the kernel to use the new ramdisk that we just created. Remember that this new ramdisk is currently located in /boot/ (aka /dev/sda1) and is called initrd-usb-update.img.

    nano /boot/grub/menu.1st

  21. Find the line starting with initrd /vmlinux-…………………… and replace with

    initrd /initrd-usb-update.img

  22. Save the file and reboot the computer, remove the CD and allowing it to boot from the USB key. You now have your new updated Openfiler installation booting from the USB key directly.

Turn off flow control for SMB Clients

For better CIFS performance turn off your network adapter flow control. I can achieve a sustained 60 mb/s transfer between my Macbook and Openfiler once flow control is turned off. I was only achieving around 30 mb/s previously.

Turn off flow control for ESXi hosts using NFS/iSCSI to Openfiler

First understand what flow control is before performing the follow actions, the following articles provide good cases for either enabling or disabling flow control and auto-negotiation for flow control.

http://www.telecom.otago.ac.nz/tele301/student_html/ethernet-autonegotiation-flow-control.html – not to be confused with auto-negotiation of flow control.

http://virtualthreads.blogspot.com/2006/02/beware-ethernet-flow-control.html

Since this is my lab I’m going to disable flow control completely.

To do this on ESXi hosts follow these instructions or use VMware KB 1013413.

  1. Enable Remote SSH for the ESXi host first.
  2. Use your favourite SSH client and log in as root (assuming you can, disable lock-down mode etc).
  3. Run the following command to list all your vmnic interfaces, make a note of the vmnic that is used to connect to the Openfiler Server.

    esxcfg-nics –l

  4. In my case it’s just vmnic0 (I’m using a HP Microserver), type the following command to see the current flow control status of that adapter.

    ethtool –show-pause vmnic0

  5. Run the following commands to set auto-negotiation or RX flow control or TX flow control, any combination is possible.
  6. To disable flow control for sent and received traffic, use the command:

    ethtool –pause tx off rx off

  7. To disable auto-negotiation of flow control, use the command:

    ethtool –pause autoneg off

  1. Open the /etc/rc.local file using a text editor and append the same commands used in Step 6, placing each on its own line. Then save the file.
  2. For an ESXi host, save the configuration change using the command:

    /sbin/auto-backup.sh

    The commands added to the /etc/rc.local file will be executed at startup, persisting the configuration changes across reboots. As they are executed in Step 6, no reboot is required for them to take effect.

How to setup Active Directory authentication on Openfiler

Setup Active Directory Authentication

The steps must be performed in this order, otherwise you’ll get a headache trying to work out why you cannot see any Groups listed.

Go to Services | Enable SMB/CIFS server.

Click on SMB/CIFS Setup.

  1. Change the NetBIOS name to just the hostname of the server (do not include the domain).

Navigate to Accounts | Expert View. Configure for your environment, note the CAPITALIZATION of some of the fields.

Click on Use Kerberos 5 and enter your domain details, note the CAPITALIZATION of some of the fields.

Now click on Accounts | Group List and if done successfully, you should see your Domain groups.

How to install and run Openfiler on a USB key

Install Openfiler onto the USB Key

  1. Disconnect all hard disks from the server.
  2. Boot from the Openfiler CD and install Openfiler by invoking the linux expert command and installing as normal onto your USB key, taking into account your partitioning to fit onto your USB key and also making a record of which partitions are your /boot and your / partitions.

Create a new ramdisk that includes the USB drivers.

  1. When installation is complete, reboot the server with the Openfiler CD still in the drive and then type

    linux rescue

  2. Go through the menus and select your region and keyboard and skip the automatic mounting of your installed OS. We will do this manually.
  3. When the prompt appears, create a directory to mount the USB key.

    mkdir /mnt/sysimage

  4. Now mount the / of the USB key onto /mnt/sysimage.

    mount /dev/sda2 /mnt/sysimage

    Note: your / partition may be /dev/sda3 instead, depending on how you setup your partitioning during the installation of Openfiler.

  5. Now mount the boot partition of the USB key onto /mnt/sysimage/boot.

    mount /dev/sda1 /mnt/sysimage

    Note: your / partition may be /dev/sda1 instead, depending on how you setup your partitioning during the installation of Openfiler.

  6. Make the /mnt/sysimage your working environment by changing your root location so you are working on the file system on the usb key.

    chroot /mnt/sysimage

  7. Copy the current initrd file to a temporary location where we can work on it.

    cp /boot/initrd-1 /tmp/initrd.gz

    Note1: now’s a good time to press TAB

  8. Gunzip the initrd.gz file

    gunzip /tmp/initrd.gz

  9. Make a temporary working directory

    mkdir /tmp/a

  10. Go into the new working directory

    cd /tmp/a

  11. Extract the contents of the initrd file into /tmp/a.

    cpio –i < /tmp/initrd

  12. Now we edit the init file to load the USB and SCSI drivers for the new initrd-usb.img ramdisk.

    nano init

  13. Do a search for “mount –t proc /proc /proc” and add the following underneath this line. We want to load these USB and storage modules before any other modules that’s why these entries need to be at the top of the file.

    echo “Starting Openfiler on USB”

    echo “Loading scsi_mod.ko module”

    insmod /lib/scsi_mod.ko

    echo “Loading sr_mod.ko module”

    insmod /lib/sr_mod.ko

    echo “Loading sd_mod.ko module”

    insmod /lib/sd_mod.ko

    echo “Loading ehci-hcd.ko module”

    insmod /lib/ehci-hcd.ko

    echo “Loading uhci-hcd.ko module”

    insmod /lib/uhci-hcd.ko

    echo “Loading ohci-hcd.ko module”

    insmod /lib/ohci-hcd.ko

    sleep 5

    echo “Loading usb-storage.ko module”

    insmod /lib/usb-storage.ko

    sleep 5

  14. Do a search for insmod /lib/scsi_mod.ko, insmod /lib/sd_mod.ko, insmod /lib/ehci-hcd.ko and insmod /lib/uhci-hcd.ko and remove these duplicate entries from the rest of the file. We do not want these loaded again.
  15. Save the file and exit with CTRL X, then Y, or if you used vi then :wq!
  16. Now we need to copy all of the modules in Step 13 into our working directory.
  17. Go to the drivers directory

    cd /lib/modules/2/kernel/drivers

    Note2: just press tab to fill in this bit, you should only have one kernel.

  18. Copy all of the modules in Step 13 to /tmp/a/lib.

    cp scsi/scsi_mod.ko /tmp/a/lib

    cp scsi/sr_mod.ko /tmp/a/lib

    cp scsi/sd_mod.ko /tmp/a/lib

    cp usb/host/ehci-hcd.ko /tmp/a/lib

    cp usb/host/uhci-hcd.ko /tmp/a/lib

    cp usb/host/ohci-hcd.ko /tmp/a/lib

    cp usb/storage/usb-storage.ko /tmp/a/lib

  19. Now let’s package the contents of the working directory /tmp/a into our new initrd-usb.img.

    cd /tmp/a

    find . | cpio –c –o | gzip -9 > /boot/initrd-usb.img

  20. Now all we need to do is edit the /boot/grub/menu.1st file to tell the kernel to use the new ramdisk that we just created. Remember that this new ramdisk is currently located in /boot/ (aka /dev/sda1) and is called initrd-usb.img.

    nano /boot/grub/menu.1st

  21. Find the line starting with initrd /vmlinux-…………………… and replace with

    initrd /initrd-usb.img

  22. Save the file and reboot the computer, remove the CD and allowing it to boot from the USB key. You now have your Openfiler installation booting from the USB key directly.

New Openfiler for the VMwire lab

Openfiler is a very cool NAS/SAN product that is completely free. I just purchased some brand new SATA III controllers and disks so I’ve decided to migrate my storage from Freenas running on my HP Microserver to my old Dell PE SC440. Doing so will free up the HP Microserver to run vSphere and allow me to expand my current lab capacity of 1.7Tb to a whopping 7.4Tb. This article details my configuration steps and acts as a means for me to document my VMwire lab and I thought that others may benefit from my experience.

Hardware


Hardware

Make/Model

Details

Server

Dell PowerEdge SC440

Intel Pentium Dual Core E2180 2.0GHz, 8Gb RAM

Networking

Intel Corporation 82546EB Gigabit Ethernet PCI-X Dual Port Controller

Installed in PCI 33MHz slot

Embedded Broadcom Corporation NetXtreme BCM5754 Gigabit Ethernet PCI Express Controller

Onboard

SATA III Controllers

2 x ASUS S3U6 Dual Port SATA III and Dual Port USB 3.0 PCI-E 2.0 x4 Contollers

One installed in PCI-E 2.0 x4 slot and the other in PCI-E 2.0 x8 slot

1 x HighPoint RocketRAID 620 Dual Port PCI-E 2.0 x1 SATA III Controller

Installed in PCI-E 2.0 x1 slot

Fibre Channel Controller

1 x Brocade 2340 Single Port 2Gb Fibre Channel PCI-X Adapter

Installed in PCI 33MHz slot

Boot Device

Kingston DataTraveller+ 2Gb USB Key

Openfiler boot device

Storage Disks

5 x Seagate ST2000DL03-9VT1 2Tb 5400RPM 64Mb Cache SATA III Disks


Installed OS

Openfiler NAS/SAN

2.6.26.8-1.0.11.smp.gcc3.4.x86_64 (SMP)


The Total SATA 3 ports is 6, plus an additional 4 SATA 2 ports from the onboard adapter.

I have disabled all the SATA 2 ports from within the BIOS as I will only be using the SATA 3 ports from the three Add-in cards to support my 5 Seagate disks in a RAID-5 aggregate.

Overview of the Openfiler Setup

I have already setup my Openfiler Server by following the instructions from https://vmwire.com/2011/06/12/how-to-install-and-run-openfiler-on-a-usb-key/ to install Openfiler onto the Kingston DataTraveller+ 2Gb USB Key. Networking is setup and everything is working nicely ready for the configuration of the new RAID-5 Array.

Below is a screenshot of the Openfiler Hardware Information.

Setting up the Software RAID

I’m using software RAID due to the fact that SATA III RAID Controllers with 5 or more ports are currently still very expensive. The HighPoint RocketRaid 630 and the ASUS S6U3 Controllers are relatively cheap and can be picked up for less than £20 each.

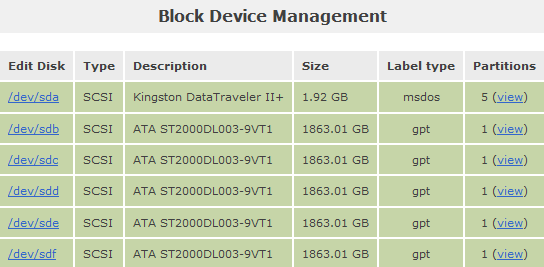
  1. You can view the list of block devices available to use on Openfiler by navigating to Volumes | Block Devices.

Openfiler has successfully picked up the 5 new disks and we can now manage them.

To set up the Software RAID we must first partition the disks as “RAID array member” partitions.

To do this you must click in each of the block devices and create a “RAID array member” partition. Remember to leave /dev/sda alone as this is the boot device.

  1. Clicking on /dev/sdb brings up the partitioning page.
  2. Select RAID array member from the Partition Type drop down menu and then just click on Create.

Continue creating the partitions on the remaining four disks by repeating Step 1.

Once complete the Block Device Management should look something like this.

Now we are ready to create the RAID Array. To do this we need to navigate to Volumes | Software RAID and create the array.

I’m going to create a RAID-5 (parity) array with a 64kB chunk size.

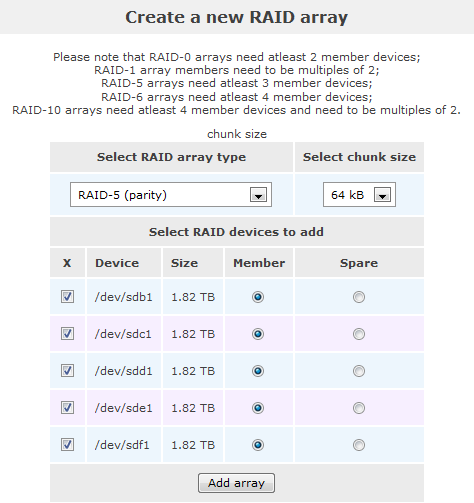
The Seagate disks only have about 1.82Tb usable capacity, so a RAID-5 array with 5 disks would give a total of 7.4Tb usable capacity.

Setting up the Volume Group

We can create the Volume Group by navigating to Volumes | Volume Groups.

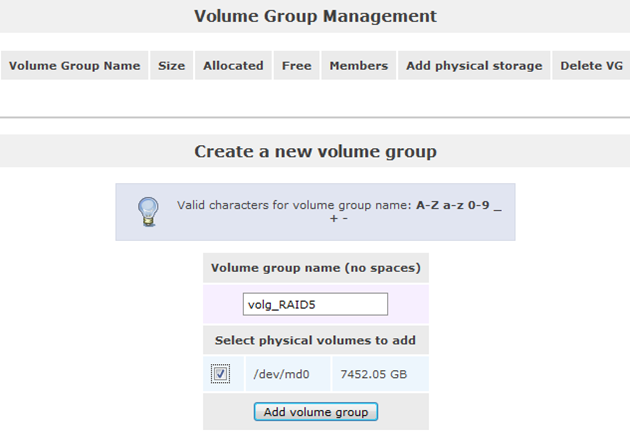
I’ve decided to create a single volume group for all my services – CIFS, NFS, iSCSI and FC. We will then create Volumes from this single Volume Group to carve up the storage. The resulting Volume Group Management page will then look something like this.

That’s our Volume Group setup complete. You would never need to revisit the Volume Group Management page ever again, unless you either rebuild your disks or create new Volume Groups from new disks. For reference the path for this Volume Group is /dev/md0/volg_raid5/.

Setting up a new Volume

Now we can start carving up our 7.4Tb usable capacity by creating Volumes and then assigning these Volumes to specific services.

We can manage this by using the Add Volume page. I’m going to add a new 1Tb NFS volume for my VMware virtual machines.

To do this navigate to Volumes | Add Volume.

Upon creating this new Volume, the path for this Volume will then be /dev/md0/volg_raid5/nfs01/.

Setting up a new Sub-folder on a Volume

Now that we have created a Volume, we can now create a Sub-folder in which we can make a Share. I’m going with a 1:1 allocation of Volume to Sub-folder in my lab, so the naming conventions reflect this.

To do this, navigate to the Shares page. The screen should be similar to this.

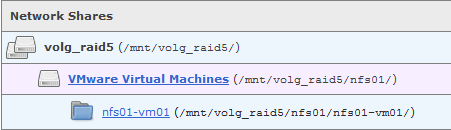
We can create the new Share by clicking on the VMware Virtual Machines link.

Now we can create a new sub-folder, I’m going to call mine nfs01-vm01.

The Shares page will now display the following.

Setting up a new Share

To create the actual nfs01-vm01 NFS share that is mounted on our vSphere servers we need to make the share from the Sub-folder created in “Setting up a new Sub-folder from a Volume”.

  1. Click on the nfs01-vm01 link and then click on the Make Share button.
  2. Select the “Public guest access” radio button and click on Update.

  1. Now scroll to the bottom of the page and click on the “RW” radio button underneath the NFS column, and then click on Update.

Note that you need to have setup network access configuration prior to doing any of these steps. This is not covered in this guide.

Again, for reference this nfs01-vm01 NFS share for use by VMware vSphere hosts has a path of /mnt/volg_raid5/nfs01/nfs01-vm01/.

Mounting the NFS share

The NFS volume is now ready to be mounted by VMware vSphere hosts. Just use /mnt/volg_raid5/nfs01/nfs01-vm01 as the “Folder” mount point.

Happy days!

[NEW]

Setting up a new Volume for CIFS

Now I can start carving up my remaining 6.4Tb usable capacity by creating Volumes and then assigning these Volumes to specific services. For this part I’m going to create a new Volume for CIFS.

We can manage this by using the Add Volume page. I’m going to add a new 3Tb CIFS volume for my Windows file storage.

To do this navigate to Volumes | Add Volume.

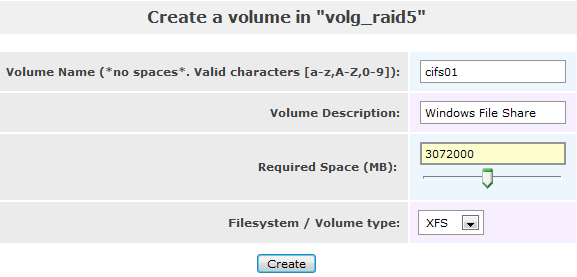
Upon creating this new Volume, the path for this Volume will then be /dev/md0/volg_raid5/cifs01/.

Setting up a new Sub-folder on a Volume for CIFS

Now that we have created a new Volume for CIFS, we can now create a Sub-folder in which we can make a Share. I’m going with a 1:1 allocation of Volume to Sub-folder in my lab, so the naming conventions reflect this.

To do this, navigate to the Shares page. The screen should be similar to this.

We can create the new Share by clicking on the Windows File Share.

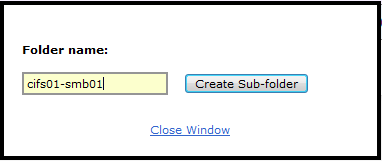
Now we can create a new sub-folder, I’m going to call mine cifs01-smb01.

The Shares page will now display the following.

Setting up a new Share for CIFS

To create the actual cifs01-smb01 CIFS share that can be used for SMB file storage we need to make the share from the Sub-folder created in “Setting up a new Sub-folder on a Volume for CIFS”.

  1. Click on the cifs01-smb01
    link and then click on the Make Share button.

  1. Select the “Controlled access” radio button and click on Update.

  1. Now scroll to the Group access configuration section in the middle and select the primary group for this CIFS share and also set Read or Read/Write Permissions for this share based on your Active Directory Groups. I’ve already created a Security Group called “openfiler cifs users” with which my AD account VIRTUAL\Hugo.Phan is a member of. Once done click Update.

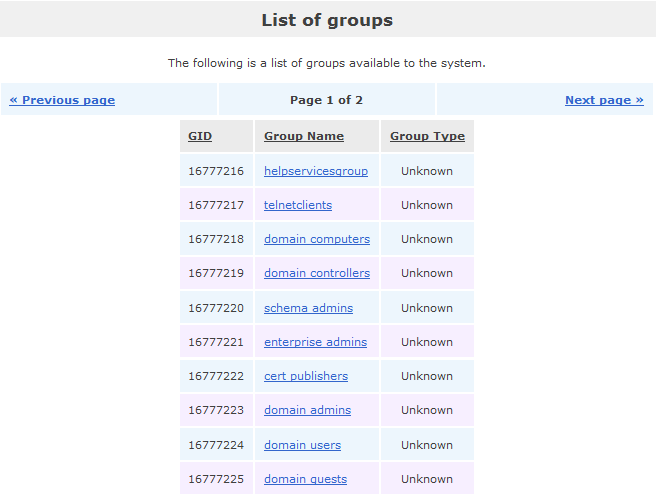
    Note that to use Active Directory authentication, you must set up Authentication under the Accounts section. I’ve written a guide here https://vmwire.com/2011/06/13/how-to-setup-active-directory-authenticaton-on-openfiler/.

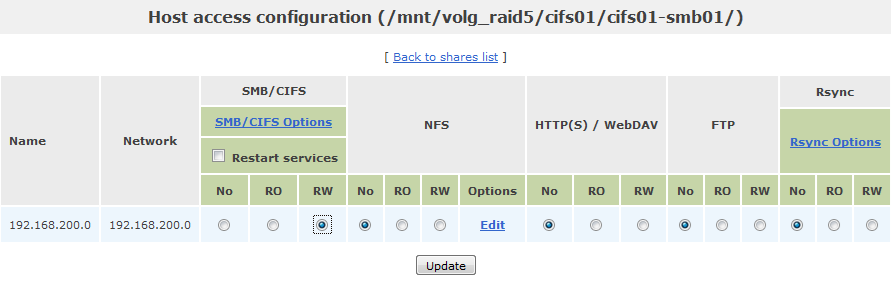
  1. Now scroll all the way down to the bottom and configure the Host access configuration to the /mnt/volg_raid5/cifs01/cifs01-smb01/ Volume. Choose the options relevant to your environment, I’m making this share R/W accessible by all my devices in my network – 192.168.200.0/24. Then just click on Update to finish.


Note that you need to have setup network access configuration prior to doing any of these steps. This is not covered in this guide.

Again, for reference this cifs01-smb01 CIFS share for use as network file storage over the network has a path of /mnt/volg_raid5/cifs01/cifs01-smb01/.

Connecting to the SMB Share

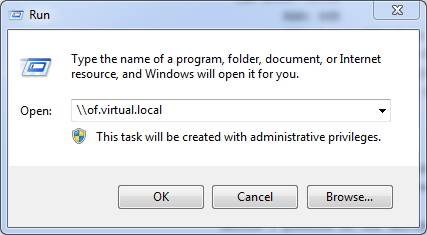
The SMB share is now ready to be used by client computers. To connect just open a UNC path to it. of.virtual.local is the FQDN of my Openfiler Server.

Now enter your domain credentials.

Job done!