
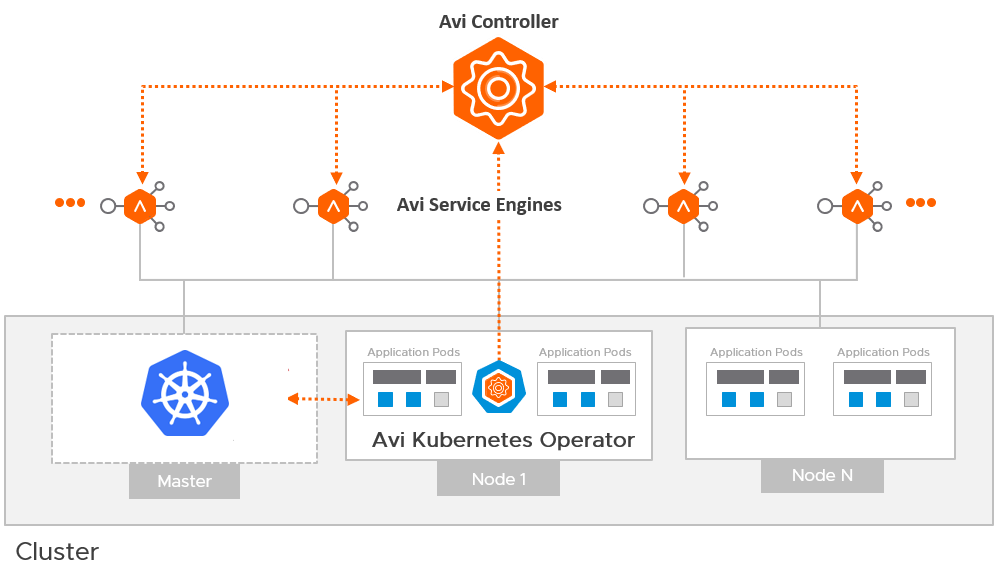
In this post I describe how to setup NSX ALB (Avi) in preparation for use with Tanzu Kubernetes Grid, more specifically, the Avi Kubernetes Operator (AKO).
AKO is a Kubernetes operator which works as an ingress controller and performs Avi-specific functions in a Kubernetes environment with the Avi Controller. It runs as a pod in the cluster and translates the required Kubernetes objects to Avi objects and automates the implementation of ingresses/routes/services on the Service Engines (SE) via the Avi Controller.
First lets describe the architecture for TKG + AKO.
For each tenant that you have, you will have at least one AKO configuration.
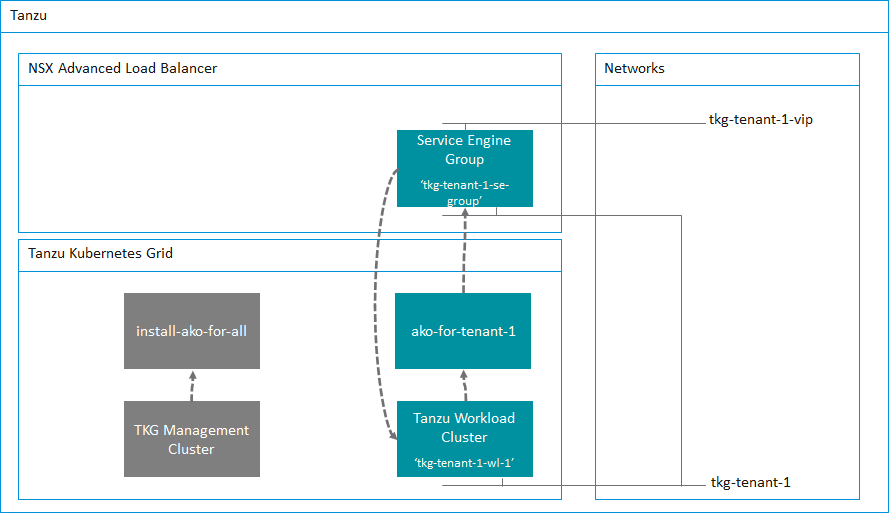
A tenant can have one or more TKG workload clusters and more than one TKG workload cluster can share an AKO configuration. This is important to remember for multi-tenant services when using Tanzu Kubernetes Grid. However, you can of course configure an AKO config for each TKG workload cluster if you wish to provide multiple AKO configurations. This will require more Service Engines and Service Engine Groups as we will discuss further below.
So as a minimum, you will have several AKO configs. Let me summarize in the following table.
| AKO Config | Description | Specification |
| install-ako-for-all | The default ako configuration used for the TKG Management Cluster and deployed by default | Provider side ako configuration for the TKG Management Cluster only. |
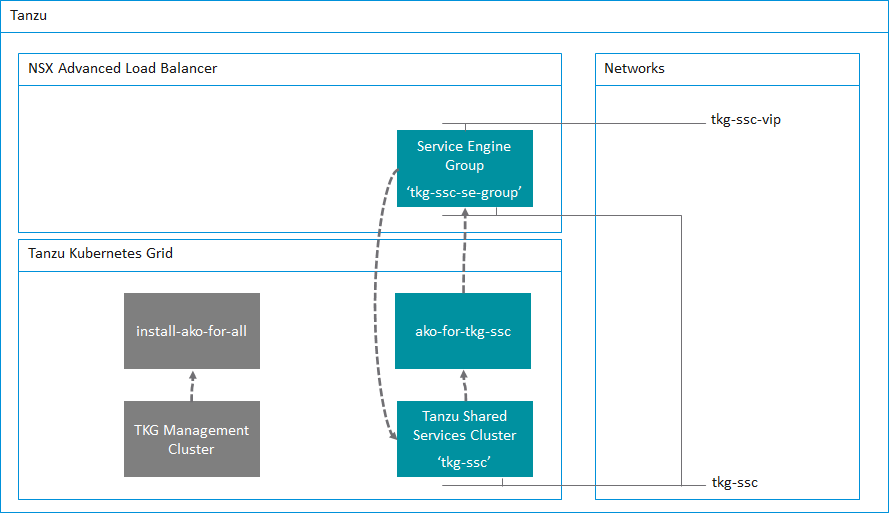
| ako-for-tkg-ssc | The ako configuration for the Tanzu Shared Services Cluster | Provider side AKO configuration for the Tanzu Shared Services Cluster only. tkg-ssc-akodeploymentconfig.yaml |
| ako-for-tenant-1 | The ako configuration for Tenant 1 | AKO configuration prepared by the Provider and deployed for the tenant to use. tkg-tenant-1-akodeploymentconfig.yaml |
| ako-for-tenant-x | The ako configuration for Tenant x |
Although TKG deploys a default AKO config, we do not use any ingress services for the TKG Management Cluster. Therefore we do not need to deploy a Service Engine Group and Service Engines for this cluster.
Service Engine Groups and Service Engines are only required if you need ingress services to your applications. We of course need this for the Tanzu Shared Services and any applications deployed into a workload cluster.
I will go into more detail in a follow-up post where I will demonstrate how to setup the Tanzu Shared Services Cluster that uses the preparation steps described in this post.
Lets start the Avi Controller configuration. Although I am using the Tanzu Shared Services Cluster as an example for this guide, the same steps can be repeated for all additional Tanzu Kubernetes Grid workload clusters. All that is needed is a few changes to the .yaml files and you’re good to go.
Clouds
I prefer not to use the Default-Cloud, and will always create a new cloud.
The benefit to using NSX ALB in write mode (Orchestration mode) is that NSX ALB will orchestrate the creation of service engines for you and also scale out more service engines if your applications demand more capacity. However, if you are using VMware Cloud on AWS, this is not possible due to restrictions with the RBAC constraints within VMC so only non-orchestration mode is possible with VMC.
In this post I’m using my home lab which is running vSphere.
Navigate to Infrastructure, Clouds and click on the CREATE button and select the VMware vCenter/VMware vSphere ESX option. This post uses vCenter as a cloud type.
Fill in the details as my screenshots show. You can leave the IPAM Profile settings empty for now, we will complete these in the next step.

Select the Data Center within your vSphere hierarchy. I’m using my home lab for this example. Again leave all the other settings on the defaults.

The next tab will take you to the network options for the management network to use for the service engines. This network needs to be routable between the Avi Controller(s) and the service engines.
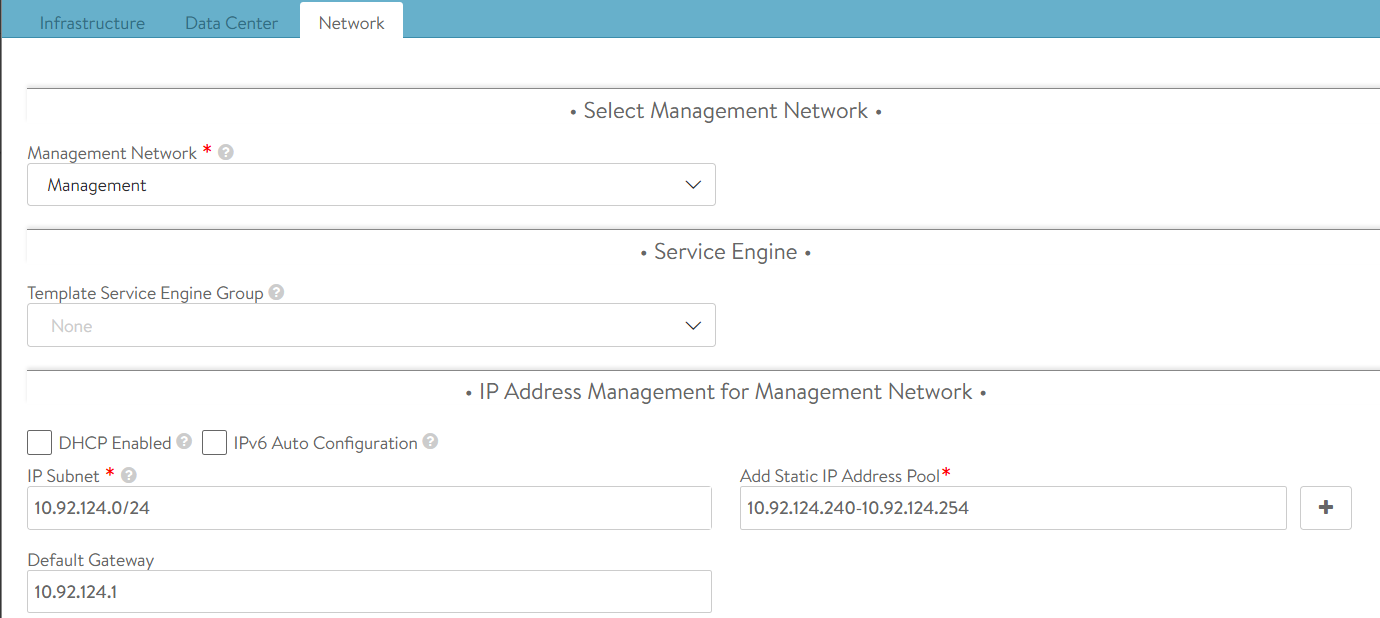
The network tab will show you the networks that it finds from the vCenter connection, I am using my management network. This network is where I run all of the management appliances, such as vCenter, NSX-T, Avi Controllers etc.
Its best to configure a static IP pool for the service engines. Generally, you’ll need just a handful of IP addresses as each service engine group will have two service engines and each service engine will only need one management IP. A service engine group can provide Kubernetes load balancing services for the entire Kubernetes cluster. This of course depends on your sizing requirements, and can be reviewed here. For my home lab, fourteen IP addresses is more than sufficient for my needs.
Service Engine Group
While we’re in the Infrastructure settings lets proceed to setup a new Service Engine Group. Navigate to Infrastructure, Service Engine Group, select the new cloud that we previously setup and then click on the CREATE button. Its important that you ensure you select your new cloud from that drop down menu.
Give your new service engine group a name, I tend to use a naming format such as tkg-<cluster-name>-se-group. For this example, I am setting up a new SE group for the Tanzu Shared Services Cluster.
Reduce the maximum number of service engines down if you wish. You can leave all other settings on defaults.

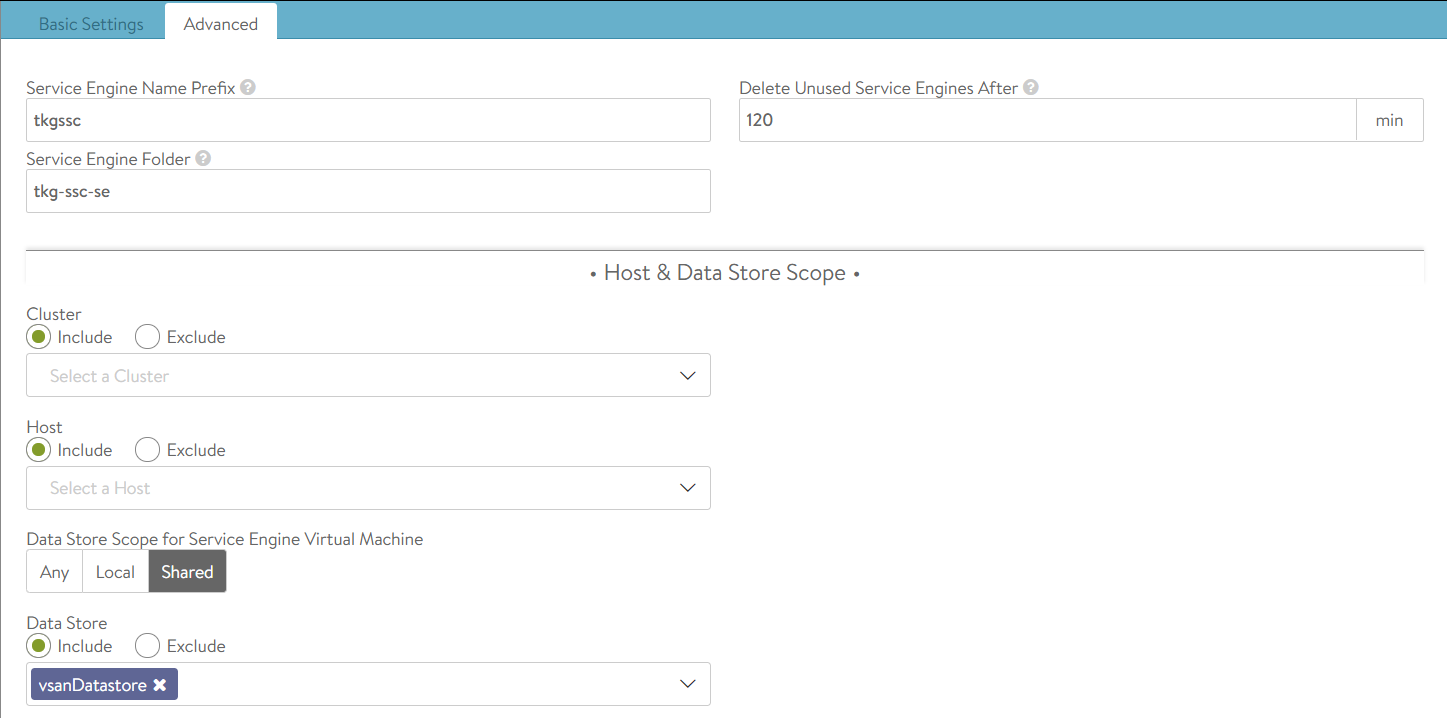
Click on the Advanced tab to setup some vSphere specifics. Here you can setup some options that will help you identify the SEs in the vSphere hierarchy as well as placing the SEs into a VM folder and options to include or exclude compute clusters or hosts and even an option to include or exclude a datastore.
Service Engine groups are important as they are the boundary with which TKG clusters will use for L4 services. Each SE Group needs to have a unique name, this is important as each TKG workload cluster will use this name for its AKODeploymentConfig file, this is the config file that maps a TKG cluster to NSX ALB for L4 load balancing services.
With TKG, when you create a TKG workload cluster you must specify some key value pairs that correspond to service engine group names and this is then applied in the AKODeploymentConfig file.
The following table shows where these relationships lie and I will go into more detail in a follow-up post where I will demonstrate how to setup the Tanzu Shared Services Cluster.
| Avi Controller | TKG cluster deployment file | AKO Config file |
Service Engine Group nametkg-ssc-se-group | AVI_LABELS | clusterSelector: |
Networks
Navigate to Infrastructure, Networks, again ensure that you select your new cloud from the drop down menu.
The Avi Controller will show you all the networks that it has detected using the vCenter connection that you configured. What we need to do in this section is to configure the networks that NSX ALB will use when configuring a service for Kubernetes to use. Generally, depending on how you setup your network architecture for TKG, you will have one network that the TKG cluster will use and another for the front-end VIP. This network is what you will use to expose the pods on. Think of it as a load balancer DMZ network.
In my home lab, I use the following setup.
| Network | Description | Specification |
| tkg-mgmt | TKG Management Cluster | Network: 172.16.3.0/27 Static IP Pools: 172.16.3.26 – 172.16.3.29 |
| tkg-ssc | TKG Shared Services Cluster | Network: 172.16.3.32/27 Static IP Pools: 172.16.3.59 – 172.16.3.62 |
| tkg-ssc-vip | TKG Shared Services Cluster front-end VIPs | Network: 172.16.4.32/27 Static IP Pools: 172.16.4.34 – 172.16.4.62 |
IPAM Profile
Create an IPAM profile by navigating to Templates, Profiles, IPAM/DNS Profiles and clicking on the CREATE button and select IPAM Profile.
Select the cloud that you setup above and select all of the usable networks that you will use for applications that will use the load balancer service from NSX ALB. You want to select the networks that you configured in the step above.

Avi Controller Certificate
We also need the SSL certificate used by the Avi Controller, I am using a signed certificate in my home lab from Let’s Encrypt, which I wrote about in a previous post.
Navigate to Templates, Security, SSL/TLS Certificates, click on the icon with a downward arrow in a circle next to the certificate for your Avi Controller, its normally the first one in the list.

Click on the Copy to clipboard button and paste the certificate into Notepad++ or similar.
At this point we have NSX ALB setup for deploying a new TKG workload cluster using the new Service Engine Group that we have prepared. In the next post, I’ll demonstrate how to setup the Tanzu Shared Services Cluster to use NSX ALB for ingress services.

2 thoughts on “Preparing NSX Advanced Load Balancer for Tanzu Kubernetes Grid Ingress Services”