A short post on some operational tips for CSE 3.0.4. This post covers recommendations for sizing the CSE server, how to protect it from failure, finding the important log files and other tips and tricks.
Important files
Backup the following files. Its a good idea to perform image level backups of the VM too.
All file locations below assume you’re using the automated method to deploy CSE.
| File | Why? |
| /opt/vmware/cse/config/config.yaml, unecrypted.conf | Contains the configuration for CSE server. Ensure you keep a safe backup of both the unecrypted file, so you can make changes and keep the encrypted file in case you lose the CSE server for whatever reason. |
| /opt/vmware/cse/.cse_scripts/* | Here you’ll find a bunch of directories that hold the Kubernetes templates runtimes for all of the supported Kubernetes versions. The supported templates are the TKGm ones and the native ones. Take a backup of this entire directory. You will need this if you want to save time when you redeploy CSE into a new VM but you’ve already prepared the templates and the templates are ready in the VCD catalog. Saving these directories and copying them to the new CSE VM will enable you to run the command: sudo -u cse -i cse upgrade --skip-template-creation -k /opt/vmware/cse/.ssh/authorized_keysThis will skip the long process of template creation again but allow you to setup CSE on the new VM. |
If you didn’t take a backup of the .cse_scripts directory and redeployed CSE with the –skip-template-creation flag and already have the templates in catalog – when you go to deploy a Kubernetes cluster with VCD you’ll see an error such as:
FileNotFoundError: [Errno 2] No such file or directory: '/opt/vmware/cse/.cse_scripts/ubuntu-16.04_k8-1.18_weave-2.6.5_rev2/mstr.sh'
How to install both native and TKGm templates
There are two cookbooks that can be used to install CSE and enable template creation into VCD. The two are
native and
When you install CSE you can only configure one entry into the broker section of the config.yaml file.
broker:
  catalog: cse-catalog
  default_template_name: ubuntu-16.04_k8-1.21_weave-2.8.1
  default_template_revision: 1
  ip_allocation_mode: pool
  network: default-organization-network
  org: cse
  remote_template_cookbook_url: https://raw.githubusercontent.com/vmware/container-service-extension-templates/master/template.yaml
  storage_profile: 'truenas-iscsi-luns'
  vdc: cse-vdc
The lines 3, 4 and 8 are what we care about in the above code snippet. This code tells CSE to use the native template cookbook.
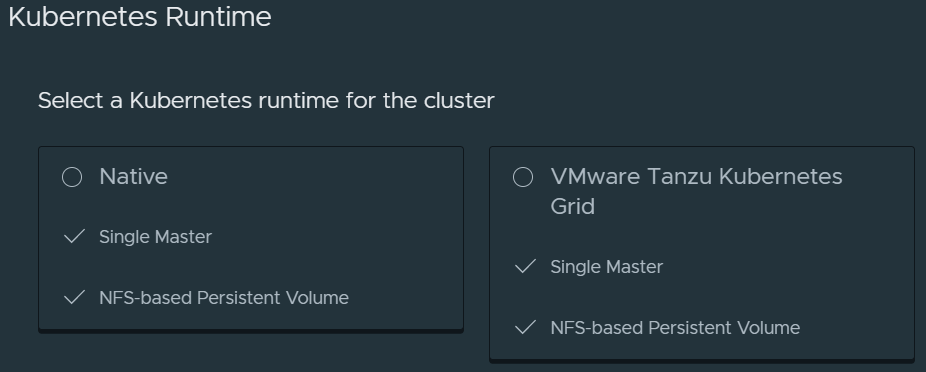
When you perform a completely fresh install of CSE you will need to run the installation without the –skip-template-creation flag.
sudo -u cse -i cse install -k /opt/vmware/cse/.ssh/authorized_keysYou’ll then get this option in VCD
How do you also enable TKGm templates in addition to native templates?
Well you would either update the config.yaml file or create a new one and use this code in the broker section instead.
broker:
  catalog: cse-catalog
  default_template_name: ubuntu-20.04_tkgm-1.20_antrea-0.11
  default_template_revision: 1
  ip_allocation_mode: pool
  network: default-organization-network
  org: cse
  remote_template_cookbook_url: https://raw.githubusercontent.com/vmware/container-service-extension-templates/tkgm/template.yaml
  storage_profile: 'truenas-iscsi-luns'
  vdc: cse-vd
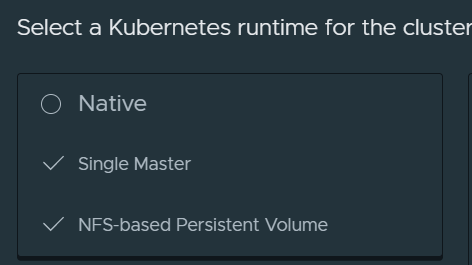
However, this time you would not use cse install command, but rather cse upgrade instead.
sudo -u cse -i cse upgrade -k /opt/vmware/cse/.ssh/authorized_keysYou’ll then see two options in VCD

For a really easy end to end automated deployment of both native and TKGm templates, use the bash script I developed in my GitHub repository.
Use vSphere HA for the CSE server
The CSE server can not support its own high availability through multiple VMs and sharing state. In fact, CSE is designed not to hold any state and communicates entirely with VCD through the message bus either with MQTT or RabbitMQ.
Use vSphere HA with high priority to ensure that the CSE server is started quickly in the event of a loss of an ESXi host.
The following is unsupported – I’ve tested running two CSE servers using the same config.yaml file on two separate VMs and this does in fact work without any obvious errors. Since CSE is stateless and uses a message bus to function and to provide the extension capability for container service with VCD. However this is totally unsupported by VMware GSS, so don’t do this.
Sizing CSE server
Consider the following sizing for the CSE server
| Configuration | Specification |
| vCPU | 2 vCPUs |
| Memory | 2 GB |
| Disk | 18 GB * from Photon 3 OVA |
This configuration will support up to 50 concurrent operations. Doubling the resource will not double the number of concurrent operations as there are many variables to consider. The bottleneck would be the ability for VCD to place messages on MQTT or RabbitMQ and also VCD’s operations concurrency.
Log files
| Log file location | Why? |
| /opt/vmware/cse/.cse-logs/cse-server-debug.log | More detailed debug logs, use this one if something fails. |
| /opt/vmware/cse/.cse-logs/cse-server-info.log | CSE server logs and message bus messages |
File Permissions for a healthy CSE server installation
I spent some time scratching my head with this when I wrote the bash script. The script ran as root but used sudo -u cse -i to run a Python virtual environment to install CSE as the cse user, this cause some issues initially but were resolved with the following chown and chmod settings.
| File | Specification |
| entire /opt/vmware/cse directory | chown cse:cse -R chmod 775 -R |
| /opt/vmware/cse/config/config.yaml | chmod 600 chown cse:cse |
| /opt/vmware/cse/cse.sh | cse user execute permissions |
CSE server service operations
| systemctl start cse.service | Start the CSE service |
| systemctl stop cse.service | Stop the CSE service |
| systemctl status cse.service | Show current statussystemctl status cse.service |
Use CA signed certificates
Use CA signed certificates for VCD, vCenter. In your production environments you should! Even in your test environments or home labs it is very easy to obtain CA signed certs to use from a provider such as Let’s Encrypt. I’ve in fact written about this in some of my previous posts. Here for vCD and here for the rest.
Using CA signed certs allows you to set the key verify to true in the config.yaml file.
verify=true
Doing so makes you CSE server much more secure. This also allows you to use the vcd and cse CLIs without using the -i -w flags which is logging in without verifying certs and to disable warnings respectively. This is of course unsafe.
In order to ensure end to end security between CSE server, VCD and vCenter, import the certificate chain consisting of the INTERMEDIATE and ROOT certs from the certificate authority into the certs store on the CSE server.
sudo -u cse -i cat >> /opt/vmware/cse/python/lib/python3.7/site-packages/certifi/cacert.pem << EOF
-----BEGIN CERTIFICATE-----
[snipped]
-----END CERTIFICATE-----
EOF
Please see my example here starting on line 71.
Monitoring with Octant
Yes, Kubernetes clusters deployed by CSE into VCD can be monitored with Octant. I wrote about it previously here.
All you need to do is update your local kubeconfig file with the kubconfig that you downloaded from CSE in VCD.

As long as the workstation where Octant is running can route to the Control Plane endpoint for the Kubernetes cluster, Octant can then see and provided you with its great dashboards. You can use the CSE expose feature for this if your workstation is not inside the VCD cloud.
Removing clusters that failed to deploy
Obtain the cluster UID,
- On CSE run this command to obtain the UID vcd cse cluster info, look for the uid parameter, it is all the way at the bottom, copy it to your clipboard.
- Open up Postman or something with curl installed.
- GET https://{{vcd_public_address}}/cloudapi/1.0.0/entities/urn:vcloud:entity:cse:nativeCluster:577b8c6c-bee4-49fb-8c03-2a22390f2783
- POST https://{{vcd_public_address}}/cloudapi/1.0.0/entities/urn:vcloud:entity:cse:nativeCluster:577b8c6c-bee4-49fb-8c03-2a22390f2783/resolve
- DEL https://{{vcd_public_address}}/cloudapi/1.0.0/entities/urn:vcloud:entity:cse:nativeCluster:577b8c6c-bee4-49fb-8c03-2a22390f2783
- If that did not work use this DEL https://{{vcd_public_address}}/cloudapi/1.0.0/entities/urn:vcloud:entity:cse:nativeCluster:577b8c6c-bee4-49fb-8c03-2a22390f2783?invokeHooks=false
Known issues
Cannot deploy TKGm runtimes with expose set to true.
If you tried to use the expose feature when deploying a TKGm runtime it would fail. This is a known issue with CSE 3.0.4 and is being fixed, I’ll update this post when a fix is released.
