Updating Let’s Encrypt SSL Certificates for vCenter Server
I prefer to use wildcard certificates for my environment to reduce the number of certificates that I need to manage. This is due to Let’s Encrypt limiting their certificates to 90 days. This means that you’ll need to renew each certificate every <90 days or so. Using a wildcard certificate reduces your operational overhead. However, vCenter does not support wildcard certificates.
After you’ve prepped the fullchain.pem file according to the previous article, you can now update the vCenter SSL certificate using vCenter’s Certificate Management tool.
Navigate to Menu then Administration and click on Certificate Management.
Under the Machine SSL Certificate, click on Actions and choose Import and Replace Certificate.
Select the Replace with external CA certificate (requires private key).
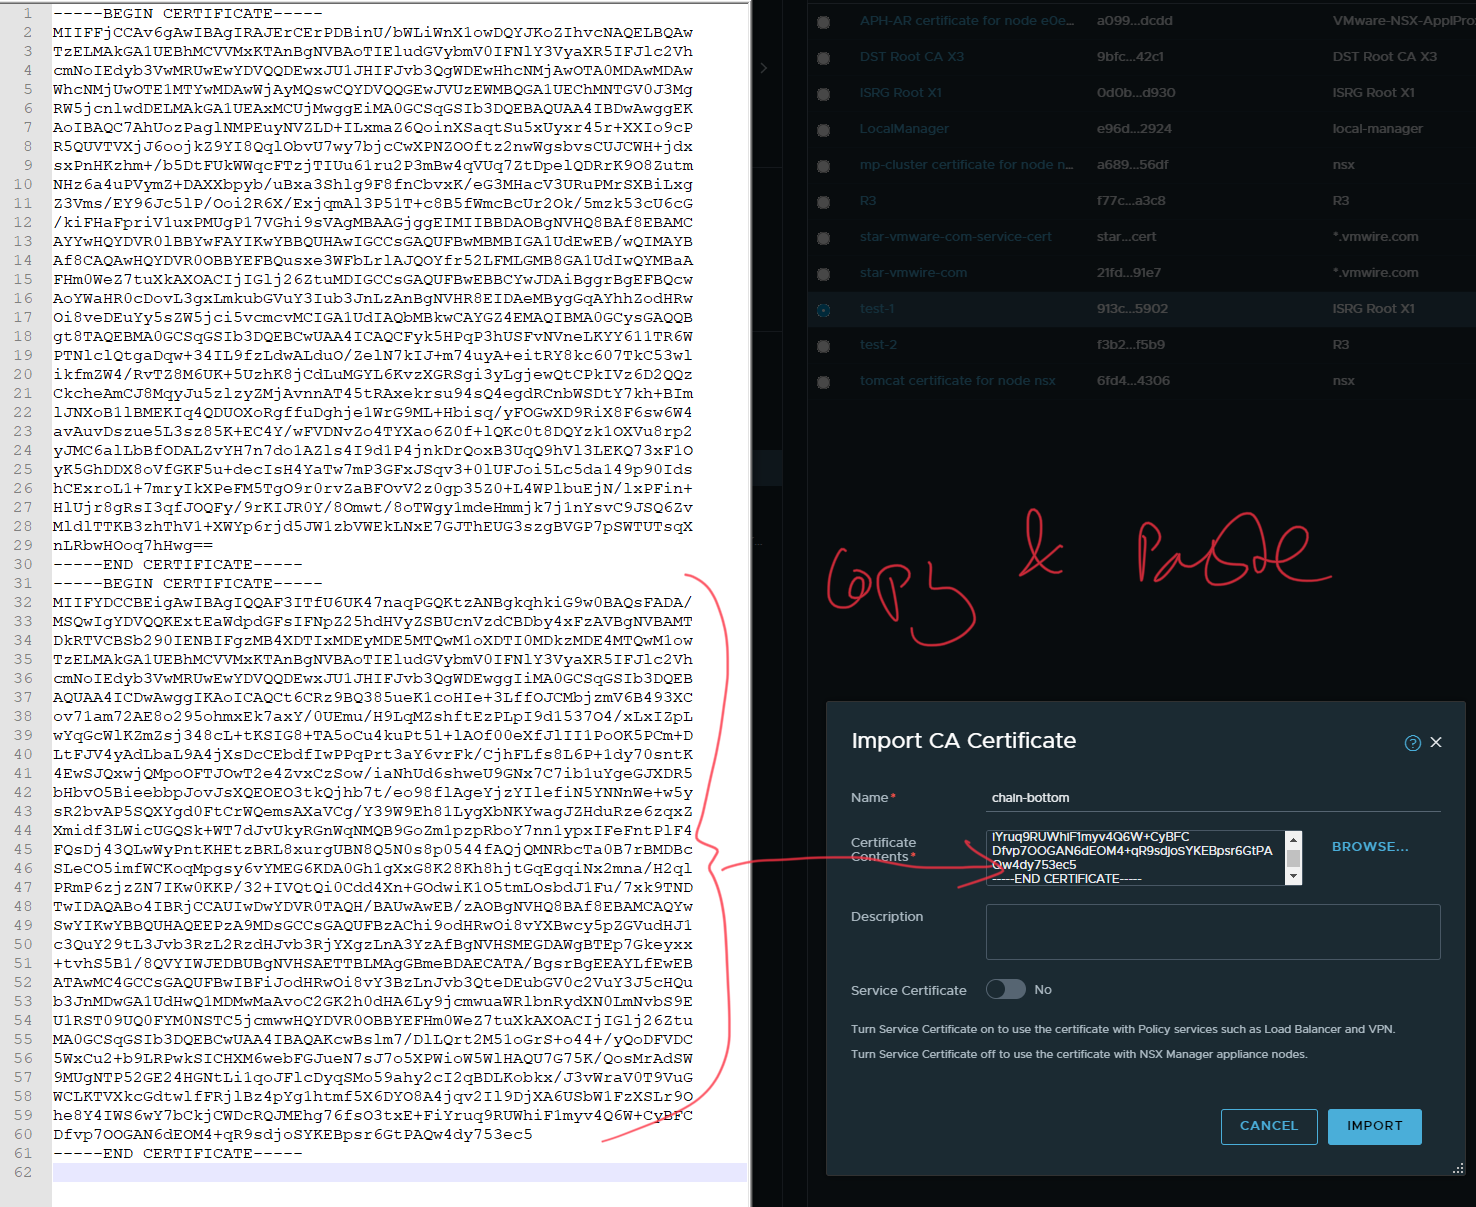
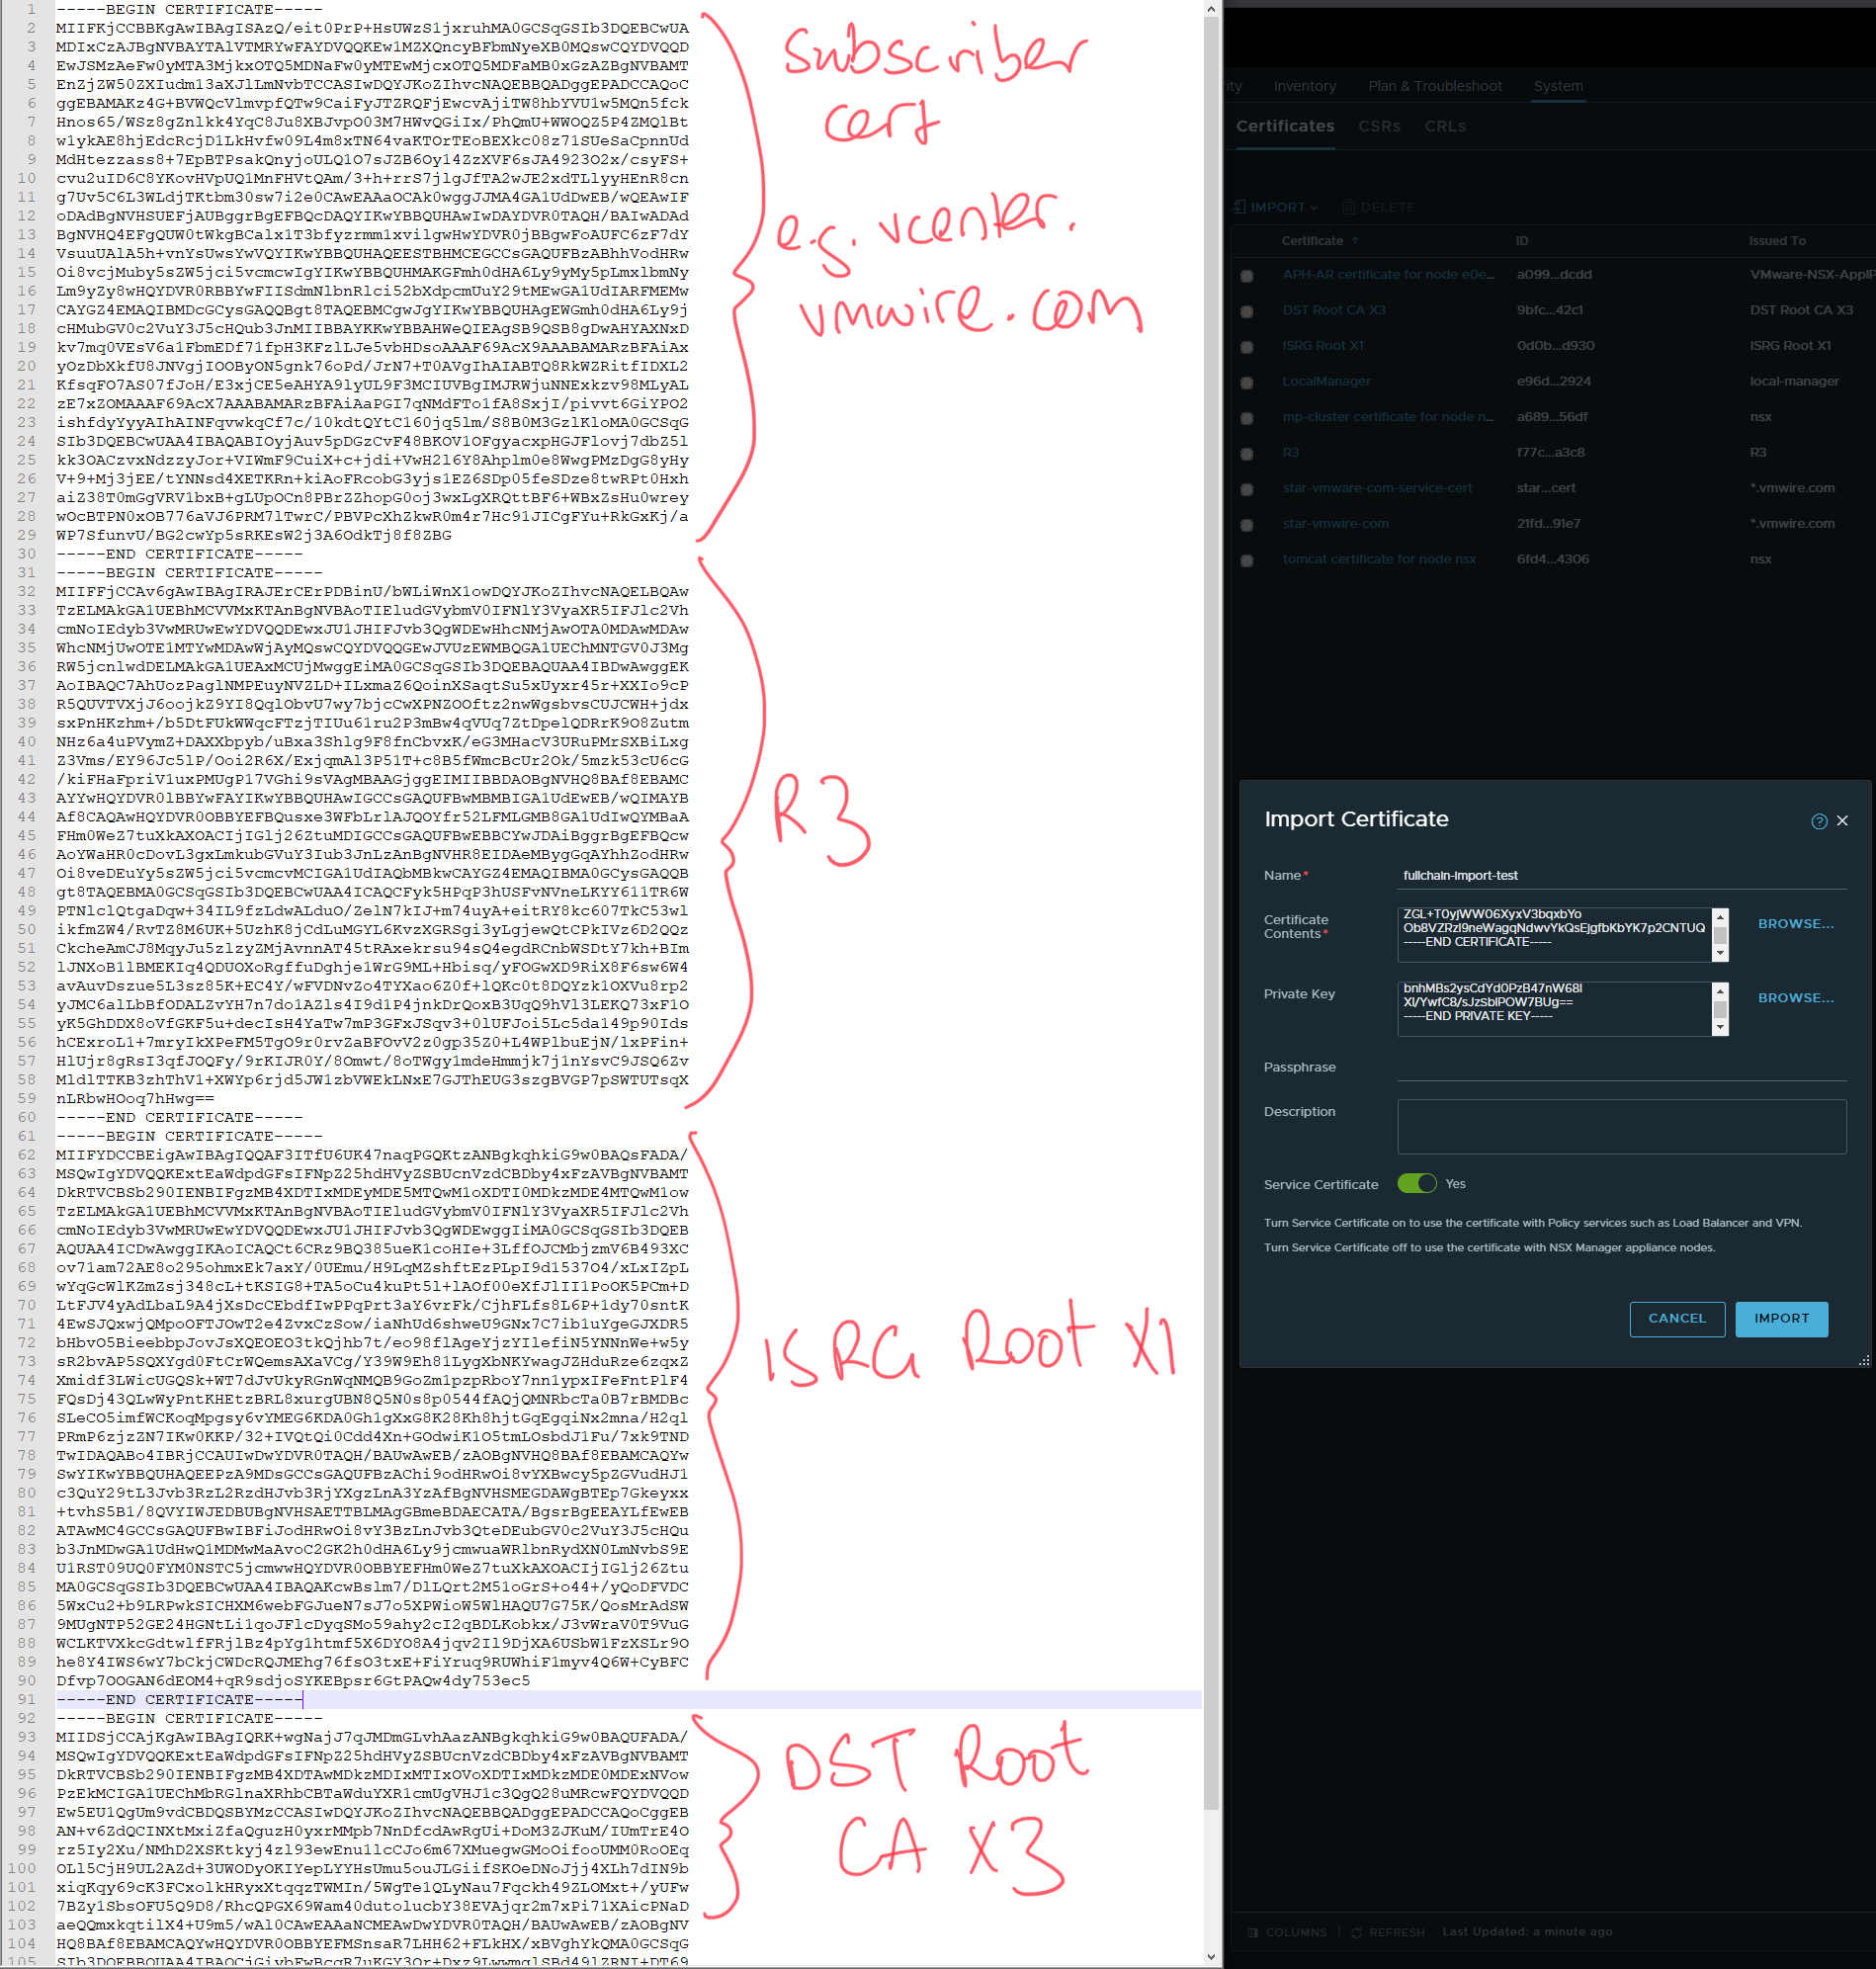
Copy the section for the Subscriber Certificate part into the Machine SSL Certificate box, and then the rest into the Chain of trusted root certificates box.
Copy the contents of the privkey.pem file into the Private Key box.
Once you click on Replace, vCenter will restart its services and you can open a new browser window to the FQDN of vCenter and enjoy a secured vCenter session.
The Let’s Encrypt DST Root CA X3 certificate is missing from the fullchain.pem and chain.pem files, therefore errors such as the following prevent certificates from being imported by VMware appliances such as NSX-T and vCenter.
This post summarizes how to fix this issue.
Let’s Encrypt is a great service that provides free SSL certificates. I recently rebuilt my lab and decided to use SSL certs for my management appliances. However, non of the management appliances would accept the certificates issued by Let’s Encrypt due to an incomplete chain. This post summarizes how to fix this issue.
TL;DR the Let’s Encrypt DST Root CA X3 certificate is missing from the fullchain.pem and chain.pem files, therefore errors such as the following prevent certificates from being imported by VMware appliances such as NSX-T and vCenter.
Certificate chain validation failed. Make sure a valid chain is provided in order leaf,intermediate,root certificate. (Error code: 2076)
Get your certbot tool up and running, you can read more with this link.
Grab your files from the /etc/letsencrypt/live folder for your vCenter certificate. My one is in /etc/letsencrypt/live/vcenter.vmwire.com
You should now have the following files.
cert.pem
chain.pem
fullchain.pem
privkey.pem
A note on Let’s Encrypt certificate chain. If you look at the Certification Path for Let’s Encrypt certificates, you’ll notice something like this.
figure 1.
vcenter.vmwire.com is issued by the R3 CA certificate. This is Let’s Encrypt’s Intermediate certificate.
R3 is issued by the DST Root CA X3 certificate. This is Let’s Encrypt root certificate.
Then the DST Root CA X3 certificate needs to be trusted by all of our management appliances, vCenter, NSX-T and Avi Controller.
What I found is that, this is not the case and trying to import a Let’s Encrypt certificate without the root certificate that issued the DST Root CA X3 certificate will fail. Here’s an example from NSX-T when importing the chain.pem certificate.
figure 2. Importing the chain.pem certificate to NSX
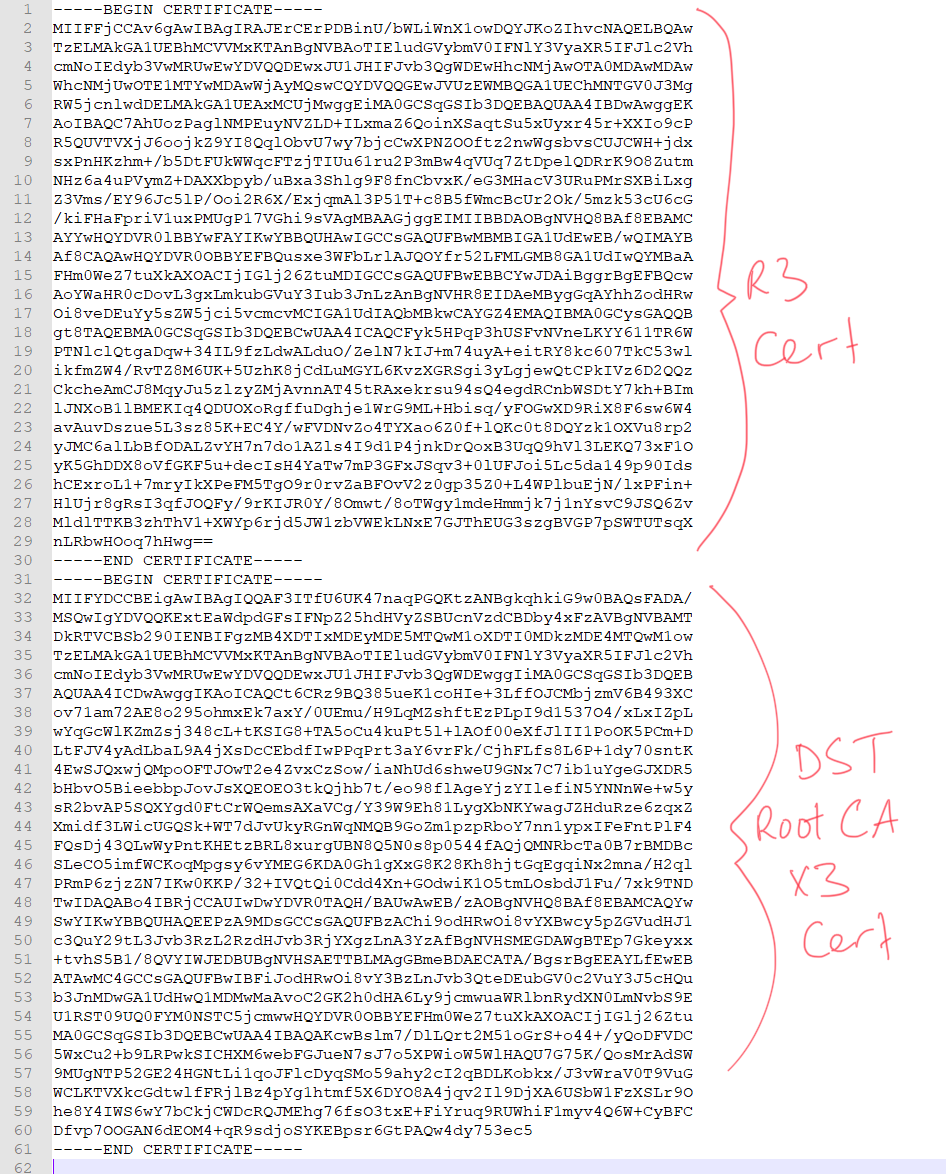
The chain.pem file contains the R3 certificate and the DST Root CA X3 certificate. When you open it in notepad++ it looks like this.
figure 3. chain.pem
So we have a problem. We need the certificate that issued the DST Root CA X3 certificate to complete the chain and pass the chain validation.
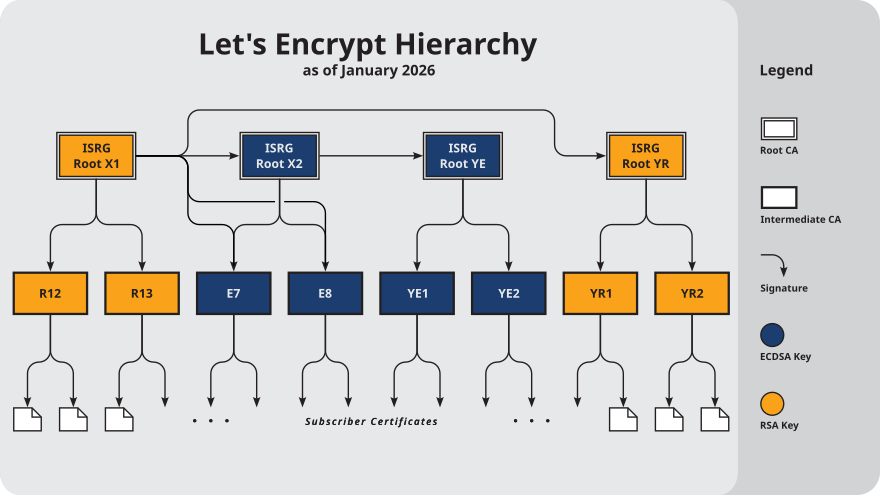
Lets take a look at Let’s Encrypt certificates on their website.
So looking up the chain, it appears that my certificate vcenter.vmwire.com corresponds to the Subscriber Cert, which is issued by R3. This confirms the assumptions above in figure 1. However, it looks like the R3 certificate is not issued by the DST Root CA X3 certificate but in fact another certificate named ISRG Root X1.
Lets test this theory and import each of the certificates in the chain.pem file individually using NSX-T.
After importing, you can see that this is in fact the ISRG Root X1 certificate that is issued by the DST Root CA X3 certificate. My assumption from figure 3. is then incorrect.
So what is the top certificate in the chain.pem file?
Lets’ import it and find out. Yup, its the R3 certificate.
So where is the DST Root CA X3 certificate that we need to complete the validation chain?
We can obtain this from the Let’s Encrypt website. Scroll all the way down to the bottom of that page and you’ll see the following:
Clicking on that link will get you the the following page with this link.
And we will get closer to our DST Root CA X3 certificate when we click on that link above.
Clicking on that link gets us to this page here.
Then clicking on that link will get us to this page here.
We can now grab our certificate with this link highlighted here.
When you click on this link, you’ll be able to download a file named 8395.crt, this is the DST Root CA X3 certificate that we need to complete the chain. However, it is in a .crt format but we need to work with .pem.
To convert a crt certificate to pem use the following command.
That means we just need to append our new DST Root CA X3 certificate to the bottom of the fullchain.pem file to get a valid chain. It will now look like this.
This post highlights some best practices on the management of the vCSA log and core files. VMware recommends that these files are stored on an NFS share external to the vCSA due to the possibility of the default log and core locations filling up.
When this happens, vCenter services will be impacted.
This screenshot shows what happens when this is not done, the partitions for /storage/core will fill up over time and will impact the availability of vCenter Server.
Figure 1 – Local core storage full!
Configuring NFS storage on the vCSA
You can add the NFS shares for the log and core files by logging into the VMware Studio management interface of the vCSA, normally https://<vcsa>:5480.
The default username and password is root | vmware.
Click on the vCenter Server tab, and then click on Storage.
Figure 2 – Configuring NFS storage on the vCSA
Using the correct syntax for the NFS storage
The correct syntax for adding the storage is
<NFS_Server>:<NFS_Export>
So if my NFS_Server is 192.168.200.21 and my NFS_Export is /mnt/vg01/vcsa_core/vcsa_core/, I would enter the following in the box for NFS share for core files:
192.168.200.21:/mnt/vg01/vcsa_core/vcsa_core/
Make sure that the NFS export on the NFS Server is configured with a UID/GID mapping of no_root_squash. For example, use the command on the NFS server:
Once done, click on Test Settings to verify that the vCSA can successfully store files to the specified NFS shares, then click on Save Settings, then restart the vCSA.
Browsing to the NFS storage
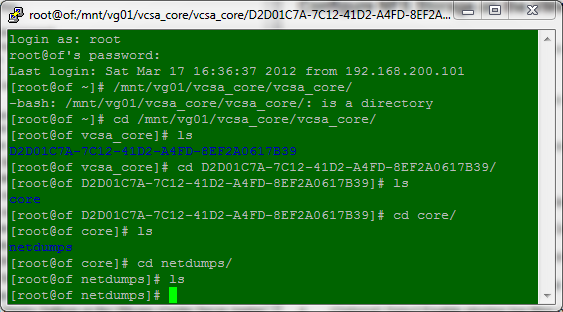
You can also see what is created in the NFS share if you listed the contents of the core files share.
Figure 3 – Core logs
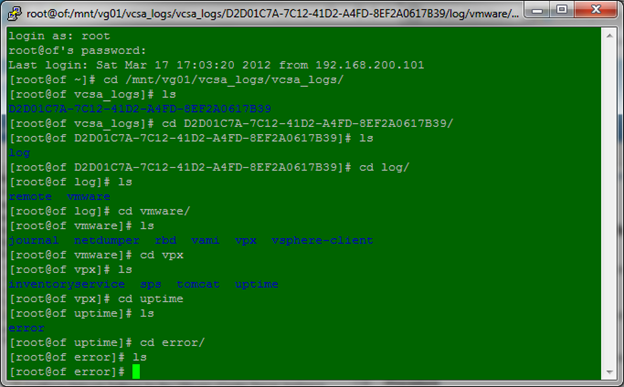
You can also see what is created in the NFS share if you listed the contents of the log files share. The screenshots below show the directory structure on the NFS server. On the vCSA the directories are mounted at /storage.
This post extends the series with how to configure an external Oracle database for use by the vCSA.
Why use an Oracle database?
The vCSA comes preinstalled with an embedded DB2 database which has similar use cases as the Windows vCenter Server when configured with SQL Express – intended for small deployments of 5 ESX/ESXi servers or less. The ability for the vCSA to utilise an external Oracle database allows customers to scale and manage larger vSphere infrastructures equivalent to environments with Windows vCenter Servers backed by SQL or Oracle databases.
This post shows how quickly and easily it is to use an external Oracle database instead of the embedded DB2 database. Hopefully you’ll see the benefits of how much quicker it is to configure the Oracle connectivity between the vCSA and the Oracle server vs installing the Oracle 64-bit Client onto a Window Server and configuring tnsnames.ora, followed by configuration of ODBC settings.
Configure an Oracle Database and User
Log into SQL*Plus session with the system account. I’m using Oracle 11g R2 x64 on Windows Server 2008.
C:`>sqlplus sys/<password> as SYSDBA
Run the following SQL commands to create a vCenter Server database. Note that your directory structure may be different.
CREATE SMALLFILE TABLESPACE “VPX” DATAFILE ‘e:/app/oracle/oradata/orcl/vpx01.dbf’ SIZE 1G AUTOEXTEND ON NEXT 10M MAXSIZE UNLIMITED LOGGING EXTENT MANAGEMENT LOCAL SEGMENT SPACE MANAGEMENT AUTO;
Run the following SQL command to create a vCenter Server database user with the correct permissions. I will create a new user named “VPXADMIN” with a password of “oracle”.
CREATE USER "VPXADMIN" PROFILE "DEFAULT" IDENTIFIED BY "oracle" DEFAULT TABLESPACE "VPX" ACCOUNT UNLOCK;grant connect to VPXADMIN;grant resource to VPXADMIN;grant create view to VPXADMIN;grant create sequence to VPXADMIN; grant create table to VPXADMIN; grant create materialized view to VPXADMIN;grant execute on dbms_lock to VPXADMIN;grant execute on dbms_job to VPXADMIN;grant select on dba_tablespaces to VPXADMIN;grant select on dba_temp_files to VPXADMIN;grant select on dba_data_files to VPXADMIN;grant unlimited tablespace to VPXADMIN;
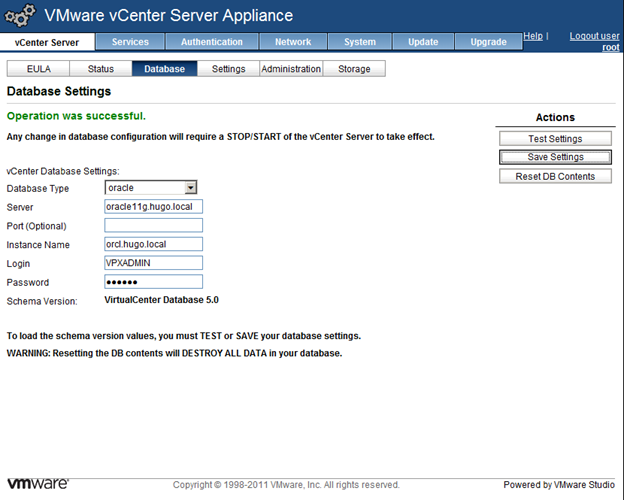
Navigate to the vCenter Server tab, then click on Database.
Select oracle as the Database Type using the drop-down menu and enter your environment information into the fields and then click on Save Settings. Note how easy that was, no messing about with installing the Oracle Client, no need to configure tnsnames.ora and no need for any ODBC configuration either.
Wait for around 5 minutes for the vCSA to create the database schema.
Now it’s safe to start the vCenter services, navigate to the Status tab and click on Start vCenter.
You can then start using vCenter when the Service Status reports as Running.
Cleaning up the Oracle configuration
After you’ve tested that everything is working, you can revoke the following privileges using SQL*Plus again.
In a previous article I wrote about the vCSA’s features and benefits. This post lists the interoperability or feature parity of the vCSA and the Windows vCenter Server. For more information about the vCSA, please see the resources listed here https://vmwire.com/vmware-vcenter-server-virtual-appliance-vcsa/.
A few readers have asked what works with the vCSA and what does not.
The vCSA supports all vCenter features – DRS, SDRS, HA, Host Profiles, dvSwitches, etc.
Secondary architecture features like supported DB, View Composer are not yet at feature parity with the Windows vCenter Server.
Not supported yet:
Microsoft SQL as the database for vCenter – requires stable ODBC driver for Linux that can scale.
vCenter Server Linked Mode – requires ADAM.
vCenter Server Heartbeat – requires Windows.
IPv6.
Single sign-on using Windows session credentials.
VMware View Composer (Linked Clones) – installed on Windows vCenter Server only.
vSphere Storage Appliance – VSA Manager & VSA Cluster Server installed on Windows vCenter Server.
VIX Plugin for vCenter Orchestrator – VMware Tools API only works with Windows vCenter Server.
The VMware vCenter Server Virtual Appliance (vCSA) provides an alternative option for organizations that chose not to run the Windows vCenter Server but still require centralised management of VMware vSphere deployments in the enterprise.
It provides exactly the same functionality as the traditional Windows vCenter Server but packaged in a Linux distribution. I know that some of my pure UNIX and LINUX customers have been asking for this for a while.
It’s been available as a technology preview since 2009 as “vCenter 2.5 on Linux” but has finally arrived with vSphere 5 to give customers’ an alternative to the Windows vCenter Server. Expect to see it available for download when vSphere 5 goes GA.
*UPDATE* vSphere5 is now GA, and the vCSA is available to download here.
I’ve been using it for a while now in the lab and have found it very easy to deploy and use. vCenter services start a lot quicker and the user experience with the VMware vSphere Client is exactly the same.
vCenter Server Virtual Appliance features and benefits
Installed on SUSE Linux Enterprise Server 11 x64.
OVF when deployed is configured with 2vCPUs and 8Gb memory, LSI Logic Parallel, VMXNET 3, 15Gb and 60Gb VMDKs and VMware Tools.
Includes embedded DB2 database that is suitable for evaluation or for environments with less than 5 ESXi hosts or 50 virtual machines (equivalent to Windows vCenter Server + MSSQL Express).
Supports external Oracle database for large environments.
Includes Active Directory (AD) and Network Information Services (NIS) authentication.
vSphere Web Client support is built into the vCenter Server Virtual Appliance. vSphere Web Client is OS agnostic and the interface is highly customisable.
Windows vSphere Client is still supported.
Includes a pre-configured Auto Deploy server therefore reducing operational costs with the installation of Auto Deploy.
Can use NFS mounts to store vCenter Server Virtual Appliance core and log files.
vCSA can act as a syslog server for ESXi system logs.
Can be used as a network collector for ESXi kernel core dumps.
Simplified and rapid deployment, approximately 15 minutes deployment time.
Lower TCO by eliminating Windows OS dependency and licenses.
Reduces operational costs – vCSA is easier to upgrade – just deploy a new appliance and connect to the external Oracle database or
Import configuration data from previous installation.
Patches can be installed using the vCSA web interface.
Not yet feature parity with Windows vCenter Server
vCenter Server Virtual Appliance provides all features as the Windows vCenter Server but does not support the following features:
Microsoft SQL as the database for vCenter.
vCenter Server Linked Mode.
vCenter Server Heartbeat.
IPv6.
For details on what products are supported with the vCSA please see this post.
I’ve provided a quick start guide including a 10-minute how-to video demonstrating the deployment and administration in this post.


 The VMware vCenter Server Virtual Appliance (vCSA) provides an alternative option for organizations that chose not to run the Windows vCenter Server but still require centralised management of VMware vSphere deployments in the enterprise.