Now, you can release the node from that certificate by first logging into one of your NSX-T controller nodes, this only works from the node directly and not from the API.
Log into a Controller node as admin, then type st e, enter the admin password and you should be at the shell.
Post this command to release the certificate from that node.
This article describes how to setup vCenter, VCD, NSX-T and NSX Advanced Load Balancer to support exposing Kubernetes applications in Kubernetes clusters provisioned into VCD.
At the end of this post, you would be able to run this command:
… and have NSX ALB together with VCD and NSX-T automate the provisioning and setup of everything that allows you to expose that application to the outside world using a Kubernetes service of type LoadBalancer.
Create a Content Library for NSX ALB
In vCenter (Resource vCenter managing VCD PVDCs), create a Content Library for NSX Advanced Load Balancer to use to upload the service engine ova.
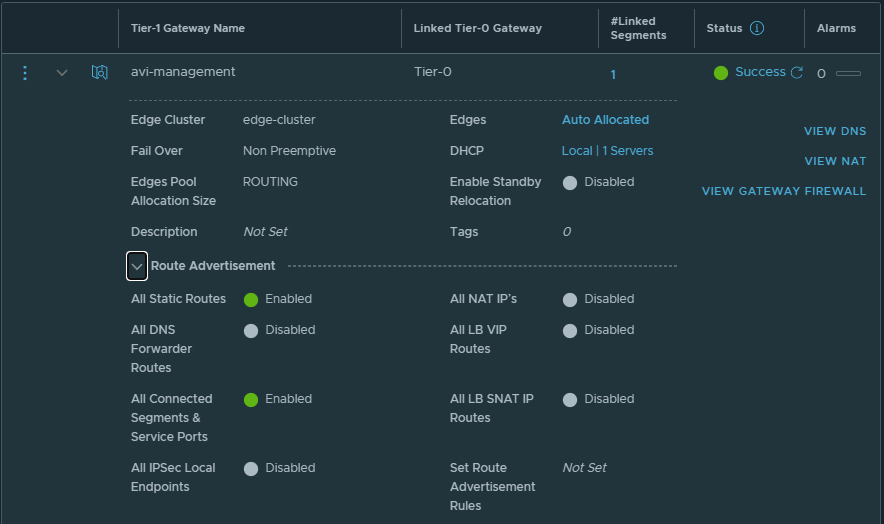
Create T1 for Avi Service Engine management network
Create T1 for Avi Service Engine management network. You can either attach this T1 to the default T0 or create a new T0.
enable DHCP server for the T1
enable All Static Routes and All Connected Segments & Service Ports under Route Advertisement
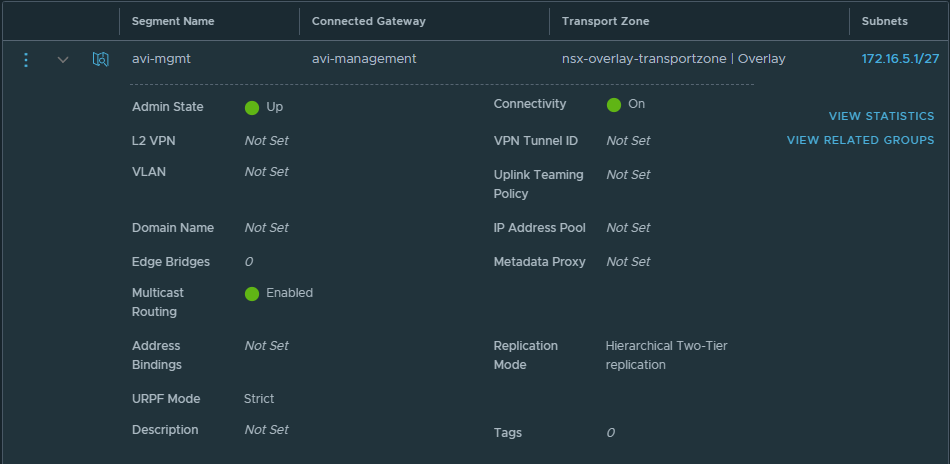
Create a network segment for Service Engine management network
Create a network segment for Avi Service Engine management network. Attach the segment to the T1 the was created in the previous step.
Ensure you enable DHCP, this will assign IP addresses to the service engines automatically and you won’t need to setup IPAM profiles in Avi Vantage.
NSX Advanced Load Balancer Settings
A couple of things to setup here.
You do not need to create any tenants in NSX ALB, just use the default admin context.
No IPAM/DNS Profiles are required as we will use DHCP from NSX-T for all networks.
Use FQDNs instead of IP addresses
Use the same FQDN in all systems for consistency and to ensure that registration between the systems work
NSX ALB
VCD
NSX-T
Navigate to Administration, User Credentials and setup user credentials for NSX-T controller and vCenter server
Navigate to Administration, Settings, Tenant Settings and ensure that the settings are as follows
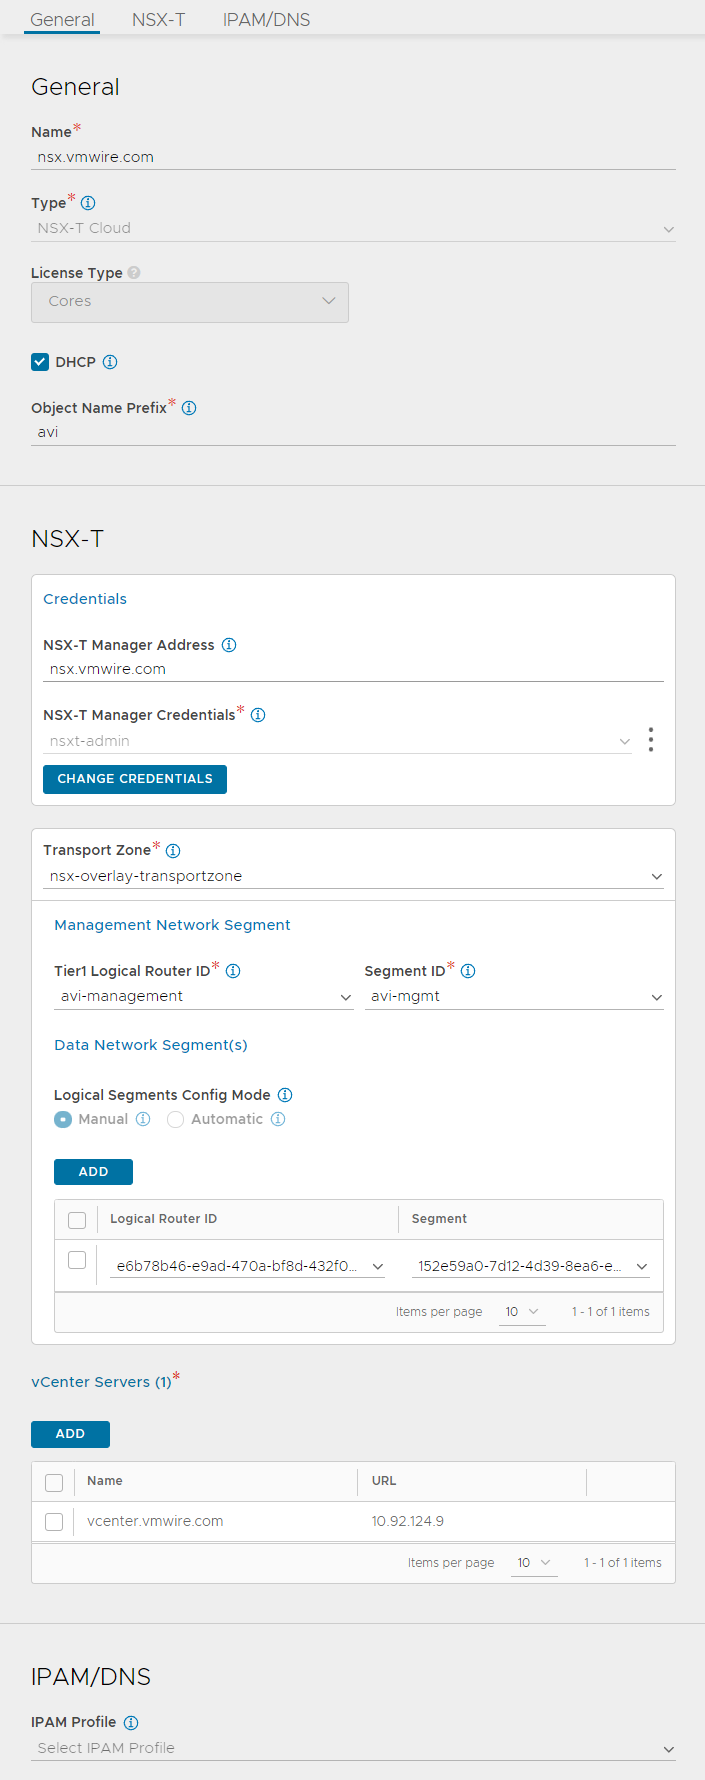
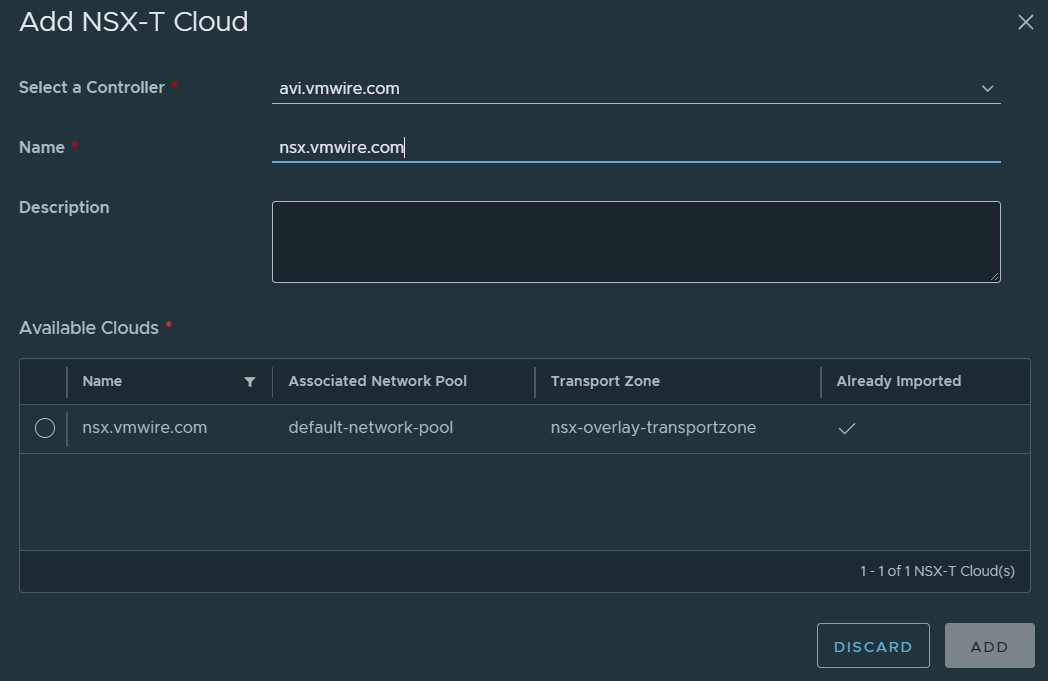
Setup an NSX-T Cloud
Navigate to Infrastructure, Clouds. Setup your cloud similar to mine, I have valled my NSX-T cloud nsx.vmwire.com (which is the FQDN of my NSX-T Controller).
Lets go through these settings from the top.
use the FQDN of your NSX-T manager for the name
click the DHCP option, we will be using NSX-T’s DHCP server so we can ignore IPAM/DNS later
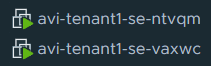
enter something for the Object Name Prefix, this will give the SE VM name a prefix so they can be identified in vCenter. I used avi here, so it will look like this in vCenter
type the FQDN of the NSX-T manager into the NSX-T Manager Address
choose the NSX-T Manager Credentials that you configured earlier
select the Transport Zone that you are using in VCD for your tenants
under Management Network Segment, select the T1 that you created earlier for SE management networking
under Segment ID, select the network segment that you created earlier for the SE management network
click ADD under the Data Network Segment(s)
select the T1 that is used by the tenant in VCD
select the tenant organization routed network that is attached to the t1 in the previous task
the two previous settings tell NSX ALB where to place the data/vip network for front-end load balancing use. NSX-ALB will create a new segment for this in NSX-T automatically, and VCD will automatically create DNAT rules when a virtual service is requested in NSX ALB
the last step is to add the vCenter server, this would be the vCenter server that is managing the PVDCs used in VCD.
Now wait for a while until the status icon turns green and shows Complete.
Setup a Service Engine Group
Decide whether you want to use a shared service engine group for all VCD tenants or dedicated a service engine group for each Tenant.
I use the dedicated model.
navigate to Infrastructure, Service Engine Group
change the cloud to the NSX-T cloud that you setup earlier
create a new service engine group with your preferred settings, you can read about the options here.
Setup Avi in VCD
Log into VCD as a Provider and navigate to Resources, Infrastructure Resources, NSX-ALB, Controllers and click on the ADD link.
Wait for a while for Avi to sync with VCD. Then continue to add the NSX-T Cloud.
Navigate to Resources, Infrastructure Resources, NSX-ALB, NSX-T Clouds and click on the ADD link.
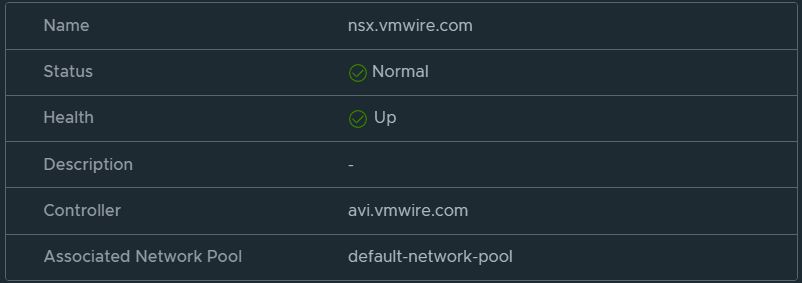
Proceed when you can see the status is healthy.
Navigate to Resources, Infrastructure Resources, NSX-ALB, Service Engine Groups and click on the ADD link.
Staying logged in as a Provider, navigate to the tenant that you wish to enable NSX ALB load balancing services and navigate to Networking, Edge Gateways, Load Balancer, Service Engine Groups. Then add the service engine group to this tenant.
This will enable this tenant to use NSX ALB load balancing services.
Deploy a new Kubernetes cluster in VCD with Container Service Extension
Deploy a new Kubernetes cluster using Container Service Extension in VCD as normal.
Once the cluster is ready, download the kube config file and log into the cluster.
Check that all the nodes and pods are up as normal.
You might see that the following pods in the kube-system namespace are in a pending state. If everything is already working then move onto the next section.
Wait for the load balancer service to start and the pod to go into a running state. During this time, you’ll see the service engines being provisioned automatically by NSX ALB. It’ll take 10 minutes or so to get everything up and running.
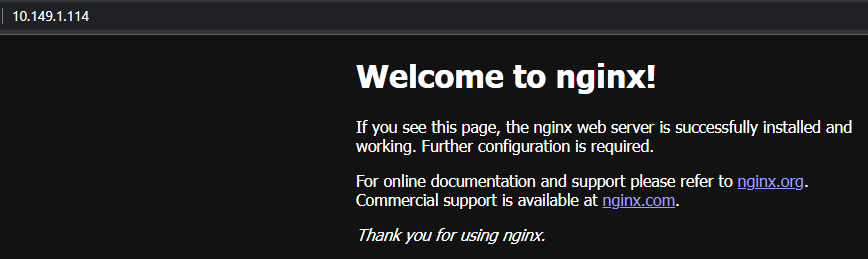
You can use this command to check when the load balancer service has completed and check the EXTERNAL-IP.
kubectl get service webserver
NAME        TYPE           CLUSTER-IP      EXTERNAL-IP    PORT(S)        AGE
webserver   LoadBalancer   100.71.45.194   10.149.1.114   80:32495/TCP   7h48m
You can see that NSX ALB, VCD and NSX-T all worked together to expose the nginx applicationto the outside world.
The external IP of 10.149.1.114 in my environment is an uplink segment on a T0 that I have configured for VCD tenants to use as egress and ingress into their organization VDC. It is the external network for their VDCs.
Paste the external IP into a web browser and you should see the nginx web page.
In the next post, I’ll go over the end to end network flow to show how this all connects NSX ALB, VCD, NSX-T and Kubernetes together.
Updating Let’s Encrypt SSL Certificates for NSX-T Manager
Updating NSX-T Manager to use a CA signed SSL certificate is a little bit different from how we updated the vCenter certificate. It requires interacting with the NSX-T API.
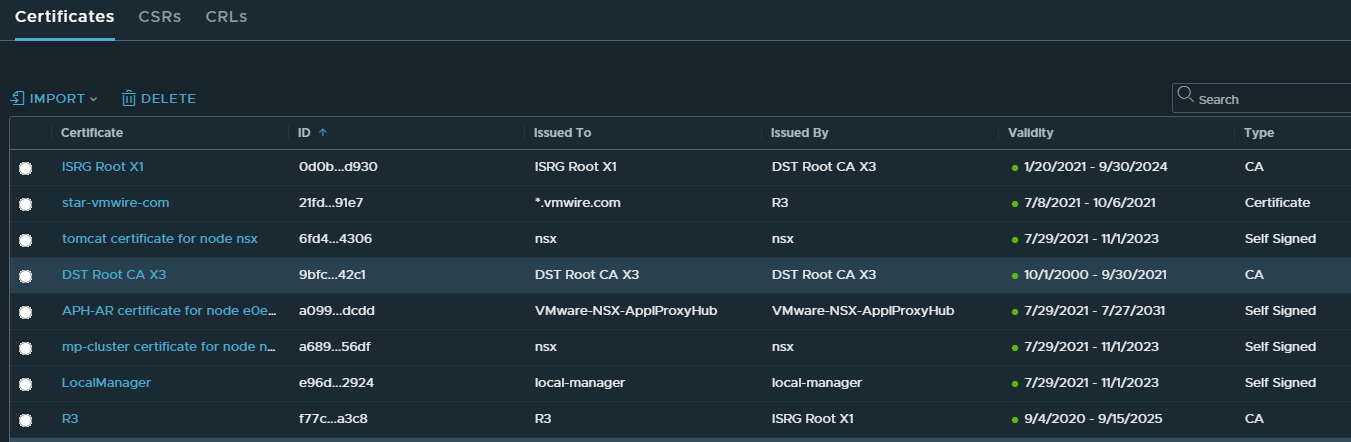
First lets import the certificate into NSX-T. Again, you’ll need the fullchain.pem file but with the appended DST Root CA X3 certificate that was prepared in this article.
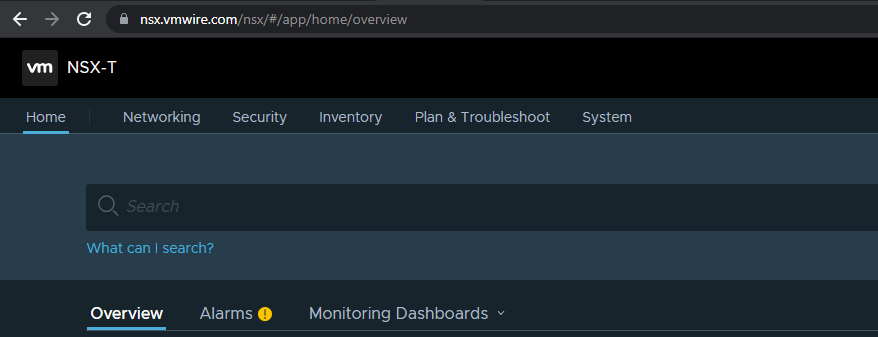
Navigate to System and then under Settings, click on the Certificates link.
First we need to import each of the CA certificates in the chain before we import the certificate for NSX-T Manager.
Again the certificates in the fullchain.pem file in order are
Click on IMPORT, Import CA Certificate. Then import each certificate individually starting from the bottom, make sure to deselect the Service Certificate slider, as we are not using these certificates for virtual services.
Its important to import bottom up as this enables NSX-T to check the issuer for subsequent certificates that you import. So import in reverse order of the fullchain.pem file. Start importing with this order
Once you’ve imported all three of the CA root and intermediate certificates – DST Root CA X3 certificate, ISRG Root X1 CA and the R3 CA certificate, you can then import the Subscriber Certificate *.vmwire.com last, once all done you’ll see the following.
Summarized in the following table.
Order in fullchain.pem
Name in NSX-T
Issued By
Subscriber Certificate
star-vmwire-com
R3
R3 Certificate
R3
ISRG Root X1
ISRG Root X1 Certificate
ISRG Root X1
DST Root CA X3
DST Root CA X3 Certificate
DST Root CA X3
DST Root CA X3
You’ll need the certificate ID for the certificate star-vmwire-com to use to update the NSX-T Manager certificate.
Click on the ID column of that certificate and copy the ID to your clipboard.
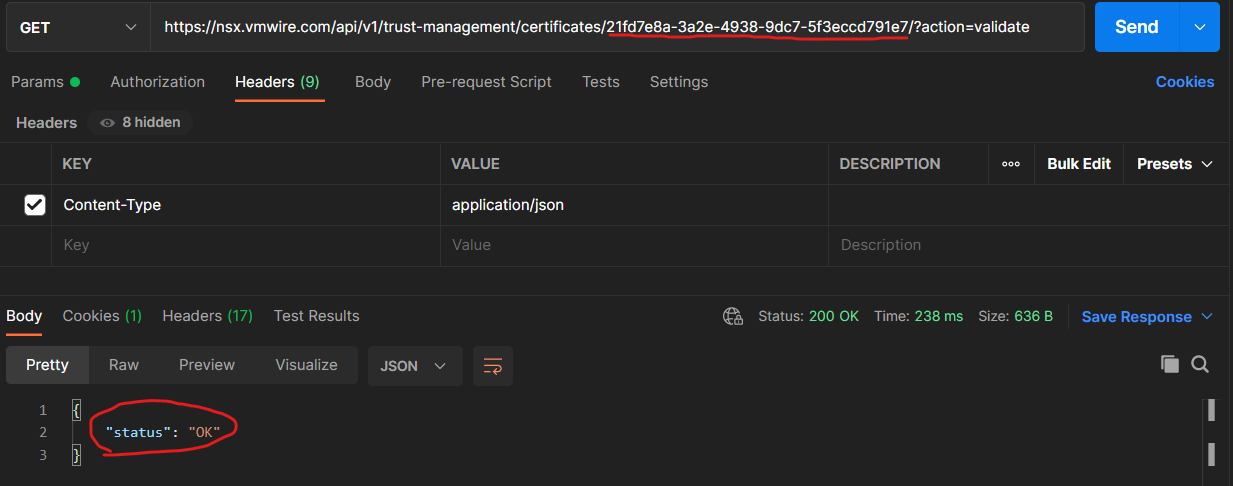
Now you’ll need to open a tool such as Postman to make the change.
First lets validate that our certificate is OK by using this GET against the NSX-T API, paste in the certificate ID into the URL.
GET https://nsx.vmwire.com/api/v1/trust-management/certificates/21fd7e8a-3a2e-4938-9dc7-5f3eccd791e7/?action=validate
If the status is “OK”, we’re good to continue.
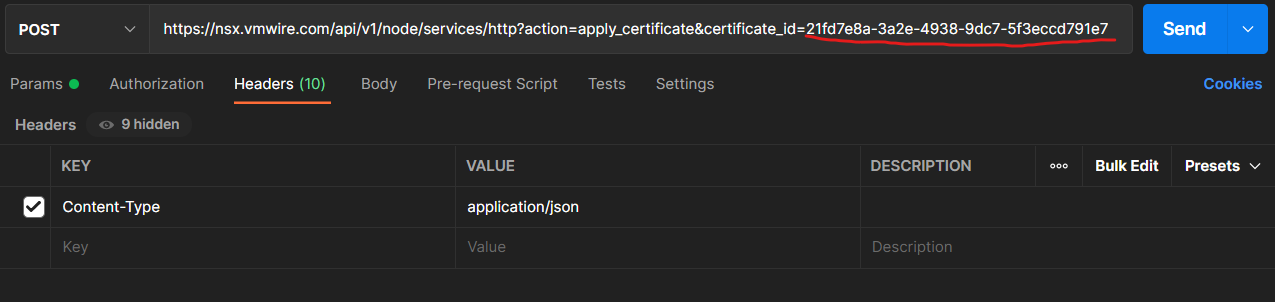
Next use will POST the certificate ID against the following URL.
POST https://nsx.vmwire.com/api/v1/node/services/http?action=apply_certificate&certificate_id=21fd7e8a-3a2e-4938-9dc7-5f3eccd791e7
Once done, close your NSX-T Manager browser session, and enjoy using a CA signed certificate with NSX-T.
Running Cloud Director (formerly vCloud Director) over the Internet has its benefits however opens up the portal to security risks. To prevent this, we can use the native load balancing capabilities of NSX-T to serve only HTTP access to the URIs that are required and preventing access to unnecessary URIs from the rest of the Internet.
Running Cloud Director (formerly vCloud Director) over the Internet has its benefits however opens up the portal to security risks. To prevent this, we can use the native load balancing capabilities of NSX-T to serve only HTTP access to the URIs that are required and preventing access to unnecessary URIs from the rest of the Internet.
An example of this is to disallow the /provider and /cloudapi/1.0.0/sessions/provider URIs as these are provider side administrator only URIs that a service provider uses to manage the cloud and should not be accessible from the Internet.
The other article that I wrote previously describes the safe URIs and unsafe URIs that can be exposed over the Internet, you can find that article here. That article discuss doing the L7 HTTP policies using Avi. This article will go through how you can achieve the same with the built in NSX-T load balancer.
This article assumes that you already have the Load Balancer configured with the Cloud Director Virtual Servers, Server Pools and HTTPS Profiles and Monitors already set up. If you need a guide on how to do this, then please visit Tomas Fojta’s article here.
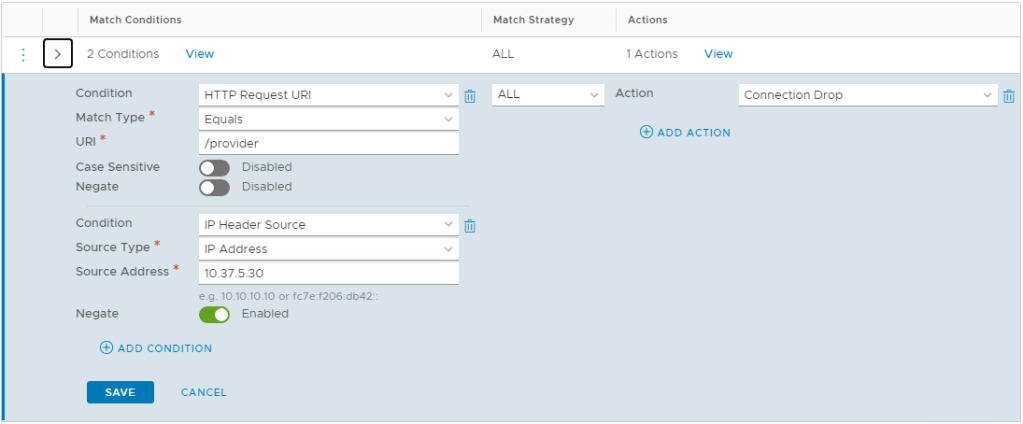
The L7 HTTP rules can be set up under Load Balancing | Virtual Servers. Edit the Virtual Server rule for the Cloud Director service and open up the Load Balancer Rules section.
Click on the Set link next to HTTP Access Phase. I’ve already set mine up so you can see that I already have two rules. You should also end up with two rules once this is complete.
Go ahead and add a new rule with the Add Rule button.
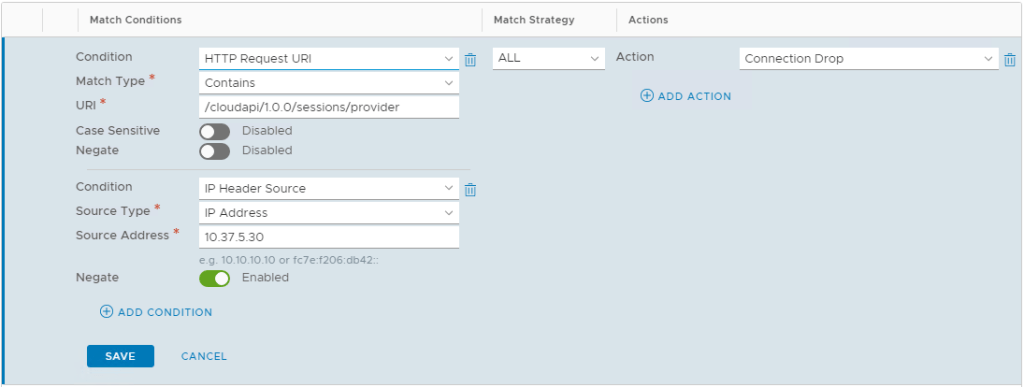
The first rule we want to set up is to prevent access from the Internet to the /provider URI but allow an IP address or group of IP addresses to access the service for provider side administration, such as a management bastion host.
Set up you rule as follows:
What we are doing here is creating a condition that when the /provider URI is requested, we drop all incoming connections unless the connection is initiated from the management jump box, this jump box has an IP address of 10.37.5.30. The Negate option is enabled to achieve this. Think of negate as the opposite of the rule, so negate does not drop connections to /provider when the source IP address is 10.37.5.30.
If negate is enabled, when Connection Drop is configured, all requests not matching the specified match condition are dropped. Requests matching the specified match condition are allowed.
Save this rule and lets setup another one to prevent access to the admin API. Setup this second rule as follows:
This time use /cloudapi/1.0.0/sessions/provider as the URI. Again, use the Negate option for your management IP address. Save your second rule and Apply all the changes.
Now you should be able to access /tenant URIs over the Internet but not the /provider URI. However, accessing the /provider URI from 10.37.5.30 (or whatever your equivalent is) will work.
Doing this with the API
Do a PUT against /policy/api/v1/infra/lb-virtual-servers/vcloud with the following.
(Note that the Terraform provider for NSX-T doesn’t support HTTP Access yet. So to automate, use the NSX-T API directly instead.)