Updating NSX-T Manager to use a CA signed SSL certificate is a little bit different from how we updated the vCenter certificate. It requires interacting with the NSX-T API.
First lets import the certificate into NSX-T. Again, you’ll need the fullchain.pem file but with the appended DST Root CA X3 certificate that was prepared in this article.
Navigate to System and then under Settings, click on the Certificates link.
First we need to import each of the CA certificates in the chain before we import the certificate for NSX-T Manager.
Again the certificates in the fullchain.pem file in order are
Subscriber Certificate
R3 Certificate
ISRG Root X1 Certificate
DST Root CA X3 Certificate
Click on IMPORT, Import CA Certificate. Then import each certificate individually starting from the bottom, make sure to deselect the Service Certificate slider, as we are not using these certificates for virtual services.
Its important to import bottom up as this enables NSX-T to check the issuer for subsequent certificates that you import. So import in reverse order of the fullchain.pem file. Start importing with this order
DST Root CA X3 Certificate
ISRG Root X1 Certificate
R3 Certificate
Subscriber Certificate

Once you’ve imported all three of the CA root and intermediate certificates – DST Root CA X3 certificate, ISRG Root X1 CA and the R3 CA certificate, you can then import the Subscriber Certificate *.vmwire.com last, once all done you’ll see the following.
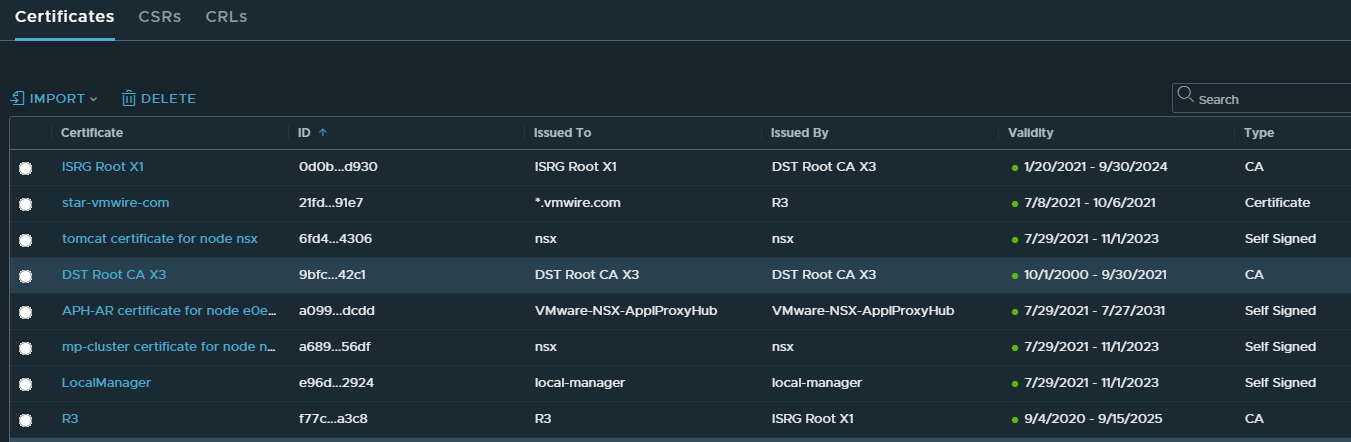
Summarized in the following table.
| Order in fullchain.pem | Name in NSX-T | Issued By |
| Subscriber Certificate | star-vmwire-com | R3 |
| R3 Certificate | R3 | ISRG Root X1 |
| ISRG Root X1 Certificate | ISRG Root X1 | DST Root CA X3 |
| DST Root CA X3 Certificate | DST Root CA X3 | DST Root CA X3 |
You’ll need the certificate ID for the certificate star-vmwire-com to use to update the NSX-T Manager certificate.
Click on the ID column of that certificate and copy the ID to your clipboard.

Now you’ll need to open a tool such as Postman to make the change.
First lets validate that our certificate is OK by using this GET against the NSX-T API, paste in the certificate ID into the URL.
GET https://nsx.vmwire.com/api/v1/trust-management/certificates/21fd7e8a-3a2e-4938-9dc7-5f3eccd791e7/?action=validate
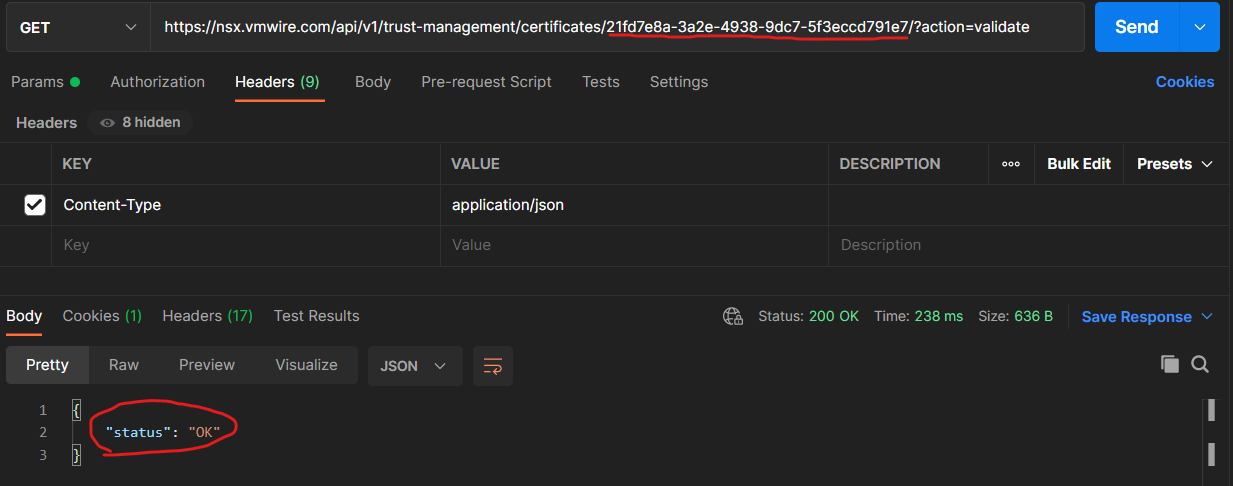
If the status is “OK”, we’re good to continue.
Next use will POST the certificate ID against the following URL.
POST https://nsx.vmwire.com/api/v1/node/services/http?action=apply_certificate&certificate_id=21fd7e8a-3a2e-4938-9dc7-5f3eccd791e7
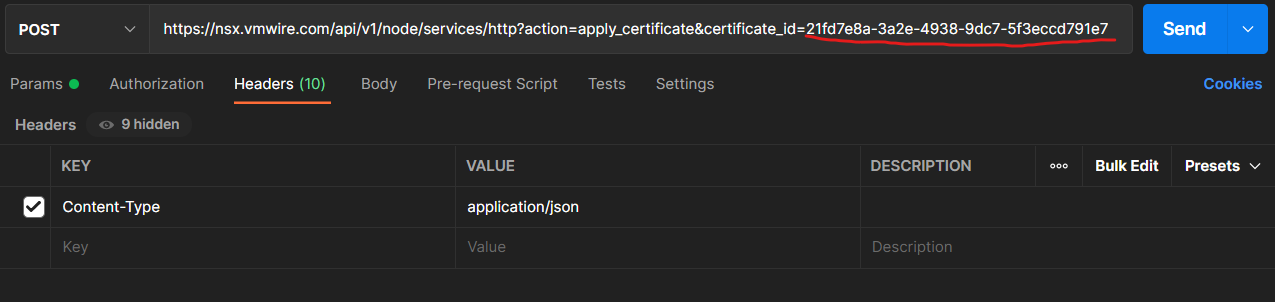
Once done, close your NSX-T Manager browser session, and enjoy using a CA signed certificate with NSX-T.


One thought on “Updating Let’s Encrypt SSL Certificates for NSX-T Manager”