The default setting for load balancer service requests for application services defaults to using the two-arm load balancer with NSX Advanced Load Balancer (Avi) in Container Service Extension (CSE) provisioned Tanzu Kubernetes Grid (TKG) cluster deployed in VMware Cloud Director (VCD).
VCD tells NSX-T to create a DNAT towards an internal only IP range of 192.168.8.x. This may be undesirable for some customers and it is now possible to remove the need for this and just use a one-arm load balancer instead.
This capability has been enabled only for VCD 10.4.x, in prior versions of VCD this support was not available.
The requirements are:
- CSE 4.0
- VCD 10.4
- Avi configured for VCD
- A TKG cluster provisioned by CSE UI.
If you’re still running VCD 10.3.x then this blog article is irrelevant.
The vcloud-ccm-configmap config map stores the vcloud-ccm-config.yaml, that is used by the vmware-cloud-director-ccm deployment.
Step 1 – make a copy of the vcloud-ccm-configmap
k get cm -n kube-system vcloud-ccm-configmap -o yaml
apiVersion: v1
data:
vcloud-ccm-config.yaml: "vcd:\n host: https://vcd.vmwire.com\n org: tenant1\n
\ vdc: tenant1-vdc\nloadbalancer:\n oneArm:\n startIP: \"192.168.8.2\"\n endIP:
\"192.168.8.100\"\n ports:\n http: 80\n https: 443\n network: default-organization-network\n
\ vipSubnet: \n enableVirtualServiceSharedIP: false # supported for VCD >= 10.4\nvAppName:
tkg-1\n"
immutable: true
kind: ConfigMap
metadata:
annotations:
kubectl.kubernetes.io/last-applied-configuration: |
{"apiVersion":"v1","data":{"vcloud-ccm-config.yaml":"vcd:\n host: https://vcd.vmwire.com\n org: tenant1\n vdc: tenant1-vdc\nloadbalancer:\n oneArm:\n startIP: \"192.168.8.2\"\n endIP: \"192.168.8.100\"\n ports:\n http: 80\n https: 443\n network: default-organization-network\n vipSubnet: \n enableVirtualServiceSharedIP: false # supported for VCD \u003e= 10.4\nvAppName: tkg-1\n"},"immutable":true,"kind":"ConfigMap","metadata":{"annotations":{},"name":"vcloud-ccm-configmap","namespace":"kube-system"}}
creationTimestamp: "2022-11-19T15:08:27Z"
name: vcloud-ccm-configmap
namespace: kube-system
resourceVersion: "1014"
uid: 5e8f2136-124f-4fc0-b4e6-49741ee5545b
Make a copy of the config map to edit it and then apply, since the current config map is immutable.
k get cm -n kube-system vcloud-ccm-configmap -o yaml > vcloud-ccm-configmap.yaml
Step 2 – Edit the vcloud-ccm-configmap
Edit the file, delete the entries under data: oneArm:\n , delete the startIP and endIP lines and change the value to true for the key enableVirtualServiceSharedIP. Ignore the rest of the file.
apiVersion: v1
data:
vcloud-ccm-config.yaml: "vcd:\n host: https://vcd.vmwire.com\n org: tenant1\n
\ vdc: tenant1-vdc\nloadbalancer:\n
\ ports:\n http: 80\n https: 443\n network: default-organization-network\n
\ vipSubnet: \n enableVirtualServiceSharedIP: true # supported for VCD >= 10.4\nvAppName:
tkg-1\n"
immutable: true
kind: ConfigMap
metadata:
annotations:
kubectl.kubernetes.io/last-applied-configuration: |
{"apiVersion":"v1","data":{"vcloud-ccm-config.yaml":"vcd:\n host: https://vcd.vmwire.com\n org: tenant1\n vdc: tenant1-vdc\nloadbalancer:\n oneArm:\n startIP: \"192.168.8.2\"\n endIP: \"192.168.8.100\"\n ports:\n http: 80\n https: 443\n network: default-organization-network\n vipSubnet: \n enableVirtualServiceSharedIP: false # supported for VCD \u003e= 10.4\nvAppName: tkg-1\n"},"immutable":true,"kind":"ConfigMap","metadata":{"annotations":{},"name":"vcloud-ccm-configmap","namespace":"kube-system"}}
creationTimestamp: "2022-11-19T15:08:27Z"
name: vcloud-ccm-configmap
namespace: kube-system
resourceVersion: "1014"
uid: 5e8f2136-124f-4fc0-b4e6-49741ee5545b
Step 3 – Apply the new config map
To apply the new config map, you need to delete the old configmap first.
k delete cm -n kube-system vcloud-ccm-configmapconfigmap "vcloud-ccm-configmap" deletedApply the new config map with the yaml file that you just edited.
k apply -f vcloud-ccm-configmap.yaml
configmap/vcloud-ccm-configmap createdTo finalize the change, you have to take a backup of the vmware-cloud-director-ccm deployment and then delete it so that it can use the new config-map.
You can check the config map that this deployment uses by typing:
k get deploy -n kube-system vmware-cloud-director-ccm -o yaml
Step 4 – Redeploy the vmware-cloud-director-ccm deloyment
Take a backup of the vmware-cloud-director-ccm deployment by typing:
k get deploy -n kube-system vmware-cloud-director-ccm -o yaml > vmware-cloud-director-ccm.yaml
No need to edit this time. Now delete the deployment:
k delete deploy -n kube-system vmware-cloud-director-ccm
deployment.apps "vmware-cloud-director-ccm" deletedYou can now recreate the deployment from the yaml file:
k apply -f vmware-cloud-director-ccm.yaml
deployment.apps/vmware-cloud-director-ccm createdNow when you deploy and application and request a load balancer service, NSX ALB (Avi) will route the external VIP IP towards the k8s workers nodes, instead of to the NSX-T DNAT segment on 192.168.2.x first.
Step 5 – Deploy a load balancer service
k apply -f https://raw.githubusercontent.com/hugopow/tkg-dev/main/web-statefulset.yaml
You’ll notice a few things happening with this example. A new statefulset with one replica is scheduled with an nginx pod. The statefulset also requests a 1 GiB PVC to store the website. A load balancer service is also requested.

Note that there is no DNAT setup on this tenant’s NAT services, this is because after the config map change, the vmware-cloud-director cloud controller manager is not using a two-arm load balancer architecture anymore, therefore no need to do anything with NSX-T NAT rules.
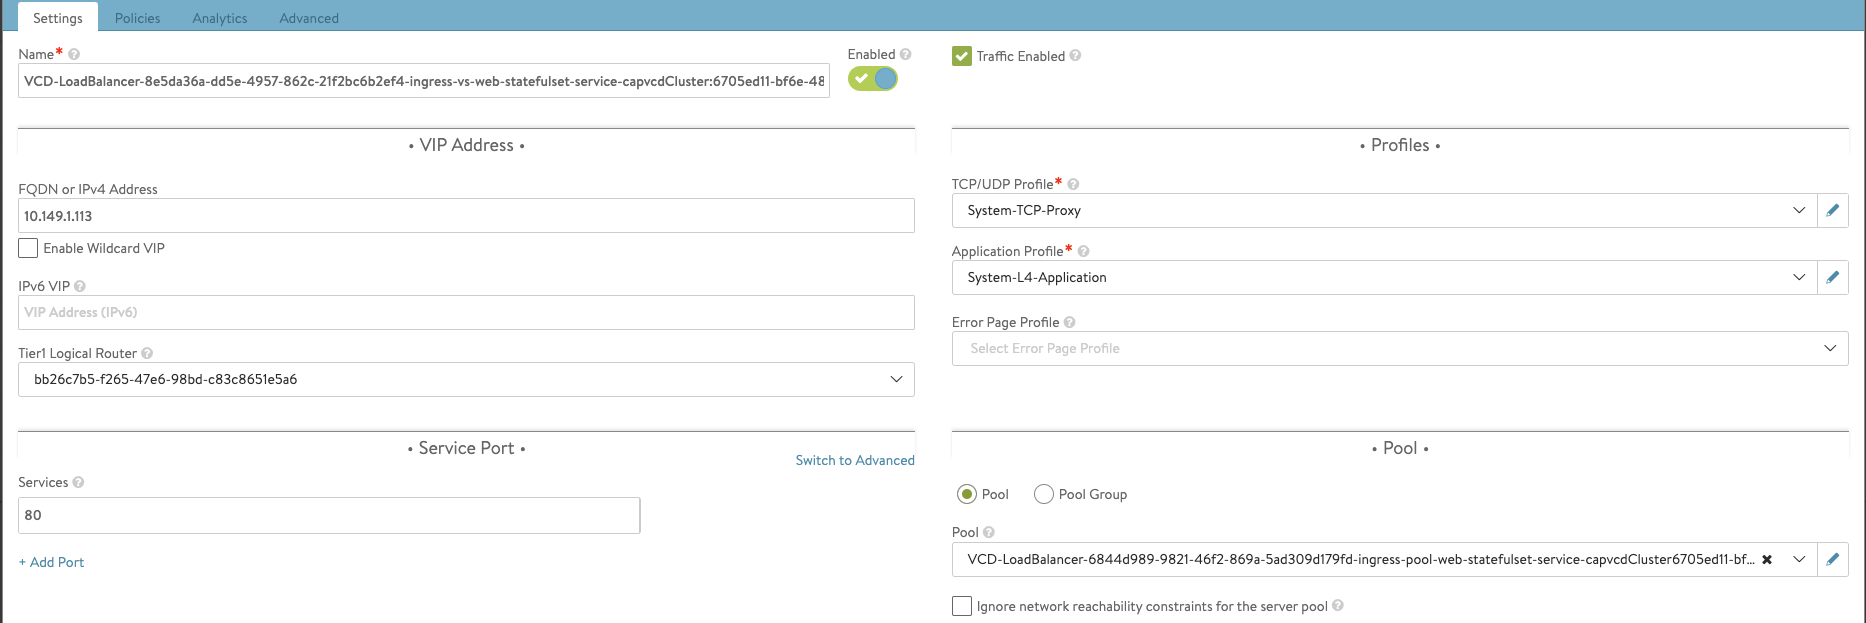
If you check your NSX ALB settings you’ll notice that it is indeed now using a one-arm configuration. Where the external VIP IP address is 10.149.1.113 and port is TCP 80. NSX ALB is routing that to the two worker nodes with IP addresses of 192.168.0.100 and 192.168.0.102 towards port TCP 30020.

k get svc -n web-statefulset
NAME TYPE CLUSTER-IP EXTERNAL-IP PORT(S) AGE
web-statefulset-service LoadBalancer 100.66.198.78 10.149.1.113 80:30020/TCP 13m
k get no -o wide
NAME STATUS ROLES AGE VERSION INTERNAL-IP EXTERNAL-IP OS-IMAGE KERNEL-VERSION CONTAINER-RUNTIME

tkg-1-worker-node-pool-1-68c67d5fd6-c79kr Ready 5h v1.22.9+vmware.1 192.168.0.102 192.168.0.102 Ubuntu 20.04.4 LTS 5.4.0-109-generic containerd://1.5.11
tkg-1-worker-node-pool-2-799d6bccf5-8vj7l Ready 4h46m v1.22.9+vmware.1 192.168.0.100 192.168.0.100 Ubuntu 20.04.4 LTS 5.4.0-109-generic containerd://1.5.11
Thanks for the explanation, very good to know!
Is there any way you could mix this with the 2 arm lb and decide on a per deployment basis of your service, f.e. the stateful deployment you did, if it should use an internal or external facing load balancer?
I don’t think you can choose between using a 1-arm or 2-arm lb, this is a per cluster setting, so once you’ve made the config map change to use a 1-arm lb in that cluster, that will be the only way you can deploy lb services