VMware vRealize Orchestrator workflows for VMware Cloud Director to automate the provisioning of cloud services.
Firstly, apologies to all those who asked for the workflow at VMworld 2019 in Barcelona and also e-mailed me for a copy. It’s been hectic in my professional and personal life. I also wanted to clean up the workflows and remove any customer specific items that are not relevant to this workflow. Sorry it took so long!
If you’d like to see an explanation video of the workflows in action, please take a look at the VMworld session recording.
Credits
These vRealize Orchestrator workflows were co-created and developed by Benoit Serratrice and Henri Timmerman.
Creates an organization based on your initial organisation name as an input.
Creates a vDC into this organization.
Adds a gateway to the vDC.
Adds an routed network with a gateway CIDR that you enter.
Adds a direct external network.
Converts the organization network to use distributed routing.
Adds a default outbound firewall rule for the routed network.
Adds a source NAT rule to allow the routed network to goto the external network.
Adds a catalog.
Commission Customer vRO Workflow
It also cleans up the provisioning if there is a failure. I have also included a Decommission Customer workflow separately to enable you to quickly delete vCD objects quickly and easily. It is designed for lab environments. Bear this in mind when using it.
Other caveats: the workflows contained in this package are unsupported. I’ll help in the comments below as much as I can.
Getting Started
Import the package after downloading it from github.
The first thing you need to do is setup the global settings in the Global, Commission, storageProfiles and the other configurations. You can find these under Assets > Configurations.
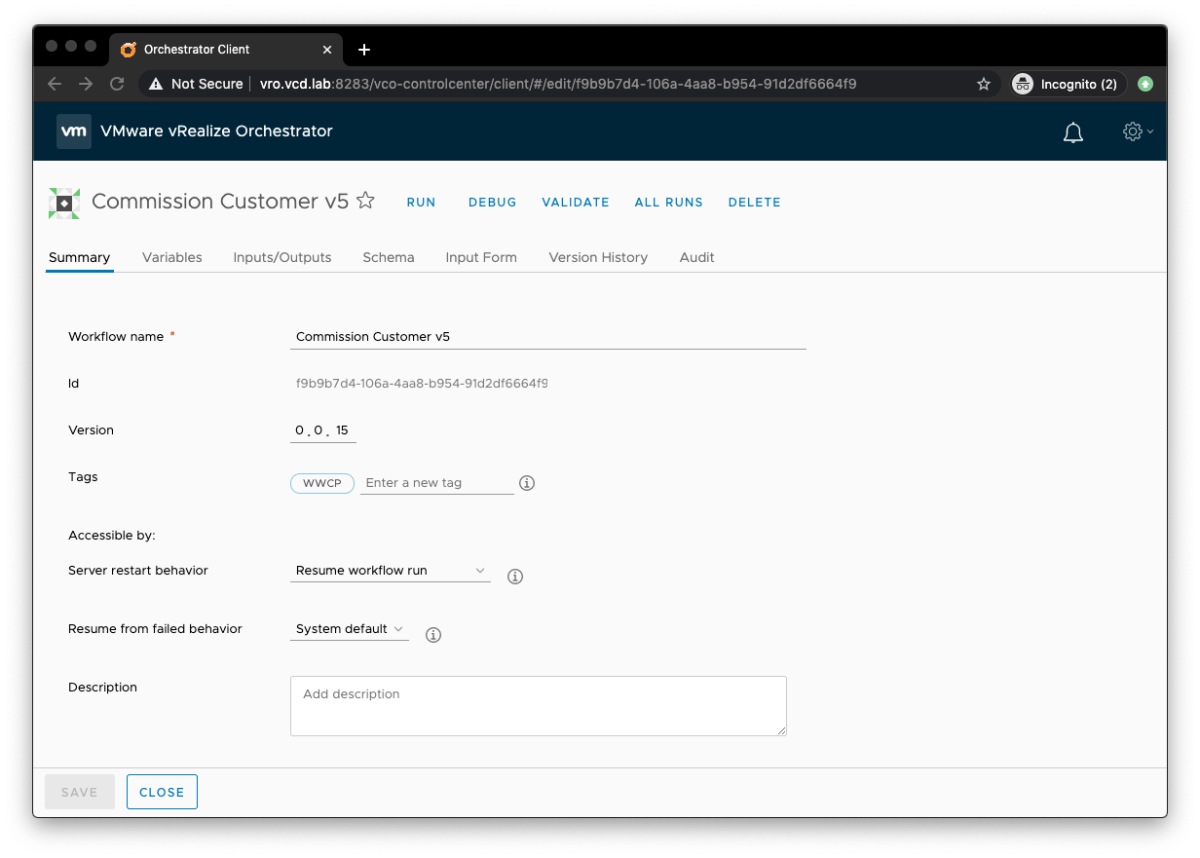
You should then see the Commission Customer v5 workflow under Workflows in your vRO client, it should look something like this.
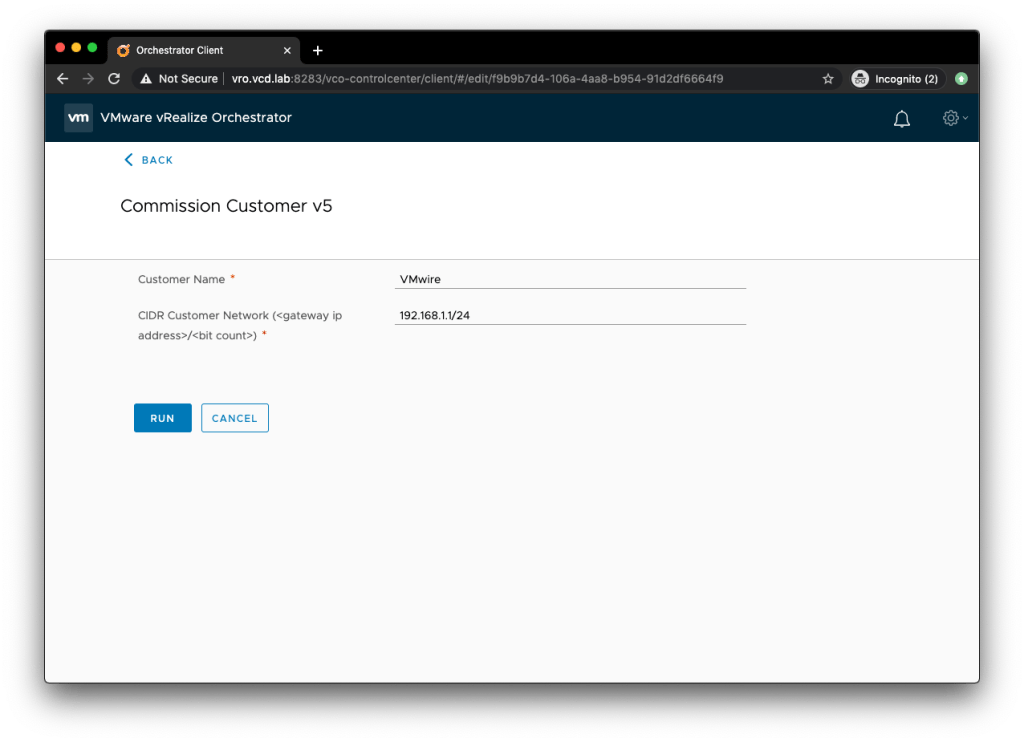
Enter a customer name and enter the gateway IP in CIDR into the form.
Press Run, then sit back and enjoy the show.
Known Issues
Commissioning a customer when there are no existing edge gateways deployed that use an external network. You see the following error in the vRO logs:
item: 'Commission Customer v5/item12', state: 'failed', business state: 'null', exception: 'TypeError: Cannot read property "ipAddress" from null (Workflow:Commission Customer v5 / get next ip (item8)#5)'
This happens because no IP addresses are in use from the external network pool. The Commission Customer workflow calculates the next IP address to assign to the edge gateway, it cannot do this if the last IP in use is null. Manually provision something that uses one IP address from the external network IP pool. Then use the Commission Customer workflow, it should now work.
Commissioning a customer workflow completes successfully, however you see the following errors:
[2020-03-22 19:30:44.596] [I] orgNetworkId: 545b5ef4-ff89-415b-b8ef-bae3559a1ac7
[2020-03-22 19:30:44.662] [I] =================================================================== Converting Org network to a distributed interface...
[2020-03-22 19:30:44.667] [I] ** API endpoint: vcloud.vmwire.com/api/admin/network/545b5ef4-ff89-415b-b8ef-bae3559a1ac7/action/convertToDistributedInterface
[2020-03-22 19:30:44.678] [I] error caught!
[2020-03-22 19:30:44.679] [I] error details: InternalError: Cannot execute the request:  (Workflow:Convert net to distributed interface / Post to vCD (item4)#21)
[2020-03-22 19:30:44.680] [I] error details: Cannot execute the request:  (Workflow:Convert net to distributed interface / Post to vCD (item4)#21)
[2020-03-22 19:30:44.728] [I] Network converted succesfully.
The workflow attempts to convert the org network from an internal interface to a distributed interface but it does not work even thought the logs says it was successful. Let me know if you are able to fix this.
This article covers protecting and load balancing the Cloud Director application with Avi Networks. It covers SSL termination. health monitoring and layer 7 HTTP filtering. It can also be used as a reference for other load balancer products such as F5 LTM or NGINX.
Overview
The Avi Vantage platform is built on software-defined principles, enabling a next generation architecture to deliver the flexibility and simplicity expected by IT and lines of business. The Avi Vantage architecture separates the data and control planes to deliver application services beyond load balancing, such as application analytics, predictive autoscaling, micro-segmentation, and self-service for app owners in both on-premises or cloud environments. The platform provides a centrally managed, dynamic pool of load balancing resources on commodity x86 servers, VMs or containers, to deliver granular services close to individual applications. This allows network services to scale near infinitely without the added complexity of managing hundreds of disparate appliances.
Controllers – these are the management appliances that are responsible for state data, Service Engines are deployed by the controllers. The controllers run in a management network.
Service Engines – the load balancing services run in here. These generally run in a DMZ network. Service Engines can have one or more network adaptors connected to multiple networks. At least one network with routing to the controllers, and the remaining networks as data networks.
Deployment modes
Avi can be installed in a variety of deployment types. For VMware Cloud on AWS, it is not currently possible to deploy using ‘write access’ as vCenter is locked-down in VMC and it also has a different API from vSphere 6.7 vCenter Server. You’ll also find that other tools may not work with vCenter in a VMware Cloud on AWS SDDC, such as govc.
Instead Avi needs to be deployed using ‘No Access’ mode.
You can refer to this link for instructions to deploy Avi Controllers in ‘No Access’ mode.
Since it is only possible to use ‘No Access’ mode with VMC based SDDCs, its also a requirement to deploy the service engines manually. To do this follow the guide in this link, and start at the section titled Downloading Avi Service Engine on OVA.
If you’re using Avi with on-premises deployments of vCenter, then ‘Write Mode’ can be used to automate the provisioning of service engines. Refer to this link for more information on the different modes.
Deploying Avi Controller with govc
You can deploy the Avi Controller onto non VMware Cloud on AWS vCenter servers using the govc tool. Refer to this other post on how to do so. I’ve copied the JSON for the controller.ova for your convenience below.
For a high-level architecture overview, this link provides a great starting point.
Figure 1. Avi architecture
Service Engine Typical Deployment Architecture
Generally in legacy deployments, where BGP is not used. The service engines would tend to have three network interfaces. These are typically used for frontend, backend and management networks. This is typical of traditional deployments with F5 LTM for example.
For our example here, I will use three networks for the SEs as laid out below.
Network name
Gateway CIDR
Purpose
sddc-cgw-vcd-dmz1
10.104.125.1/24
Management
sddc-cgw-vcd-dmz2
10.104.126.1/24
Backend
sddc-cgw-vcd-dmz3
10.104.127.1/24
Frontend
The service engines are configured with the following details. It is important to make a note of the MAC addresses in ‘No access’ mode as you will need this information later.
Service Engine
avi-se1
avi-se2
Management
IP Address 10.104.125.11 Mac Address 00:50:56:8d:c0:2e
IP Address 10.104.125.12 Mac Address 00:50:56:8d:38:33
Backend
IP Address 10.104.126.11 Mac Address 00:50:56:8d:8e:41
IP Address 10.104.126.12 Mac Address 00:50:56:8d:53:f6
Frontend
IP Address 10.104.127.11 Mac Address 00:50:56:8d:89:b4
IP Address 10.104.127.12 Mac Address 00:50:56:8d:80:41
The Management network is used for communications between the SEs and the Avi controllers. For the port requirements, please refer to this link.
The Backend network is used for communications between the SEs and the application that is being load balanced and protected by Avi.
The Frontend network is used for upstream communications to the clients, in this case the northbound router or firewall towards the Internet.
Sample Application
Lets use VMware Cloud Director as the sample application for configuring Avi. vCD as it is more commonly named (to be renamed VMware Cloud Director), is a cloud platform which is deployed with an Internet facing portal. Due to this, it is always best to protect the portal from malicious attacks by employing a number of methods.
Some of these include, SSL termination and web application filtering. The following two documents explain this in more detail.
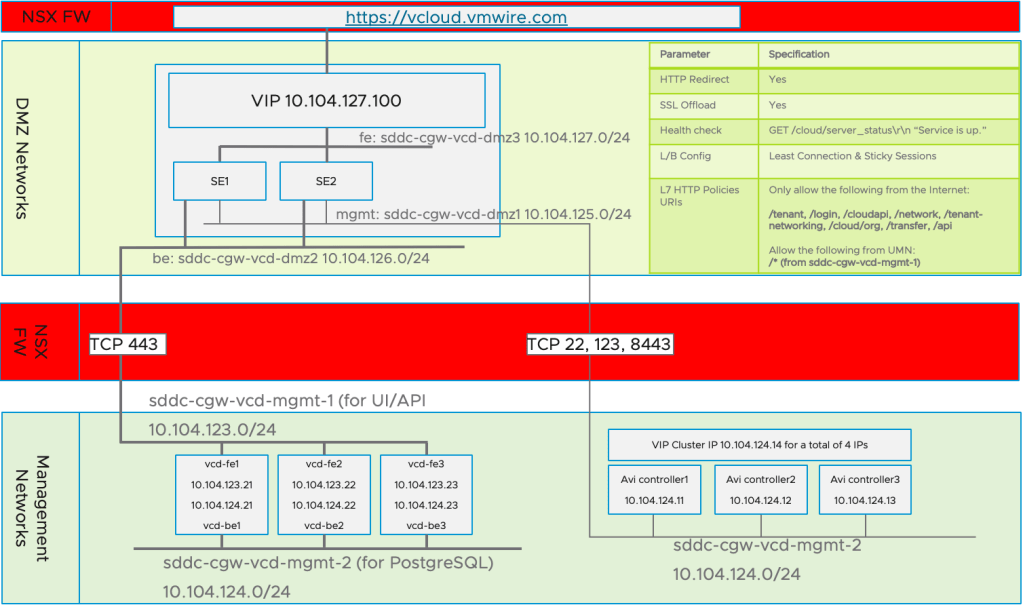
You’ll notice that the eth0 and eth1 interfaces are connected to two different management networks 10.104.123.0/24 and 10.104.124.0/24 respectively. For vCD, it is generally good practice to separate the two interfaces into separate networks.
Network name
Gateway CIDR
Purpose
sddc-cgw-vcd-mgmt-1
10.104.123.1/24
vCD Frontend UI/API/VM Remote Console
sddc-cgw-vcd-mgmt-2
10.104.124.1/24
vCD Backend PostgreSQL, SSH etc.
For simplicity, I also deployed my Avi controllers onto the sddc-cgw-vcd-mgmt-2 network.
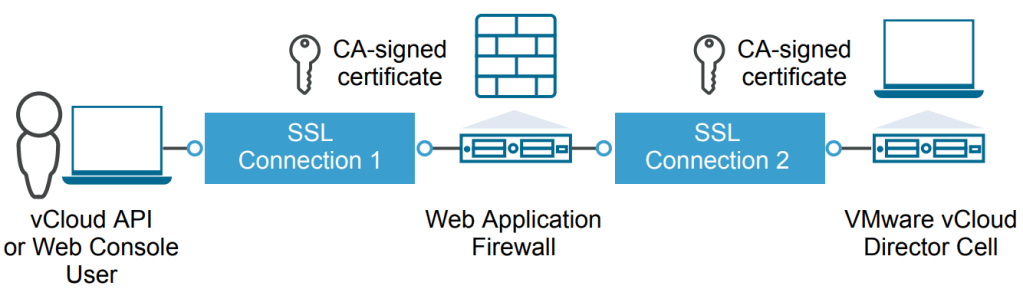
The diagram below summarises the above architecture for the HTTP interface for vCD. For this guide, I’ve used VMware Cloud on AWS together with Avi Networks to protect vCD running as an appliance inside the SDDC. This is not a typical deployment model as Cloud Director Service will be able to use VMware Cloud on AWS SDDC resource soon, but I wanted to showcase the possibilities and constraints when using Avi with VMC based SDDCs.
Figure 2 . vCD HTTP Diagram
Configuring Avi for Cloud Director
After you have deployed the Avi Controllers and the Service Engines, there are few more steps needed before vCD is fully up and operational. The proceeding steps can be summarised as follows:
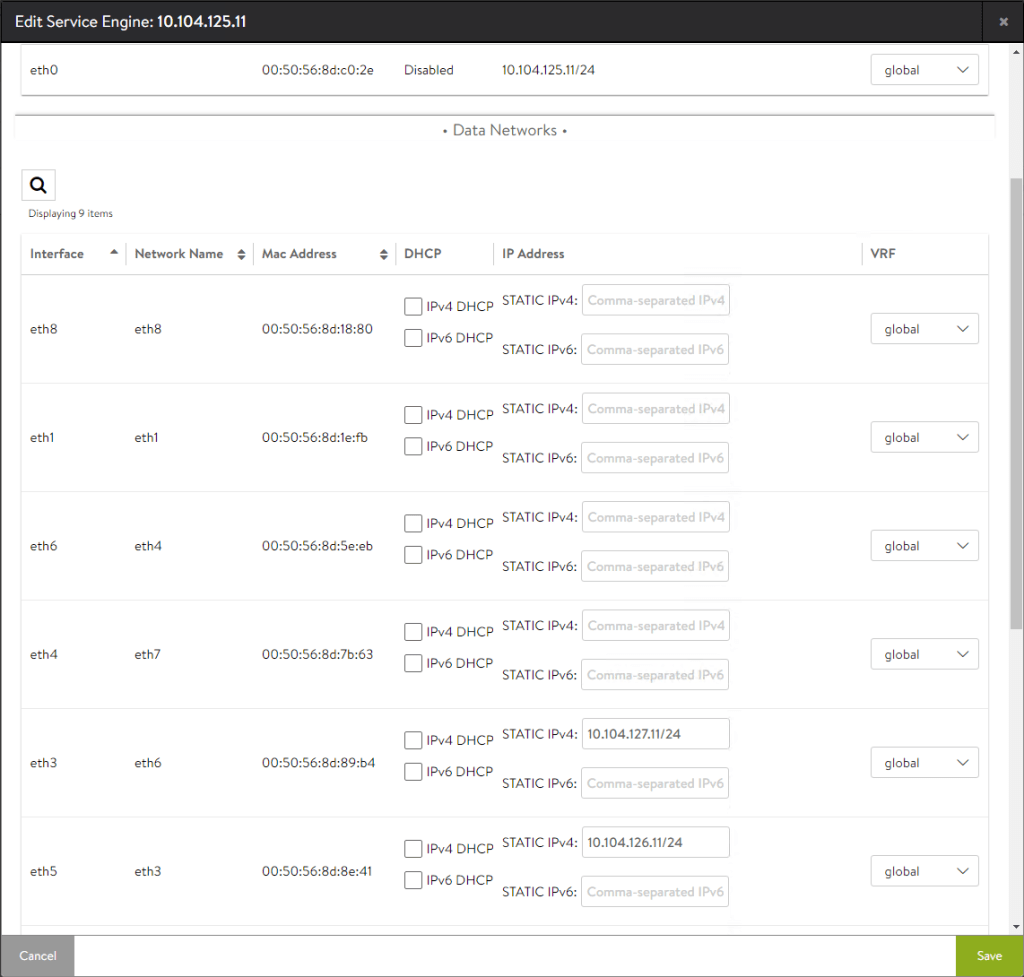
Setup networking for the service engines by assigning the right IP address to the correct MAC addresses for the data networks
Configure the network subnets for the service engines
Configure static routes for the service engines to reach vCD
Setup Legacy HA mode for the service engine group
Setup the SSL certificate for the HTTP service
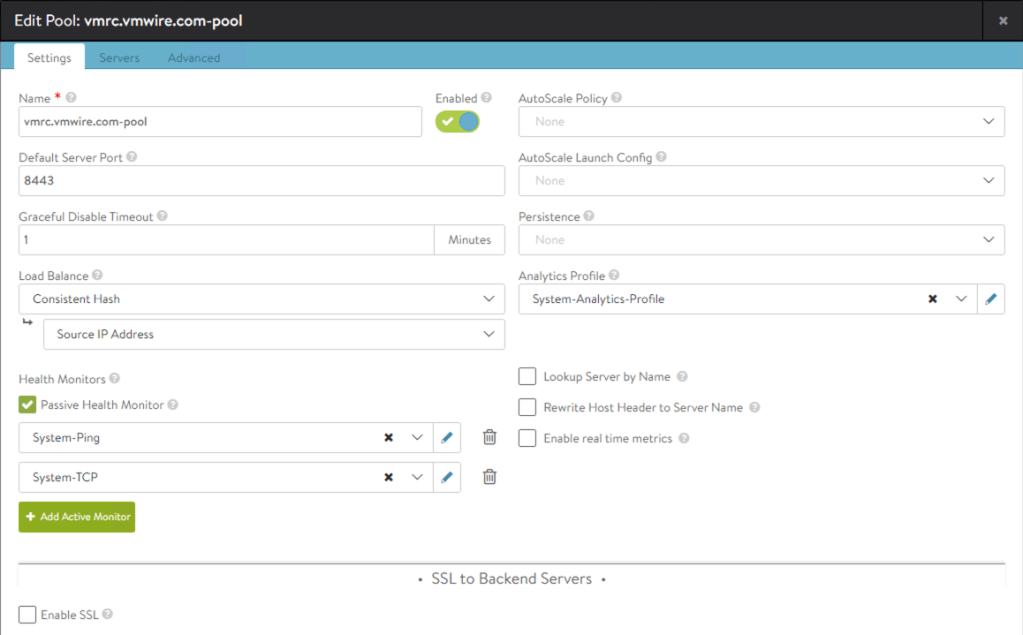
Setup the Virtual Services for HTTP and Remote Console (VMRC)
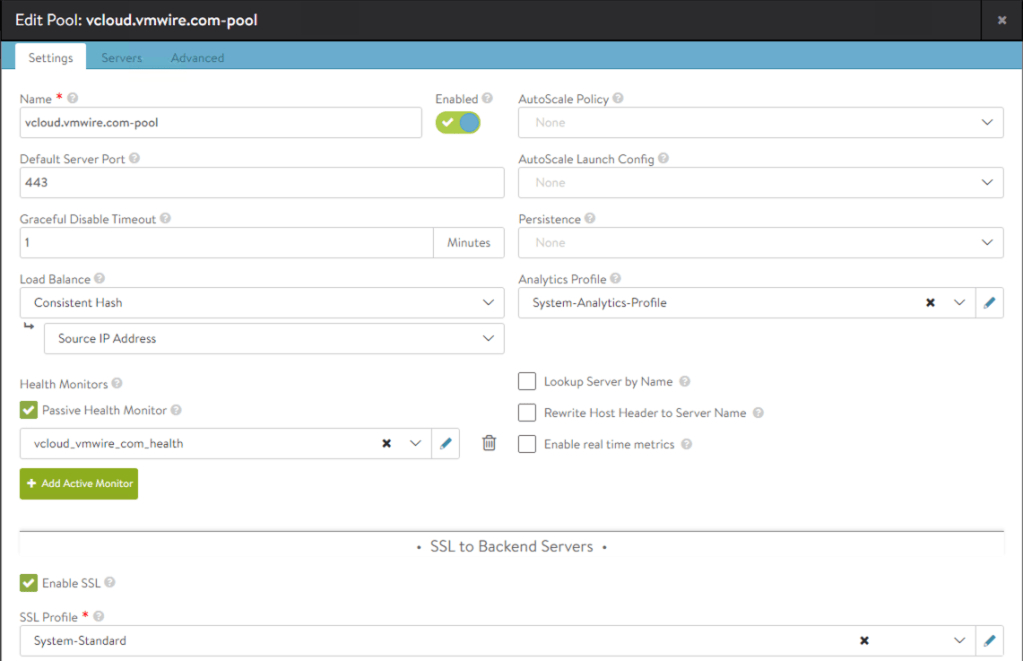
Setup the server pools
Setup health monitors
Setup HTTP security policies
Map Service Engine interfaces
Using the Avi Vantage Controller, navigate to Infrastructure > Service Engine, select one of the Service Engines then click on the little pencil icon. Then map the MAC addresses to the correct IP addresses.
Configure the network subnets for the service engines
Navigate to Infrastructure > Networks and create the subnets.
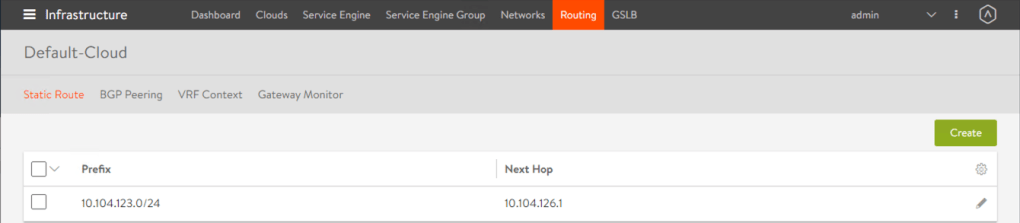
Configure static routes
Navigate to Infrastructure > Routing and setup any static routes. You’ll notice from figure 2 that since the service engine has three network interfaces on different networks, we need to create a static route on the interface that does not have the default gateway. This is so the service engines knows which gateway to use to route traffic for particular traffic types. In this case, the gateway for the service engine to route the HTTP and Remote Console traffic southbound to the vCD cells.
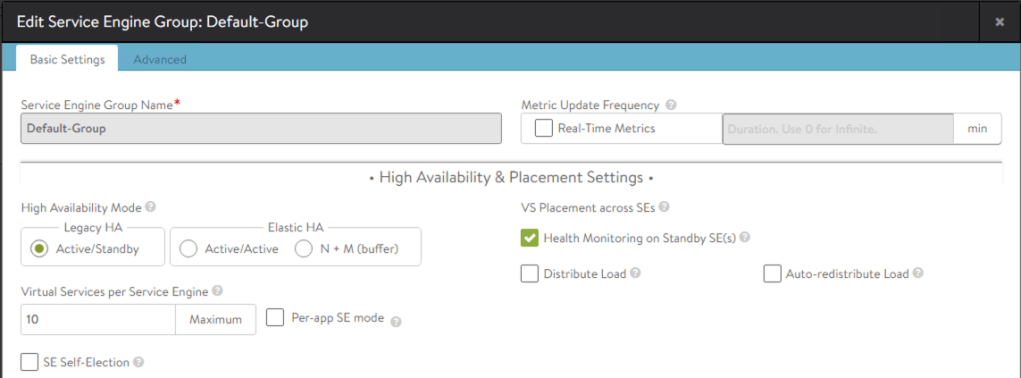
Setup Legacy HA mode for the service engine group
Navigate to Infrastructure > Service Engine Group.
Setup the HA mode to Legacy HA. This is the simplest configuration, you can use Elastic HA if you wish.
Configure the HTTP and Remote Console Virtual Services
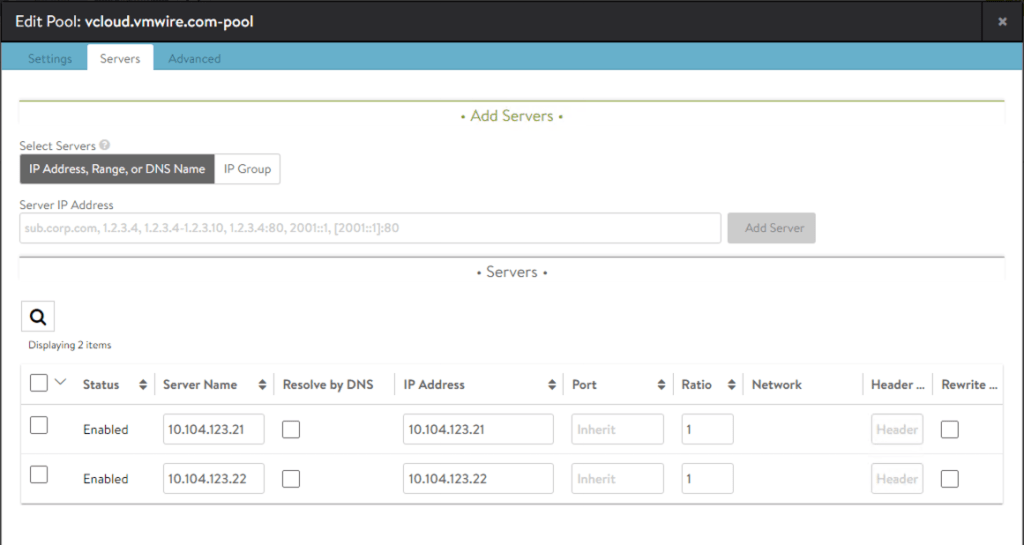
Navigate to Applications > Virtual Services.
Creating a Virtual Service, has a few sub tasks which include the creation of the downstream server pools and SSL certificates.
Create a new Virtual Service for the HTTP service, this is for the Cloud Director UI and API. Please use this example to create another Virtual Service for the Remote Console.
For the Remote Console service, you will need to accept TCP 443 on the load balancer but connect southbound to the Cloud Director appliances on port TCP 8443. TCP 8443 is the port that VMRC uses as it shares the same IP addresses as the HTTP service.
You may notice that the screenshot is for an already configured Virtual Service for the vCD HTTP service. The server pool and SSL certificate is already configured. Below are the screenshots for those.
Certificate Management
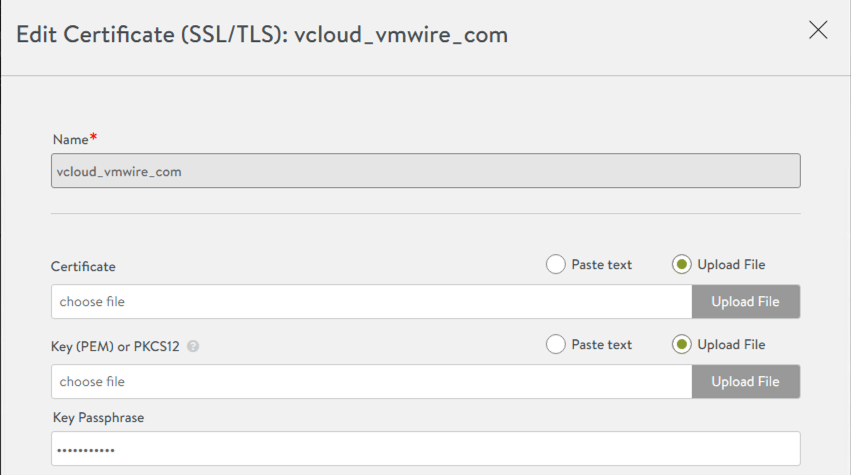
You may already have a signed HTTP certificate that you wish to use with the load balancer for SSL termination. To do so, you will need to use the JAVA keytool to manipulate the HTTP certificate, obtaining the private key and convert from JCEKS to PCKS12. JAVA keytool is available in the vCD appliance at /opt/vmware/vcloud-director/jre/bin/.
Figure 3. SSL termination on load balancer
For detailed instructions on creating a signed certificate for vCD, please follow this guide.
Convert the keystore file certificates.ks file from JCEKS to PKCS12
Now that you have the private key for the HTTP certificate, you can go ahead and configure the HTTP certificate on the load balancer.
For the certificate file, you can either paste the text or upload the certificate file (.cer, .crt) from the certificate authority for the HTTP certificate.
For the Key (PEM) or PKCS12 file, you can use the httpcert.p12 file that you extracted from the certificates_pkcs12.ks file above.
The Key Passphrase is the password that you used to secure the httpcert.p12 file earlier.
Note that the vCD Remote Console (VMRC) must use pass-through for SSL termination, e.g., termination of the VMRC session must happen on the Cloud Director cell. Therefore, the above certificate management activities on Avi are not required for the VMRC.
Health Monitors
Navigate to Applications > Pools.
Edit the HTTP pool using the pencil icon and click on the Add Active Monitor green button.
Health monitoring of the HTTP service uses
GET /cloud/server_status HTTP/1.0
With an expected server response of
Service is up.
And a response code of 200.
The vCD Remote Console Health monitor is a lot simpler as you can see below.
Layer 7 HTTP Security
Layer 7 HTTP Security is very important and is highly recommended for any application exposed to the Internet. Layer 3 fire-walling and SSL certificates is always never enough in protecting and securing applications.
Navigate to Applications > Virtual Services.
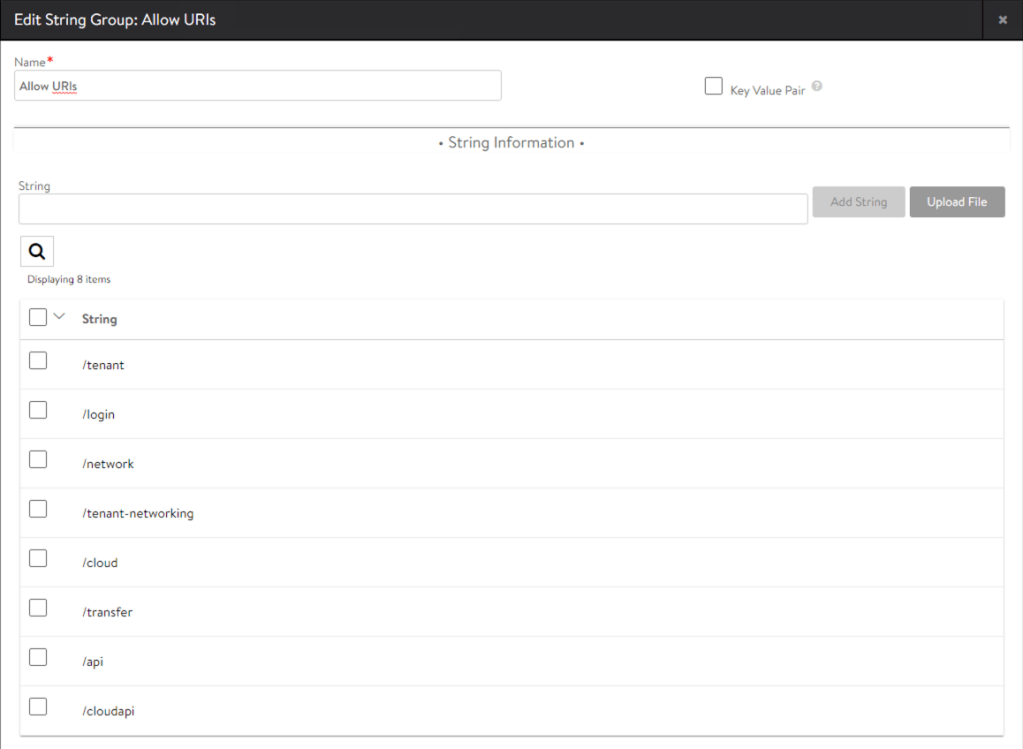
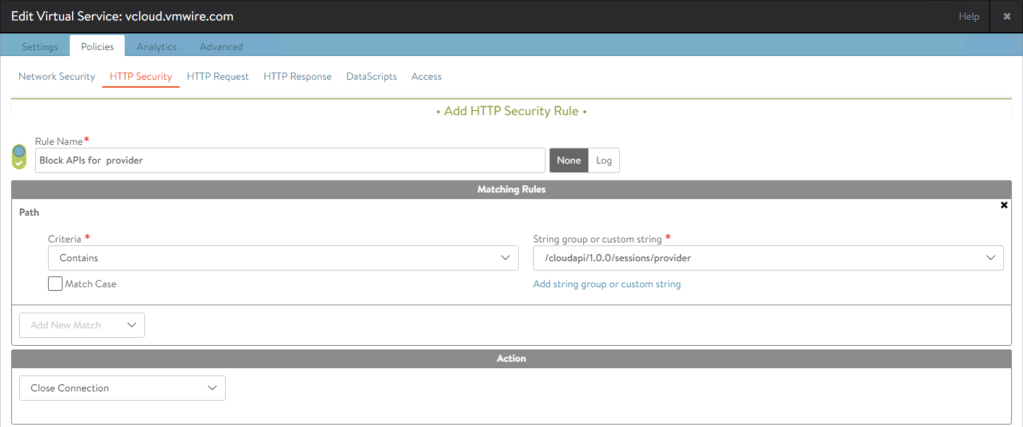
Click on the pencil icon for the HTTP virtual service and then click on the Policies tab. Then click on the HTTP Security policy. Add a new policy with the following settings. You can read more about Layer 7 HTTP policies here.
Allowed Strings
Required by
/tenant
Tenant use
/login
Login
/network
Access to networking
/tenant-networking
Access to networking
/cloud
For SAML/SSO logins
/transfer
Uploads/Downloads of ISO and templates
/api
General API access
/cloudapi
General API access
/docs
Swagger API browser
Blocked Strings
/cloudapi/1.0.0/sessions/provider
Specifically block admin APIs from the Internet
This will drop all provider side services when accessed from the Internet. To access provider side services, such as /provider or admin APIs, use an internal connection to the Cloud Director cells.
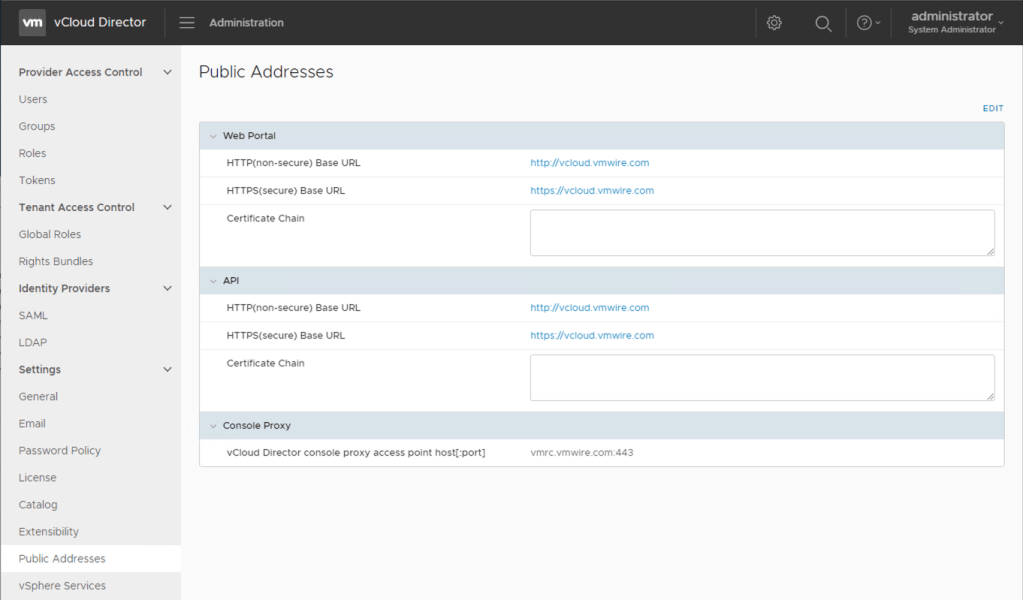
Change Cloud Director public addresses
If not already done so, you should also change the public address settings in Cloud Director.
A quick post on how to enable the import of vShield Manager 5.0.1 OVA as a vApp Template into vCloud Director. This will allow you to spin up vCloud Director labs inside of vCloud Director for some crazy inception action.
Note: that this method can be used for other appliances.
As you know if you downloaded vShield Manager from VMware, the file format would be in OVA format, which is not compatible with vCloud Director.
This post goes through some of the steps required to
Convert the OVA to OVF
Edit the OVF to remove vCloud Director unsupported features (vmw:ExtraConfig)
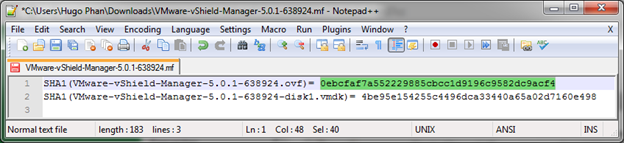
Create a new manifest file with the new SHA-1 hash
When you see the message You hash has been successfully created, copy the top lower case hex hash and open up the VMware-vShield-Manager-5.0.1-638924.mf file in Notepad++
Replace the current hash for VMware-vShield-Manager-5.0.1-638924.ovf with the new one.
Save the file.
Now you can successfully upload the new VMware-vShield-Manager-5.0.1-638924.ovf to vCloud Director without the error occurring.
VMware vCloud Director can use three different authentication mechanisms for subscriber authentication to the VCD portal. The portal is accessed using the URL https://<cloud-url>/cloud/org/<organisation>. In this post, I’ll try to highlight some of the authentication options that a subscriber can use to access the VCD portal.
Supported LDAP Services
Platform
LDAP Server
Authentication Methods
Windows Server 2003
Active Directory
Simple, Simple SSL, Kerberos, Kerberos SSL
Windows Server 2008
Active Directory
Simple
Windows 7 (2008 R2)
Active Directory
Simple, Simple SSL, Kerberos, Kerberos SSL
Linux
OpenLDAP
Simple, Simple SSL
VCD LDAP Options
A provider can configure a subscriber to use three different authentication mechanisms as highlighted by Figure 1.
Figure 1 – VCD LDAP Options
Do not use LDAP (also known as local authentication)
This is the simplest authentication method, selecting this radio button when configuring a new Organization will not use any kind of LDAP service. Instead, new users will need to be configured using the VCD GUI or the VCD API, and these users will be stored within the VCD database. Some of the disadvantages when using the local authentication are:
Groups cannot be used
A minimum length of 6 character only
No password complexity policies
No password expiration policies
No password history
No authentication failure controls
No integration with enterprise identity management systems
VCD system LDAP service
Selecting this will force the Organization to use the same LDAP service as the LDAP service that is used by the VCD system (Provider). Although, a separate OU can be used for each Organization, this is not the ideal model to use for large cloud deployments. Some of the disadvantages when using the VCD system LDAP service are:
Organizations must use the same LDAP service as the Provider.
Although separate OUs can be used, Organizations may not want to have their Users and Groups managed by the Provider.
Organizations may not want to share the same LDAP service with another Organization, even if separate OUs are used.
No self-service of the LDAP service by each subscriber is possible unless complex access is setup for each subscriber to their respective OU.
Custom LDAP service
Selecting this will allow the Organization to use its own private LDAP service. What this means is for each Organization, a completely separate and unique LDAP service can be used for that Organization, an Organization does not need to use the same service as the VCD system but can use its own LDAP service. This can be a completely separate unique Active Directory Forest for example, with no network links to any other AD Forest.
VCD System LDAP Service
Consider this following example:
I run a Public Cloud so I am a Provider of cloud services, my VCD system authenticates to a Microsoft Active Directory Forest with a domain name of HUGO.LOCAL. This allows me as a System Administrator to log into my VCD portal as a user on HUGO.LOCAL.
As the System Administrator, I first configure an LDAP service for the VCD System:
Figure 2 – VCD System LDAP
Then, a new Security Group called SG_VCD.System.Administrators is created in the HUGO.LOCAL domain, with the user HUGO.LOCAL\HPhan as a member of that group.
Figure 3 – VCD System Administrators Group
The new Security Group SG_VCD.System.Administrators is then added to the System Administrator role in VCD.
Figure 4 – Import LDAP group into VCD role
Now I can log into my cloud as a System Administrator with my domain user HUGO\HPhan.
Figure 5 – System LDAP
Organization Custom LDAP Service
So pretty easy and straightforward so far right? What happens when a subscriber comes along and wants to use my cloud services? Let’s do another example.
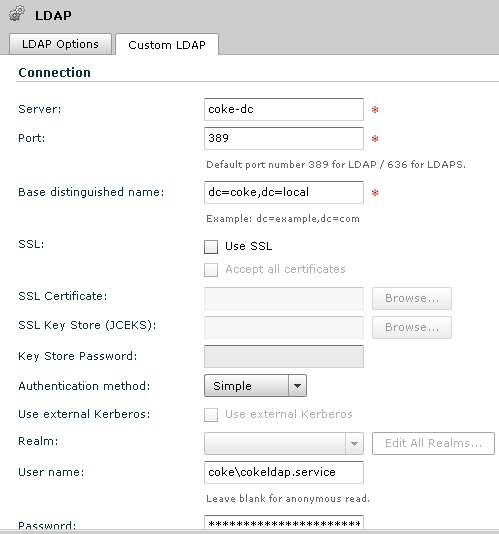
A new organization let’s say Coke, wish to use their own LDAP service to authenticate with the VCD portal. In much the same way as how the System LDAP was configured, an Organization LDAP service is configured in similar ways.
As a System Administrator, I first configure a LDAP service for the Coke Organization, instead of using the HUGO.LOCAL LDAP service, I now direct this Organization’s LDAP service to a unique LDAP service for Coke. This can be a LDAP service hosted by me (the Provider) and managed by Coke (think co-lo), or a LDAP service managed by Coke in Coke’s datacentres (think MPLS/IPVPN):
Figure 6 – Organization LDAP
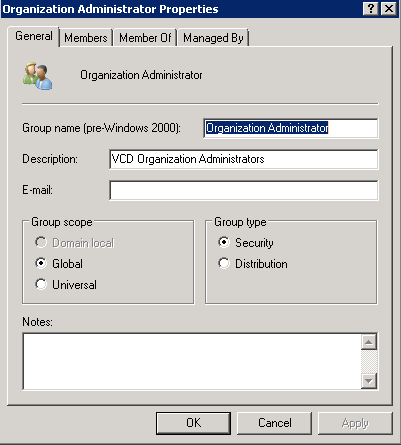
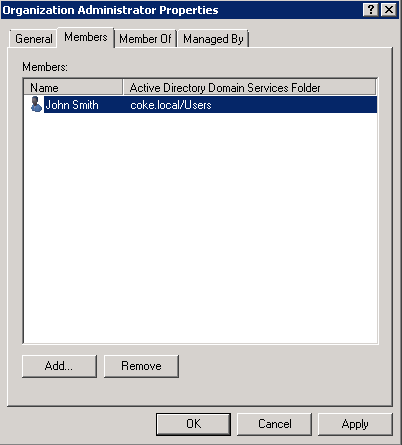
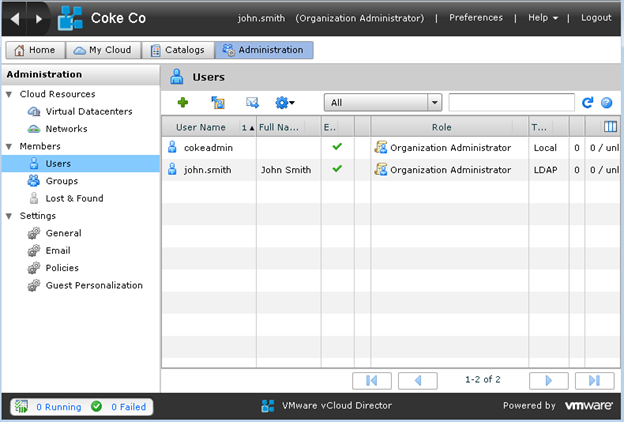
Then a new Security Group called Organization Administrators is created in the COKE.LOCAL domain, with the user COKE.LOCAL\John.Smith as a member of that group.
Figure 7 – VCD Organization Administrators Group and Members
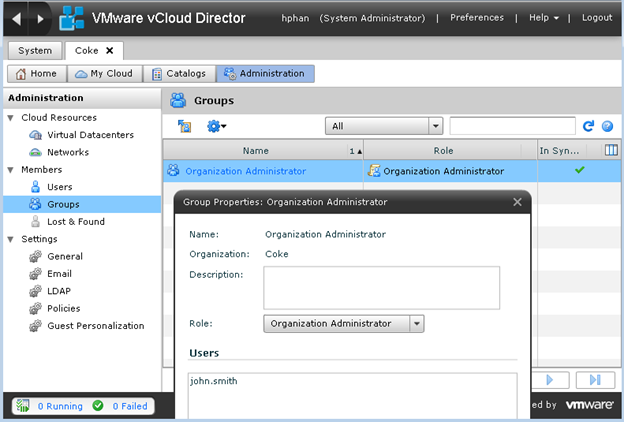
The new Security Group Organization Administrator is then added to the Organization Administrator role in Coke’s Organization.
Figure 8 – Assign LDAP Group to VCD Role
John Smith can log into the Coke Organization as an Organization Administrator with the domain user COKE\John.Smith.
Figure 9 – LDAP User logged into VCD
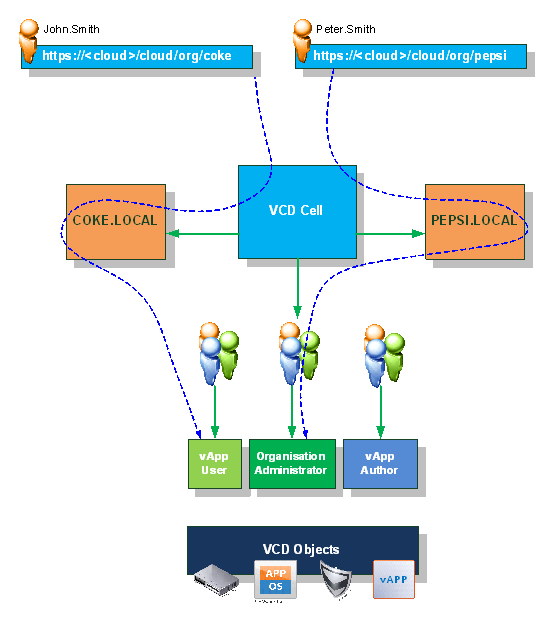
So what happens when another Organization joins the party? Extending our example above, let’s say Pepsi also want to use my cloud services. In much the same way that the Coke Organization is configured to use its own LDAP service, we do the same for the Pepsi Organization – an Organization Administrator group is created in the PEPSI.LOCAL domain, and a user named Peter.Smith is a member of that group, Peter Smith can also log into Pepsi’s Organization as an Organization Administrator.
Figure 10 – Another LDAP User logged into VCD
In Summary
In summary the provider will use the System LDAP, all other (subscribers) Organizations could also use the System LDAP (either with a separate OU or not) if required, however, you can also configure each Organization to use its own LDAP Service.
We have a Provider which uses the domain HUGO.LOCAL to authenticate the System VCD, with the Active Directory Security Group SG_VCD.System.Administrators having the System Administrator role in VCD and my account HUGO\HPhan is a member of this group.
We have subscriber 1 with an Organization named Coke Co, and this organization uses its own LDAP service which is backed by a domain COKE.LOCAL.
We have another subscriber, subscriber 2 with an Organization named Pepsi Co, and this organization uses its own LDAP service which is backed by a domain PEPSI.LOCAL.
Provider – Uses HUGO.LOCAL – System LDAP
Subscriber 1 – Uses COKE.LOCAL – Custom LDAP
Subscriber 2 – Uses PEPSI.LOCAL – Custom LDAP
There is no trust between the Provider LDAP or any Subscribers’ LDAP required.
More importantly, there is no trust and no network connectivity between any of the subscriber’s LDAP systems.
Securing Custom LDAP Services
For each Organization, a single LDAP Service for that Organization will need to be configured as a Custom LDAP to authenticate to. To enable this functionality, the vCloud Director Cell must be able to connect to ALL LDAP servers over TCP 389 or 636. The VMware vCloud Security Hardening Guide gives good recommendations on how Service Providers can host Subscribers’ LDAP servers and also how to maintain connectivity to Subscribers’ LDAP servers if hosted remotely over MPLS/VPN etc.
It is therefore important that the vCD Cell is secured and network connectivity to each organization’s LDAP services are also secured. The following extract from the VMware vCloud Security Hardening Guide explains the connectivity options for subscriber’s LDAP services:
Connectivity from the VMware vCloud Director cells to the system LDAP server and any Organization LDAP servers must be enabled for the software to properly authenticate users. As recommended in this document, the system LDAP server must be located on the private management network, separated from the DMZ by a firewall. Some cloud providers and most IT organizations will run any Organization LDAP servers required, and those too would be on a private network, not the DMZ. Another option for an Organization LDAP server is to have it hosted and managed outside of the cloud provider’s environment and under the control of the Organization. In that case, it must be exposed to the VMware vCloud Director cells, potentially through the enterprise datacenter’s own DMZ (see Shared Resource Cloud Service Provider Deployment above).
In all of these circumstances, opening the appropriate ports through the various firewalls in the path between the cells and the LDAP server is required. By default, this port is 389/TCP for LDAP and 636/TCP for LDAPS; however, this port is customizable with most servers and in the LDAP settings in the Web UI. Also, a concern that arises when the Organization is hosting their own LDAP server is exposing it through their DMZ. It is not a service that needs to be accessible to the general public, so steps should be taken to limit access only to the VMware vCloud Director cells. One simple way to do that is to configure the LDAP server and/or the external firewall to only allow access from IP addresses that belong to the VMware vCloud Director cells as reported by the cloud provider. Other options include systems such as per-Organization site-to-site VPNs connecting those two sets of systems, hardened LDAP proxies or virtual directories, or other options, all outside the scope of this document.
Figure 11 – Multiple Custom LDAP in VCD
Note: The use of Coke and Pepsi are used as an example of multi tenancy within a public cloud and the use of the names on this blog are for information purposes only.
VMware vCloud Director (vCD) automatically creates a URL for each organisation that is created in vCD. There is a slight bug which does not create the URL properly and will cause the URL that is displayed under Customer | Administration | Settings | General to be incorrect.
For example, if you create an organisation called Customer1, the default URL that is created will be:
This WILL work but you will have to do this for every new customer and also remember to publish the correct URL.
However, there is a better way, being much more intelligent, amend the system VCD public URL under System | Administration | System Settings | Public Addresses
vCD Public URL
This will automatically add cloud into all organisation VCD public URLs.
Most administrative changes to vShield Manager can be done using the command line interface (CLI) by initiating a console session to the vShield Manager virtual machine. You can log in to the CLI by using the default user name admin and password default.
You can also access the CLI by enabling SSH.
To enable SSH:
Log in to the CLI by using the default user name and password
Enter configuration mode by typing
manager# en
manager# configure terminal
manager(config)# ssh start
manager(config)# cli ssh allow
To change the hostname of vShield Manager
vShield Manager uses manager as the default hostname but there is no easy way to change the hostname using the web interface or the vSphere plugin. You can only change vShield Manager’s hostname using the CLI.
Log in to the CLI by using the default user name and password
Enter configuration mode by typing
manager# en
manager# configure terminal
manager# hostname newhostname
vShield will then restart its web services and accept the changes
A VMware vCloud Director (vCD) cluster contains one or more vCD servers, these servers are referred to as “Cells” and form the basis of the VMware cloud. A cloud can be formed of multiple cells.
This diagram is a good representation of the vCD Cluster concept.
To enable multiple servers to participate in a cluster, the same pre-requisites exist for a single host as for multiple hosts but the following must be met:
each host must mount the shared transfer server storage at $VCLOUD_HOME/data/transfer, this is typically located in /opt/vmware/cloud-director/data/transfer.
This shared storage could be a NFS mount, mounted to all participating servers with rw access for root. It is important that prior to configuring the first server, a decision must be made on whether a cluster is required. If you intend to use a vCD Cluster, configure the shared transfer server storage before executing the vCD installer.
For this post, I’ve setup an NFS volume on Freenas and given rw permissions for all cluster members to the volume. It is assummed that you have a completely clean installation of RHEL 5 x64 (or if like me you are running this in a lab CENTOS 5 x64), with all the latest updates and pre-requisite packages.
Now to mount the volume on all hosts:
Connect to your first host using SSH or login directly
Edit your /etc/fstab file and add the following line remembering to change to your NFS server and relevant mount point
Now create the shared transfer server storage folder structure, /opt/vmware/cloud-director/data/transfer (just do a mkdir command)
run chkconfig netfs on
Repeat steps 1-6 for any other hosts
Restart servers
Now you are ready to install vCD onto the first host, making sure that you have met all the pre-requisites as detailed in the vCloud Director Installation and Configuration Guide. Once completed you should have a working cell with its shared transfer server storage folder located on the NFS volume.
Setting up a second cell as part of the Cloud Director Cluster
At this point you should already have a working cell with the vCD shared transfer server storage located on the NFS volume. Before you install vCD onto a server the following must be done:
All pre-requisites for a single server installation must also be met for subsequent servers as part of a vCD Cluster
The second server must also have rw access for root to the shared transfer server storage
The second server must have access to the response file, this file is located in /opt/vmware/cloud-director/etc/responses.properties on the first successfully installed server
Copy the above file to the second server or to the shared transfer server storage
It is important to note that the response file contains values that were used for the first server. Subsequent servers will use the response file, and as such if you stored your certificates.ks file for the first server in a location not recognised by subsequent servers, you will be prompted by the installation script to enter the correct path to the certificates.ks file for any subsequent servers. To avoid this, you could create all the certificates.ks files for all cluster members and place them in the shared transfer server storage, with of course unique names such as vcd-cell1-certificates.ks and vcd-cell2-certificates.ks.
You can now install vCD onto subsequent servers with the command vmware-cloud-director-1.0.0-285979.bin -r /opt/vmware/cloud-director/data/transfer/responses.properties
The installer will automatically complete most prompts for you, but you will still need to select the correct eth adapter for the http and consoleproxy services, everything else will be automatic.
Go ahead and have a play and maybe even deploy a load balancer on top.
Here’s a screenshot of my two cells working side by side connecting to the same shared transfer server storage, oracle database and managing the same vCenters.
For more information read the overview at Yellow Bricks which also includes links to the product pages.


")


