Running Cloud Director (formerly vCloud Director) over the Internet has its benefits however opens up the portal to security risks. To prevent this, we can use the native load balancing capabilities of NSX-T to serve only HTTP access to the URIs that are required and preventing access to unnecessary URIs from the rest of the Internet.
Running Cloud Director (formerly vCloud Director) over the Internet has its benefits however opens up the portal to security risks. To prevent this, we can use the native load balancing capabilities of NSX-T to serve only HTTP access to the URIs that are required and preventing access to unnecessary URIs from the rest of the Internet.
An example of this is to disallow the /provider and /cloudapi/1.0.0/sessions/provider URIs as these are provider side administrator only URIs that a service provider uses to manage the cloud and should not be accessible from the Internet.
The other article that I wrote previously describes the safe URIs and unsafe URIs that can be exposed over the Internet, you can find that article here. That article discuss doing the L7 HTTP policies using Avi. This article will go through how you can achieve the same with the built in NSX-T load balancer.
This article assumes that you already have the Load Balancer configured with the Cloud Director Virtual Servers, Server Pools and HTTPS Profiles and Monitors already set up. If you need a guide on how to do this, then please visit Tomas Fojta’s article here.
The L7 HTTP rules can be set up under Load Balancing | Virtual Servers. Edit the Virtual Server rule for the Cloud Director service and open up the Load Balancer Rules section.
Click on the Set link next to HTTP Access Phase. I’ve already set mine up so you can see that I already have two rules. You should also end up with two rules once this is complete.
Go ahead and add a new rule with the Add Rule button.
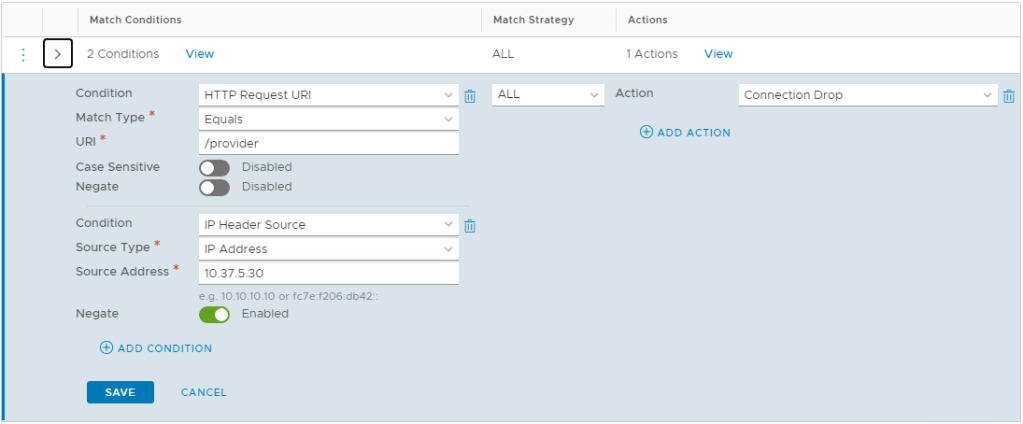
The first rule we want to set up is to prevent access from the Internet to the /provider URI but allow an IP address or group of IP addresses to access the service for provider side administration, such as a management bastion host.
Set up you rule as follows:
What we are doing here is creating a condition that when the /provider URI is requested, we drop all incoming connections unless the connection is initiated from the management jump box, this jump box has an IP address of 10.37.5.30. The Negate option is enabled to achieve this. Think of negate as the opposite of the rule, so negate does not drop connections to /provider when the source IP address is 10.37.5.30.
If negate is enabled, when Connection Drop is configured, all requests not matching the specified match condition are dropped. Requests matching the specified match condition are allowed.
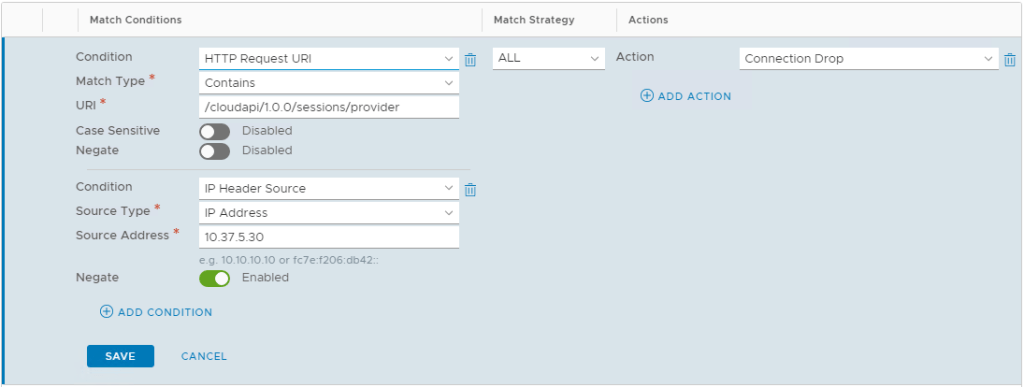
Save this rule and lets setup another one to prevent access to the admin API. Setup this second rule as follows:
This time use /cloudapi/1.0.0/sessions/provider as the URI. Again, use the Negate option for your management IP address. Save your second rule and Apply all the changes.
Now you should be able to access /tenant URIs over the Internet but not the /provider URI. However, accessing the /provider URI from 10.37.5.30 (or whatever your equivalent is) will work.
Doing this with the API
Do a PUT against /policy/api/v1/infra/lb-virtual-servers/vcloud with the following.
(Note that the Terraform provider for NSX-T doesn’t support HTTP Access yet. So to automate, use the NSX-T API directly instead.)
VMware vRealize Orchestrator workflows for VMware Cloud Director to automate the provisioning of cloud services.
Firstly, apologies to all those who asked for the workflow at VMworld 2019 in Barcelona and also e-mailed me for a copy. It’s been hectic in my professional and personal life. I also wanted to clean up the workflows and remove any customer specific items that are not relevant to this workflow. Sorry it took so long!
If you’d like to see an explanation video of the workflows in action, please take a look at the VMworld session recording.
Credits
These vRealize Orchestrator workflows were co-created and developed by Benoit Serratrice and Henri Timmerman.
Creates an organization based on your initial organisation name as an input.
Creates a vDC into this organization.
Adds a gateway to the vDC.
Adds an routed network with a gateway CIDR that you enter.
Adds a direct external network.
Converts the organization network to use distributed routing.
Adds a default outbound firewall rule for the routed network.
Adds a source NAT rule to allow the routed network to goto the external network.
Adds a catalog.
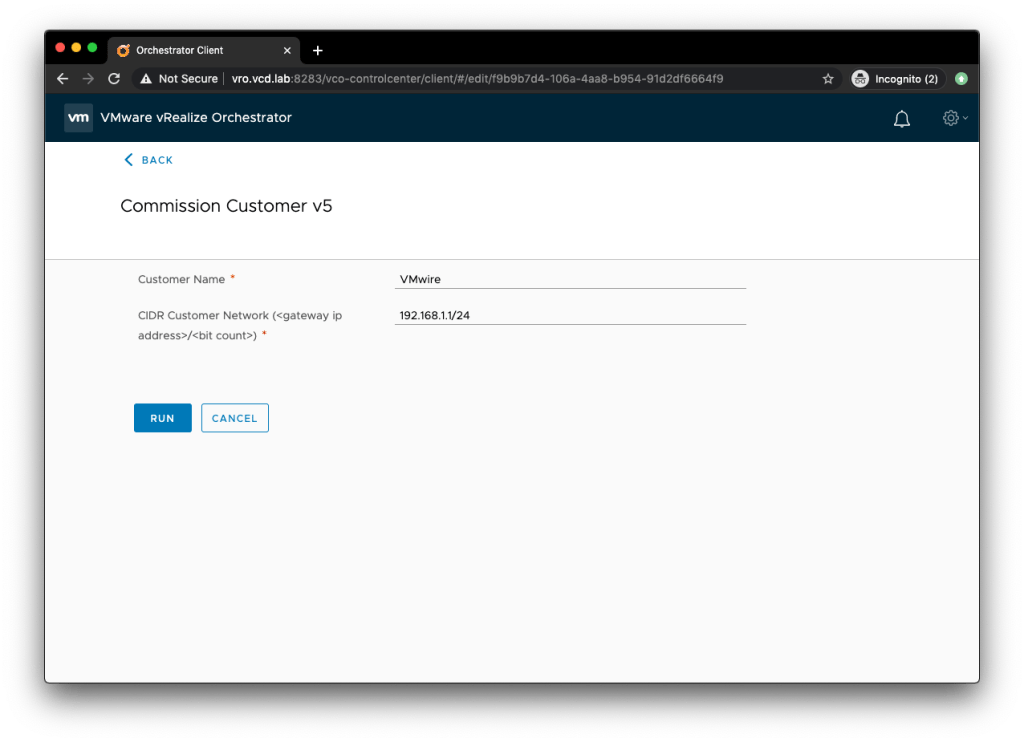
Commission Customer vRO Workflow
It also cleans up the provisioning if there is a failure. I have also included a Decommission Customer workflow separately to enable you to quickly delete vCD objects quickly and easily. It is designed for lab environments. Bear this in mind when using it.
Other caveats: the workflows contained in this package are unsupported. I’ll help in the comments below as much as I can.
Getting Started
Import the package after downloading it from github.
The first thing you need to do is setup the global settings in the Global, Commission, storageProfiles and the other configurations. You can find these under Assets > Configurations.
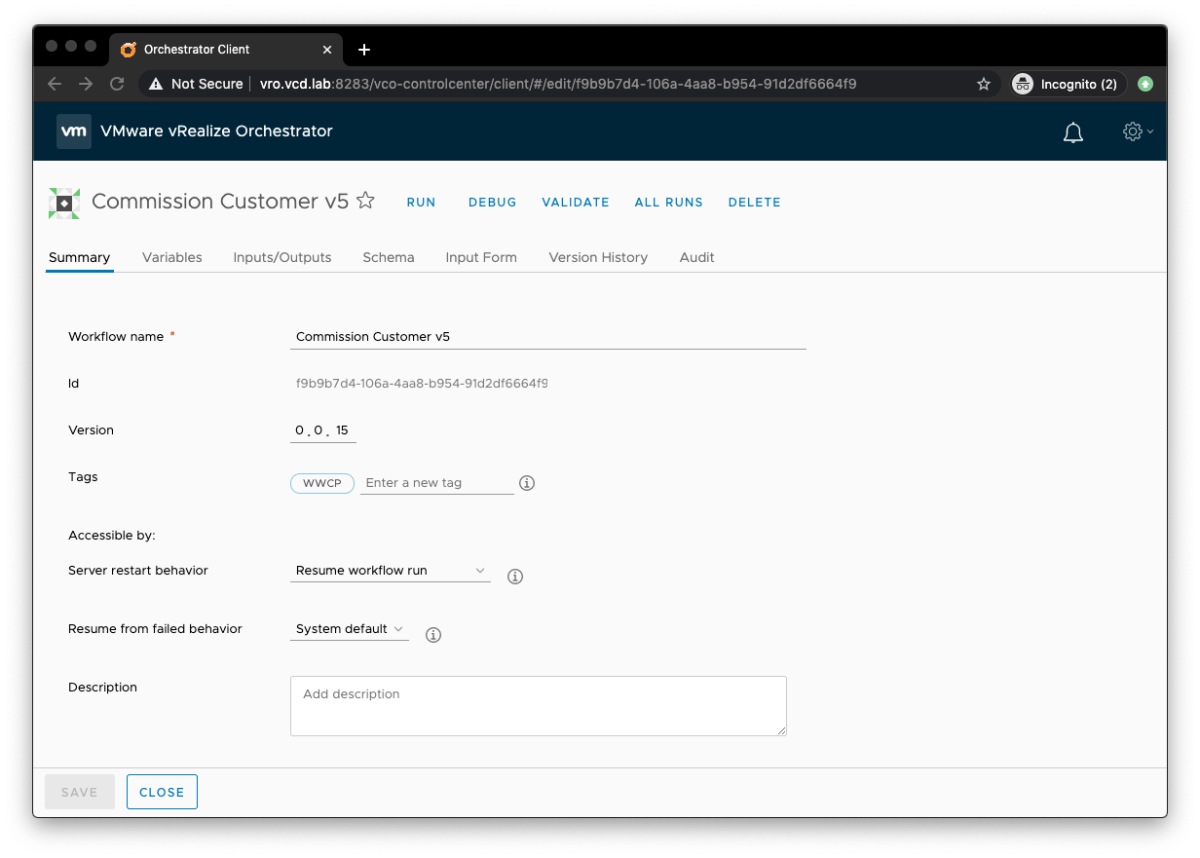
You should then see the Commission Customer v5 workflow under Workflows in your vRO client, it should look something like this.
Enter a customer name and enter the gateway IP in CIDR into the form.
Press Run, then sit back and enjoy the show.
Known Issues
Commissioning a customer when there are no existing edge gateways deployed that use an external network. You see the following error in the vRO logs:
item: 'Commission Customer v5/item12', state: 'failed', business state: 'null', exception: 'TypeError: Cannot read property "ipAddress" from null (Workflow:Commission Customer v5 / get next ip (item8)#5)'
This happens because no IP addresses are in use from the external network pool. The Commission Customer workflow calculates the next IP address to assign to the edge gateway, it cannot do this if the last IP in use is null. Manually provision something that uses one IP address from the external network IP pool. Then use the Commission Customer workflow, it should now work.
Commissioning a customer workflow completes successfully, however you see the following errors:
[2020-03-22 19:30:44.596] [I] orgNetworkId: 545b5ef4-ff89-415b-b8ef-bae3559a1ac7
[2020-03-22 19:30:44.662] [I] =================================================================== Converting Org network to a distributed interface...
[2020-03-22 19:30:44.667] [I] ** API endpoint: vcloud.vmwire.com/api/admin/network/545b5ef4-ff89-415b-b8ef-bae3559a1ac7/action/convertToDistributedInterface
[2020-03-22 19:30:44.678] [I] error caught!
[2020-03-22 19:30:44.679] [I] error details: InternalError: Cannot execute the request:  (Workflow:Convert net to distributed interface / Post to vCD (item4)#21)
[2020-03-22 19:30:44.680] [I] error details: Cannot execute the request:  (Workflow:Convert net to distributed interface / Post to vCD (item4)#21)
[2020-03-22 19:30:44.728] [I] Network converted succesfully.
The workflow attempts to convert the org network from an internal interface to a distributed interface but it does not work even thought the logs says it was successful. Let me know if you are able to fix this.
Rewatch my session with Onni Rautanen at VMworld EMEA 2019 where we cover the clouds that we are building together with Tieto.
Rewatch my session with Onni Rautanen at VMworld EMEA 2019 where we cover the clouds that we are building together with Tieto.
Description: In this session, you will get a technical deep dive into Tieto’s next generation service provider cloud hosting platform running on VMware vCloud Director Cloud POD architecture deployed on top of VMware Cloud Foundation. Administrators and cloud engineers will learn from Tieto cloud architects about their scalable design and implementation guidance for building a modern multi-tenant hosting platform for 10,000+ VMs. Other aspects of this session will discuss the API integration of ServiceNow into the VMware cloud stack, Backup and DR, etc.
You’ll need to create a free VMworld account to access this video and many other videos that are made available during and after the VMworld events.
This article covers protecting and load balancing the Cloud Director application with Avi Networks. It covers SSL termination. health monitoring and layer 7 HTTP filtering. It can also be used as a reference for other load balancer products such as F5 LTM or NGINX.
Overview
The Avi Vantage platform is built on software-defined principles, enabling a next generation architecture to deliver the flexibility and simplicity expected by IT and lines of business. The Avi Vantage architecture separates the data and control planes to deliver application services beyond load balancing, such as application analytics, predictive autoscaling, micro-segmentation, and self-service for app owners in both on-premises or cloud environments. The platform provides a centrally managed, dynamic pool of load balancing resources on commodity x86 servers, VMs or containers, to deliver granular services close to individual applications. This allows network services to scale near infinitely without the added complexity of managing hundreds of disparate appliances.
Controllers – these are the management appliances that are responsible for state data, Service Engines are deployed by the controllers. The controllers run in a management network.
Service Engines – the load balancing services run in here. These generally run in a DMZ network. Service Engines can have one or more network adaptors connected to multiple networks. At least one network with routing to the controllers, and the remaining networks as data networks.
Deployment modes
Avi can be installed in a variety of deployment types. For VMware Cloud on AWS, it is not currently possible to deploy using ‘write access’ as vCenter is locked-down in VMC and it also has a different API from vSphere 6.7 vCenter Server. You’ll also find that other tools may not work with vCenter in a VMware Cloud on AWS SDDC, such as govc.
Instead Avi needs to be deployed using ‘No Access’ mode.
You can refer to this link for instructions to deploy Avi Controllers in ‘No Access’ mode.
Since it is only possible to use ‘No Access’ mode with VMC based SDDCs, its also a requirement to deploy the service engines manually. To do this follow the guide in this link, and start at the section titled Downloading Avi Service Engine on OVA.
If you’re using Avi with on-premises deployments of vCenter, then ‘Write Mode’ can be used to automate the provisioning of service engines. Refer to this link for more information on the different modes.
Deploying Avi Controller with govc
You can deploy the Avi Controller onto non VMware Cloud on AWS vCenter servers using the govc tool. Refer to this other post on how to do so. I’ve copied the JSON for the controller.ova for your convenience below.
For a high-level architecture overview, this link provides a great starting point.
Figure 1. Avi architecture
Service Engine Typical Deployment Architecture
Generally in legacy deployments, where BGP is not used. The service engines would tend to have three network interfaces. These are typically used for frontend, backend and management networks. This is typical of traditional deployments with F5 LTM for example.
For our example here, I will use three networks for the SEs as laid out below.
Network name
Gateway CIDR
Purpose
sddc-cgw-vcd-dmz1
10.104.125.1/24
Management
sddc-cgw-vcd-dmz2
10.104.126.1/24
Backend
sddc-cgw-vcd-dmz3
10.104.127.1/24
Frontend
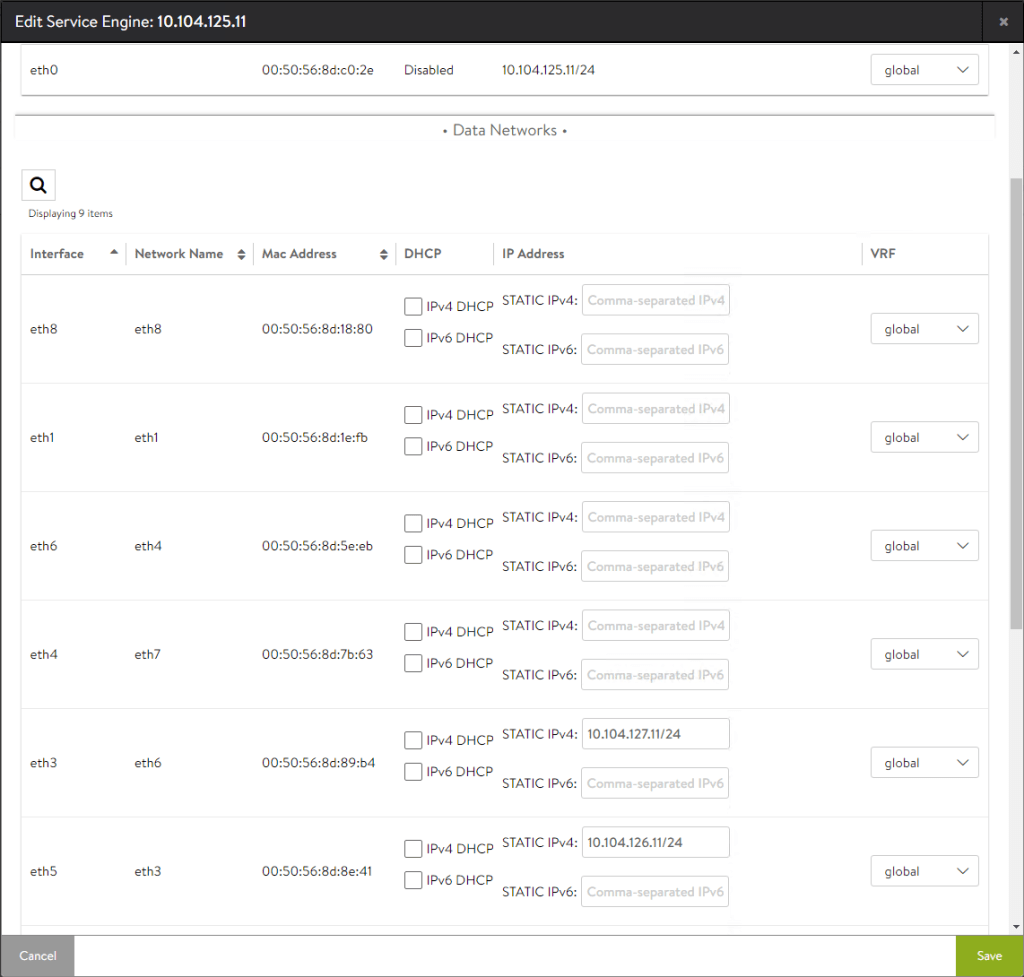
The service engines are configured with the following details. It is important to make a note of the MAC addresses in ‘No access’ mode as you will need this information later.
Service Engine
avi-se1
avi-se2
Management
IP Address 10.104.125.11 Mac Address 00:50:56:8d:c0:2e
IP Address 10.104.125.12 Mac Address 00:50:56:8d:38:33
Backend
IP Address 10.104.126.11 Mac Address 00:50:56:8d:8e:41
IP Address 10.104.126.12 Mac Address 00:50:56:8d:53:f6
Frontend
IP Address 10.104.127.11 Mac Address 00:50:56:8d:89:b4
IP Address 10.104.127.12 Mac Address 00:50:56:8d:80:41
The Management network is used for communications between the SEs and the Avi controllers. For the port requirements, please refer to this link.
The Backend network is used for communications between the SEs and the application that is being load balanced and protected by Avi.
The Frontend network is used for upstream communications to the clients, in this case the northbound router or firewall towards the Internet.
Sample Application
Lets use VMware Cloud Director as the sample application for configuring Avi. vCD as it is more commonly named (to be renamed VMware Cloud Director), is a cloud platform which is deployed with an Internet facing portal. Due to this, it is always best to protect the portal from malicious attacks by employing a number of methods.
Some of these include, SSL termination and web application filtering. The following two documents explain this in more detail.
You’ll notice that the eth0 and eth1 interfaces are connected to two different management networks 10.104.123.0/24 and 10.104.124.0/24 respectively. For vCD, it is generally good practice to separate the two interfaces into separate networks.
Network name
Gateway CIDR
Purpose
sddc-cgw-vcd-mgmt-1
10.104.123.1/24
vCD Frontend UI/API/VM Remote Console
sddc-cgw-vcd-mgmt-2
10.104.124.1/24
vCD Backend PostgreSQL, SSH etc.
For simplicity, I also deployed my Avi controllers onto the sddc-cgw-vcd-mgmt-2 network.
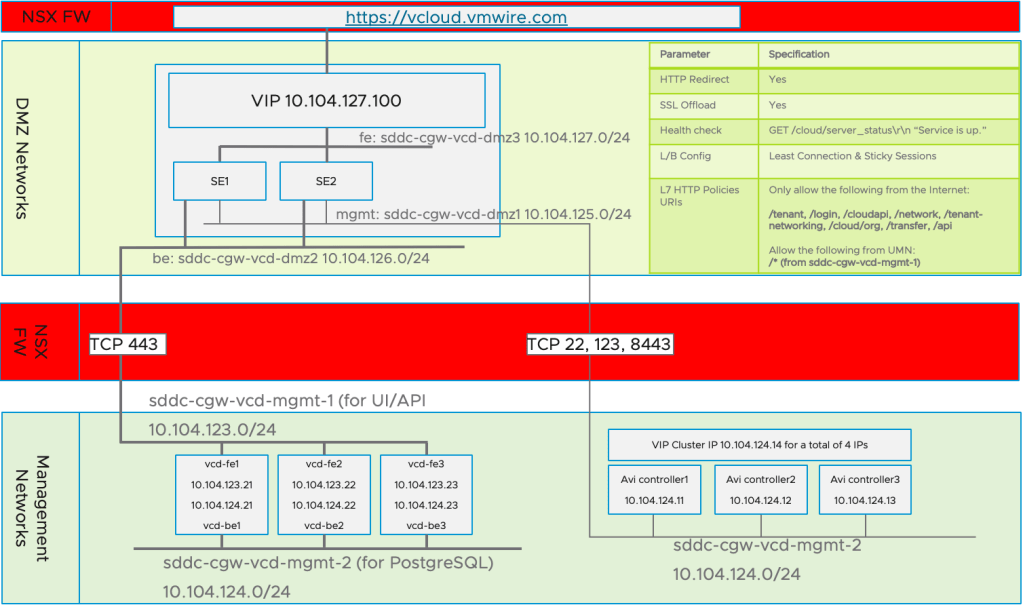
The diagram below summarises the above architecture for the HTTP interface for vCD. For this guide, I’ve used VMware Cloud on AWS together with Avi Networks to protect vCD running as an appliance inside the SDDC. This is not a typical deployment model as Cloud Director Service will be able to use VMware Cloud on AWS SDDC resource soon, but I wanted to showcase the possibilities and constraints when using Avi with VMC based SDDCs.
Figure 2 . vCD HTTP Diagram
Configuring Avi for Cloud Director
After you have deployed the Avi Controllers and the Service Engines, there are few more steps needed before vCD is fully up and operational. The proceeding steps can be summarised as follows:
Setup networking for the service engines by assigning the right IP address to the correct MAC addresses for the data networks
Configure the network subnets for the service engines
Configure static routes for the service engines to reach vCD
Setup Legacy HA mode for the service engine group
Setup the SSL certificate for the HTTP service
Setup the Virtual Services for HTTP and Remote Console (VMRC)
Setup the server pools
Setup health monitors
Setup HTTP security policies
Map Service Engine interfaces
Using the Avi Vantage Controller, navigate to Infrastructure > Service Engine, select one of the Service Engines then click on the little pencil icon. Then map the MAC addresses to the correct IP addresses.
Configure the network subnets for the service engines
Navigate to Infrastructure > Networks and create the subnets.
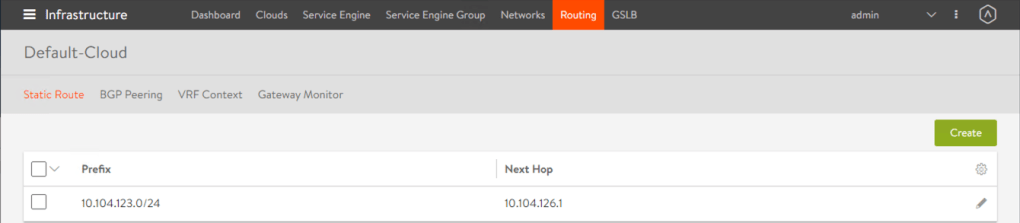
Configure static routes
Navigate to Infrastructure > Routing and setup any static routes. You’ll notice from figure 2 that since the service engine has three network interfaces on different networks, we need to create a static route on the interface that does not have the default gateway. This is so the service engines knows which gateway to use to route traffic for particular traffic types. In this case, the gateway for the service engine to route the HTTP and Remote Console traffic southbound to the vCD cells.
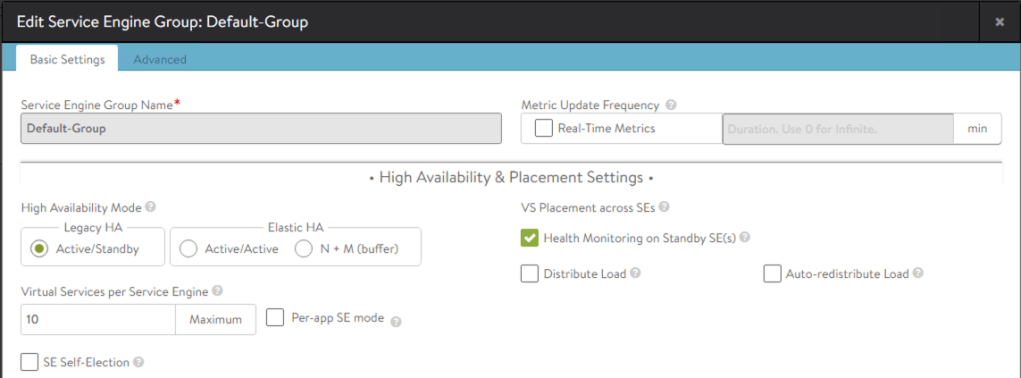
Setup Legacy HA mode for the service engine group
Navigate to Infrastructure > Service Engine Group.
Setup the HA mode to Legacy HA. This is the simplest configuration, you can use Elastic HA if you wish.
Configure the HTTP and Remote Console Virtual Services
Navigate to Applications > Virtual Services.
Creating a Virtual Service, has a few sub tasks which include the creation of the downstream server pools and SSL certificates.
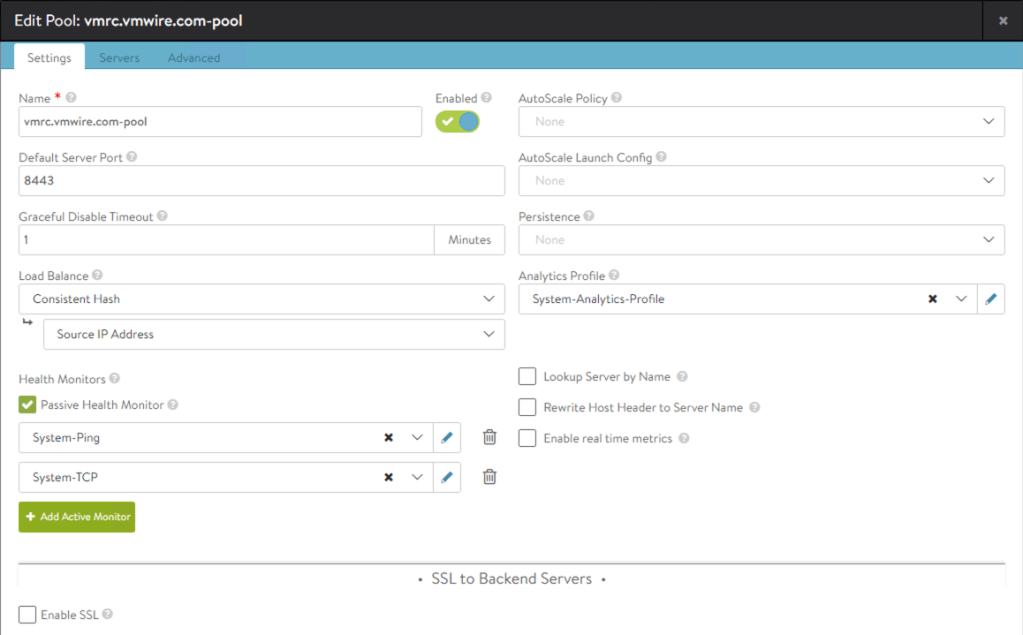
Create a new Virtual Service for the HTTP service, this is for the Cloud Director UI and API. Please use this example to create another Virtual Service for the Remote Console.
For the Remote Console service, you will need to accept TCP 443 on the load balancer but connect southbound to the Cloud Director appliances on port TCP 8443. TCP 8443 is the port that VMRC uses as it shares the same IP addresses as the HTTP service.
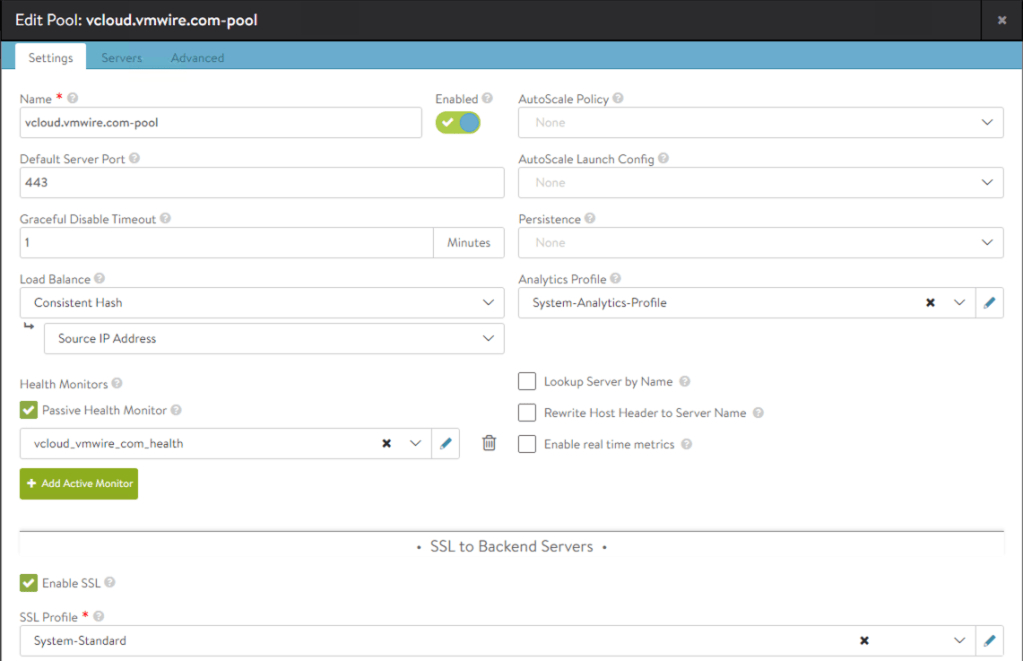
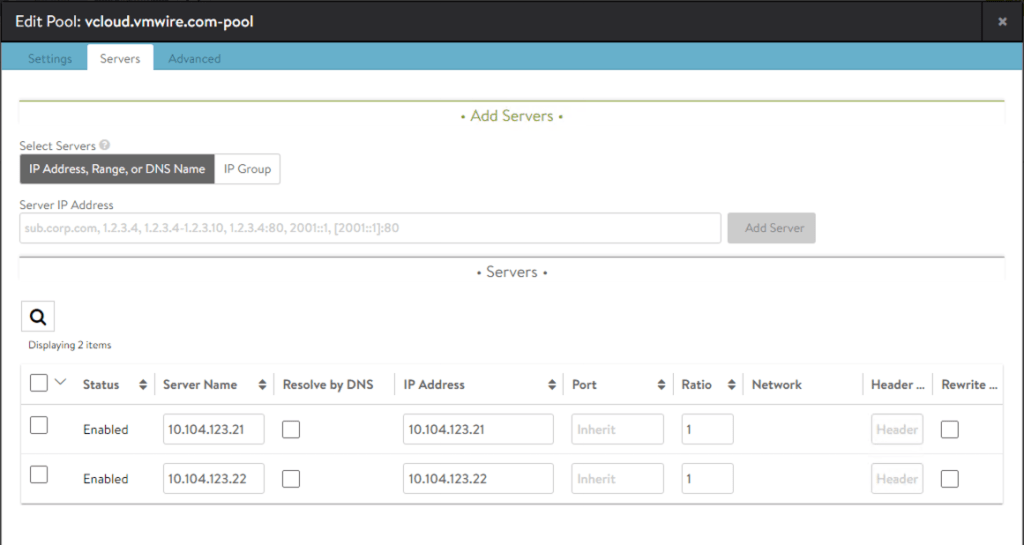
You may notice that the screenshot is for an already configured Virtual Service for the vCD HTTP service. The server pool and SSL certificate is already configured. Below are the screenshots for those.
Certificate Management
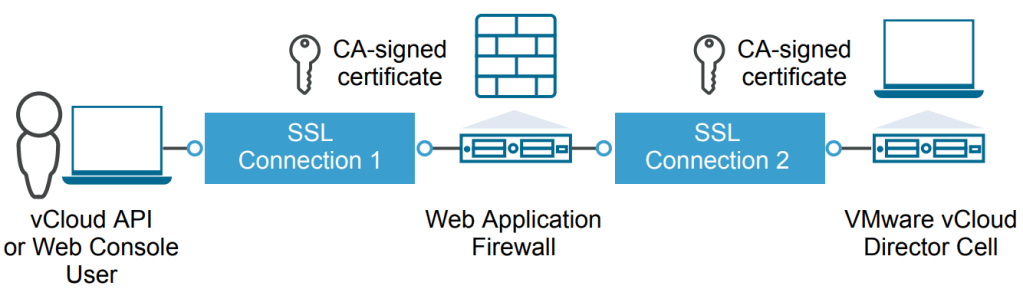
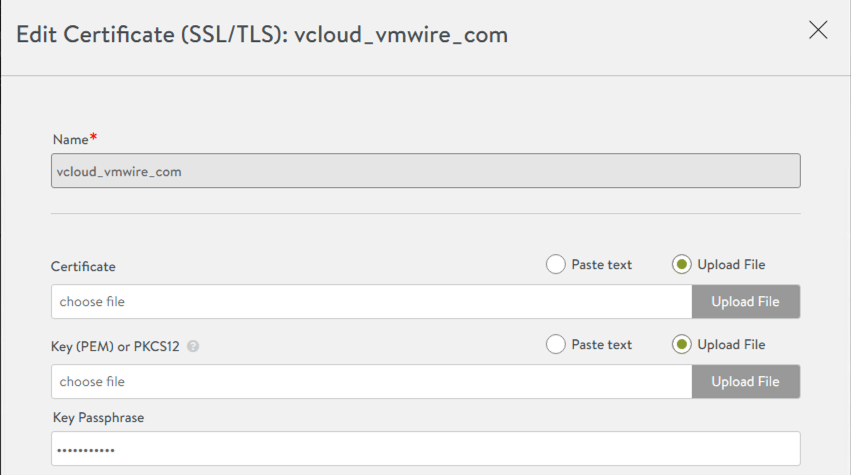
You may already have a signed HTTP certificate that you wish to use with the load balancer for SSL termination. To do so, you will need to use the JAVA keytool to manipulate the HTTP certificate, obtaining the private key and convert from JCEKS to PCKS12. JAVA keytool is available in the vCD appliance at /opt/vmware/vcloud-director/jre/bin/.
Figure 3. SSL termination on load balancer
For detailed instructions on creating a signed certificate for vCD, please follow this guide.
Convert the keystore file certificates.ks file from JCEKS to PKCS12
Now that you have the private key for the HTTP certificate, you can go ahead and configure the HTTP certificate on the load balancer.
For the certificate file, you can either paste the text or upload the certificate file (.cer, .crt) from the certificate authority for the HTTP certificate.
For the Key (PEM) or PKCS12 file, you can use the httpcert.p12 file that you extracted from the certificates_pkcs12.ks file above.
The Key Passphrase is the password that you used to secure the httpcert.p12 file earlier.
Note that the vCD Remote Console (VMRC) must use pass-through for SSL termination, e.g., termination of the VMRC session must happen on the Cloud Director cell. Therefore, the above certificate management activities on Avi are not required for the VMRC.
Health Monitors
Navigate to Applications > Pools.
Edit the HTTP pool using the pencil icon and click on the Add Active Monitor green button.
Health monitoring of the HTTP service uses
GET /cloud/server_status HTTP/1.0
With an expected server response of
Service is up.
And a response code of 200.
The vCD Remote Console Health monitor is a lot simpler as you can see below.
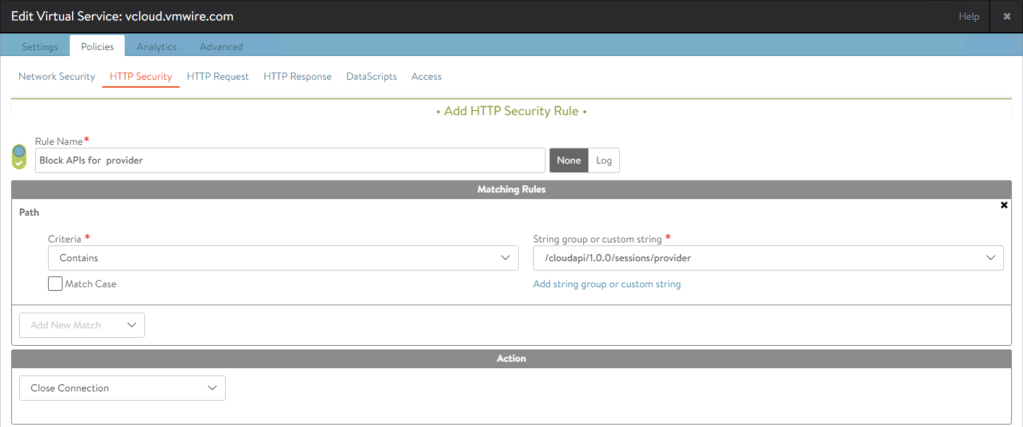
Layer 7 HTTP Security
Layer 7 HTTP Security is very important and is highly recommended for any application exposed to the Internet. Layer 3 fire-walling and SSL certificates is always never enough in protecting and securing applications.
Navigate to Applications > Virtual Services.
Click on the pencil icon for the HTTP virtual service and then click on the Policies tab. Then click on the HTTP Security policy. Add a new policy with the following settings. You can read more about Layer 7 HTTP policies here.
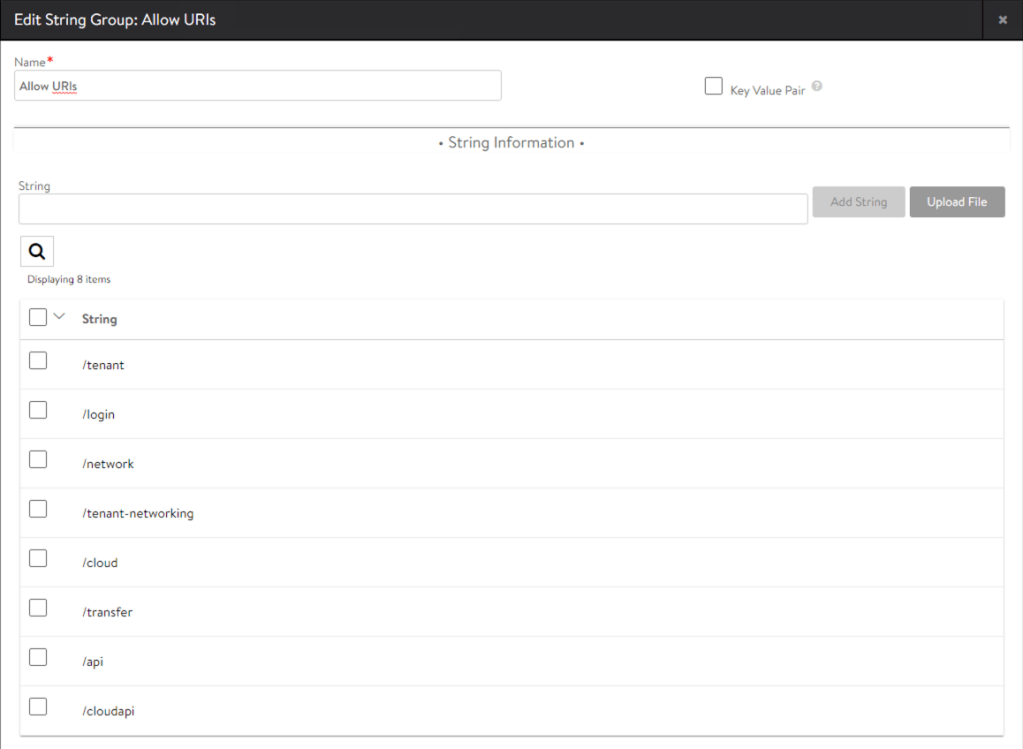
Allowed Strings
Required by
/tenant
Tenant use
/login
Login
/network
Access to networking
/tenant-networking
Access to networking
/cloud
For SAML/SSO logins
/transfer
Uploads/Downloads of ISO and templates
/api
General API access
/cloudapi
General API access
/docs
Swagger API browser
Blocked Strings
/cloudapi/1.0.0/sessions/provider
Specifically block admin APIs from the Internet
This will drop all provider side services when accessed from the Internet. To access provider side services, such as /provider or admin APIs, use an internal connection to the Cloud Director cells.
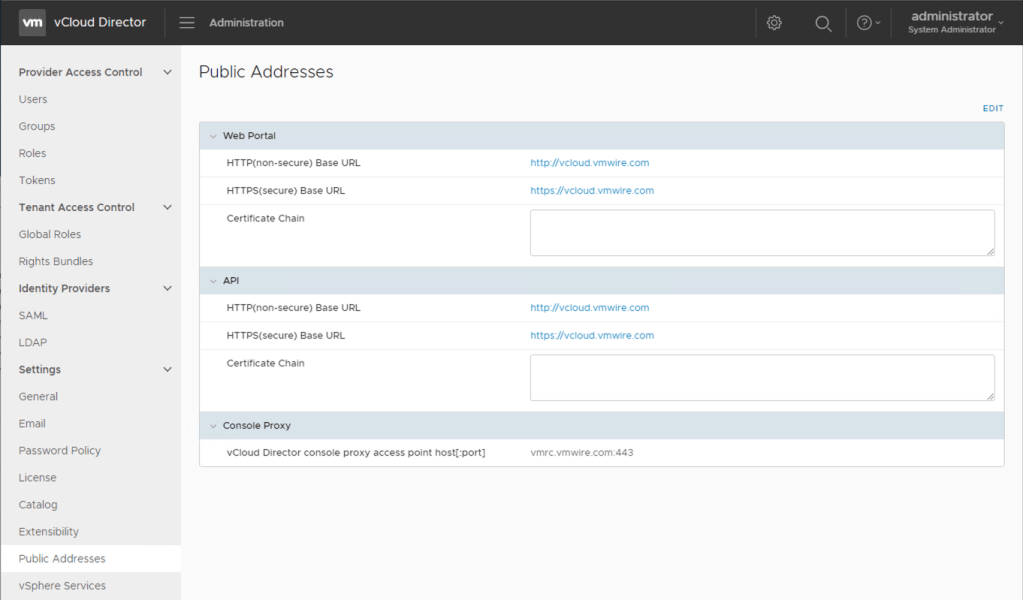
Change Cloud Director public addresses
If not already done so, you should also change the public address settings in Cloud Director.