Configuring vCenter Server Virtual Appliance to use an Oracle database

In previous posts I blogged about what the vCenter Server Virtual Appliance (vCSA) is, its features and benefits, feature parity with the Windows vCenter Server and also how to quickly deploy the vCSA. For more information about the vCSA, please see the resources listed here https://vmwire.com/vmware-vcenter-server-virtual-appliance-vcsa/.

This post extends the series with how to configure an external Oracle database for use by the vCSA.

Why use an Oracle database?

The vCSA comes preinstalled with an embedded DB2 database which has similar use cases as the Windows vCenter Server when configured with SQL Express – intended for small deployments of 5 ESX/ESXi servers or less. The ability for the vCSA to utilise an external Oracle database allows customers to scale and manage larger vSphere infrastructures equivalent to environments with Windows vCenter Servers backed by SQL or Oracle databases.

This post shows how quickly and easily it is to use an external Oracle database instead of the embedded DB2 database. Hopefully you’ll see the benefits of how much quicker it is to configure the Oracle connectivity between the vCSA and the Oracle server vs installing the Oracle 64-bit Client onto a Window Server and configuring tnsnames.ora, followed by configuration of ODBC settings.

Configure an Oracle Database and User

  1. Log into SQL*Plus session with the system account. I’m using Oracle 11g R2 x64 on Windows Server 2008.
    C:`>sqlplus sys/<password> as SYSDBA
  2. Run the following SQL commands to create a vCenter Server database. Note that your directory structure may be different.

    CREATE SMALLFILE TABLESPACE “VPX” DATAFILE ‘e:/app/oracle/oradata/orcl/vpx01.dbf’ SIZE 1G AUTOEXTEND ON NEXT 10M MAXSIZE UNLIMITED LOGGING EXTENT MANAGEMENT LOCAL SEGMENT SPACE MANAGEMENT AUTO;

  3. Run the following SQL command to create a vCenter Server database user with the correct permissions. I will create a new user named “VPXADMIN” with a password of “oracle”.
    CREATE USER "VPXADMIN" PROFILE "DEFAULT" IDENTIFIED BY "oracle" DEFAULT TABLESPACE "VPX" ACCOUNT UNLOCK;
    grant connect to VPXADMIN;
    grant resource to VPXADMIN;
    grant create view to VPXADMIN;
    grant create sequence to VPXADMIN; 
    grant create table to VPXADMIN; 
    grant create materialized view to VPXADMIN;
    grant execute on dbms_lock to VPXADMIN;
    grant execute on dbms_job to VPXADMIN;
    grant select on dba_tablespaces to VPXADMIN;
    grant select on dba_temp_files to VPXADMIN;
    grant select on dba_data_files to VPXADMIN;
    grant unlimited tablespace to VPXADMIN;

Configure the vCSA

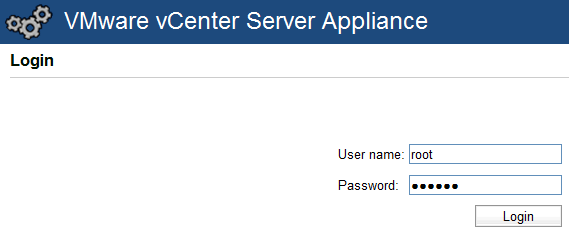
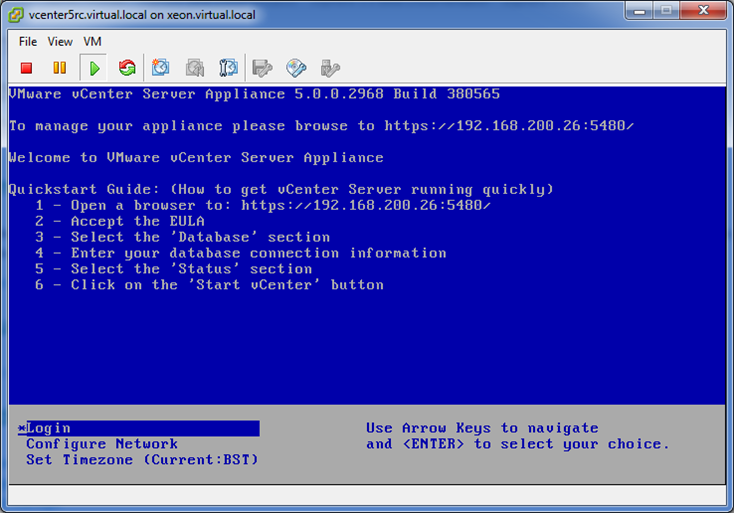
  1. Log into the vCSA VMware Studio management interface at https://<vcsa>:5480/
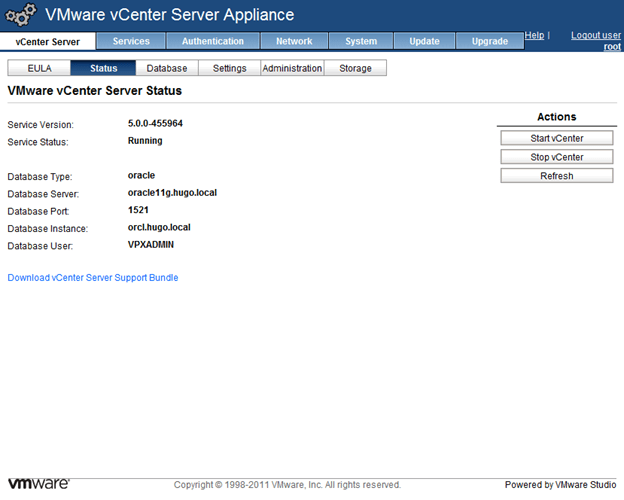
  2. Navigate to the vCenter Server tab, then click on Database.
  3. Select oracle as the Database Type using the drop-down menu and enter your environment information into the fields and then click on Save Settings. Note how easy that was, no messing about with installing the Oracle Client, no need to configure tnsnames.ora and no need for any ODBC configuration either.

  4. Wait for around 5 minutes for the vCSA to create the database schema.
  5. Now it’s safe to start the vCenter services, navigate to the Status tab and click on Start vCenter.

  6. You can then start using vCenter when the Service Status reports as Running.

Cleaning up the Oracle configuration

After you’ve tested that everything is working, you can revoke the following privileges using SQL*Plus again.

revoke select on dba_tablespaces from VPXADMIN;
revoke select on dba_temp_files from VPXADMIN;
revoke select on dba_data_files from VPXADMIN;

Total configuration time ~approx 10 minutes.

References

vSphere Installation and Setup Guide

Advertisement

vSphere 5 vCenter Server Virtual Appliance Quick-Start Guide

The vCenter Server Linux Virtual Appliance (vCSA) is a preconfigured Linux-based virtual machine that is optimized for running vCenter Server and associated services.

This article provides a step-by-step guide on how to deploy the vCSA, configure networking, authentication, database and vCenter services.  For further information regarding the vCSA please refer to this post and this post.  To use an external Oracle database instead of the embedded DB2 database, please see this post.

For more information about the vCSA, please see the resources listed here https://vmwire.com/vmware-vcenter-server-virtual-appliance-vcsa/.

Note: This article was written using the release candidate version of the software so your experience with the GA version may differ slightly.

The following table lists the required files that you will need, gather these files before proceeding.

Description Filename Location Size (KB)
vCenter Appliance .cert file VMware-vCenter-Server-Appliance-5.0.0.2968-380565_OVF10.cert 2
vCenter Appliance .mf file VMware-vCenter-Server-Appliance-5.0.0.2968-380565_OVF10.mf 1
vCenter Appliance .ovf file that is used to import the appliance onto a vSphere server VMware-vCenter-Server-Appliance-5.0.0.2968-380565_OVF10.ovf 9
vCenter Appliance data disk VMware-vCenter-Server-Appliance-5.0.0.2968-380565-data 43,365
vCenter Appliance system disk VMware-vCenter-Server-Appliance-5.0.0.2968-380565-system 4,029,063
vSphere 5 Client VMware-viclient-en-5.0.0-380461 310,475

Watch the 10-minute video (Optimised for iPad)

Deploy the vCenter Server Linux Virtual Appliance

  1. Launch your vSphere Client and navigate to File | Deploy OVF Template.
  2. Browse to the location of the vCenter Appliance .ovf file, then click on Open.
  3. On the following screen click on Next.
  4. Then click on Next again on the OVF Template Details page.
  5. Under Name and Location, give your vCenter Appliance a name then click Next.
  6. Choose a datastore then click Next.
  7. Select a disk format on the next page then click on Next to continue.
  8. Click on Finish to start deploying.

Configuring the vCenter Server Linux Virtual Appliance

  1. Boot the appliance.
  2. Open a vSphere Client console session to the virtual appliance and configure the network and timezone.
  3. Now open up a browser and type https://<ip_of_appliance&gt;:5480 to continue the configuration.
  4. Accept the certificate error to continue.
  5. Login as root, the default password is vmware.

  1. Now read through every single word of the EULA and click on Accept EULA to continue. Please be patient whilst the vCenter is configured. If you look at the appliance remote console you’ll see the services being configured and started.

  1. You can start using the web interface again once the console screen returns to default.

  1. Next click on Status, and view the current status of the vCenter Server. The service should be on a Stopped state and the Database Type should show not configured.
  2. Click on the tab, you will notice that there are no DNS Servers configured and the appliance’s hostname is the standard localhost.localdom, lets change this.
  3. Click on and change to your relevant values and click on to complete the network configuration.
  4. Now setup authentication by clicking on and then on either NIS or Active Directory. My lab environment uses AD.
  5. Click on the tick box and then fill in your domain details and then click on Save Settings. You should receive an Operation is successful message to confirm that the authentication settings has worked.
  6. We now need to configure a database for vCenter to use, for this article, let’s use the embedded DB2 database. Click on to continue.
  7. When using the embedded database, there is no need to enter any details, just click on . This will take a while to complete, once done click on . After some time the database will complete configuration.
  8. Now reboot the virtual appliance one last time. To reboot click on and then click on . Click Reboot again to confirm.
  9. This time the vCenter Appliance will successfully start the vpxd daemon and initialize the database, eventually vCenter 5.0 will be ready for you to use.

Connecting to vCenter 5.0 for the first time

With all VMware vSphere Clients, when you start the vSphere Client and connect to either a vCenter Server or an ESX/ESXi host, it will check whether the vSphere Client is compatible. This is still the case with vSphere 5.0 and you will need to update your vSphere Client if you haven’t already done so. You can update by connecting to vCenter Server or ESX/ESXi or you can download the vSphere Client executable from the VMware Downloads website.

  1. Launch the vSphere Client and connect to your newly configured vCenter Server.
  2. You must use root | vmware to login, domain credentials will not work until the permissions are added to vCenter.

  1. Update the vSphere Client as necessary.
  2. Add an AD group into vCenter permissions and set the role as Administrator. [See video].
  3. Now you will be able to log in with domain credentials.
  4. You will need to enter your username in DOMAIN\Username or username@DOMAIN format.

It is also possible to just use the vSphere Web Client by opening up a browser session to https://&lt;ip_of_vCSA>:9443/vsphere-client/