Introduction to Avi Ingress and Replacing Contour for Prometheus and Grafana

Avi Ingress is an alternative to Contour and NGINX ingress controllers.

Tanzu Kubernetes Grid ships with Contour as the default Ingress controller that Tanzu Packages uses to expose Prometheus and Contour. Prometheus and Grafana are configured to use Contour if you set ingress: true in the values.yaml files.

This post details how to set Avi Ingress up and use it to expose these applications using signed TLS certificates.

Let’s start

Install AKO with helm as normal, use ClusterIP in the Avi values.yaml config file.

Reference link to documentation:

https://avinetworks.com/docs/ako/1.9/networking-v1-ingress/

Create secret for ingress certificate, using a wildcard certificate will enable Avi to automatically secure all applications with the TLS certificate.

tls.key and tls.crt in base64 encoded format.

router-certs-default.yaml

apiVersion: v1
kind: Secret
metadata:
  name: router-certs-default
  namespace: avi-system
type: kubernetes.io/tls
data:
  tls.key: --snipped--
  tls.crt: LS0tLS1CRUdJTiBDRVJUSUZJQ0FURS0tLS0tCk1JSUVjVENDQTFtZ0F3SUJBZ0lTQTI0MDJNMStJN01kaTIwRWZlK2hlQitQTUEwR0NTcUdTSWIzRFFFQkN3VUEKTURJeEN6QUpCZ05WQkFZVEFsVlRNUll3RkFZRFZRUUtFdzFNWlhRbmN5QkZibU55ZVhCME1Rc3dDUVlEVlFRRApFd0pTTXpBZUZ3MHlNekF6TWpReE1qSTBNakphRncweU16QTJNakl4TWpJME1qRmFNQ1V4SXpBaEJnTlZCQU1NCkdpb3VkR3RuTFhkdmNtdHNiMkZrTVM1MmJYZHBjbVV1WTI5dE1Ga3dFd1lIS29aSXpqMENBUVlJS29aSXpqMEQKQVFjRFFnQUVmcEs2MUQ5bFkyQUZzdkdwZkhwRlNEYVl1alF0Nk05Z21yYUhrMG5ySHJhTUkrSEs2QXhtMWJyRwpWMHNrd2xDWEtrWlNCbzRUZmFlTDF6bjI1N0M1QktPQ0FsY3dnZ0pUTUE0R0ExVWREd0VCL3dRRUF3SUhnREFkCkJnTlZIU1VFRmpBVUJnZ3JCZ0VGQlFjREFRWUlLd1lCQlFVSEF3SXdEQVlEVlIwVEFRSC9CQUl3QURBZEJnTlYKSFE0RUZnUVVxVjMydlU4Yzl5RFRpY3NVQmJCMFE0MFNsZFl3SHdZRFZSMGpCQmd3Rm9BVUZDNnpGN2RZVnN1dQpVQWxBNWgrdm5Zc1V3c1l3VlFZSUt3WUJCUVVIQVFFRVNUQkhNQ0VHQ0NzR0FRVUZCekFCaGhWb2RIUndPaTh2CmNqTXVieTVzWlc1amNpNXZjbWN3SWdZSUt3WUJCUVVITUFLR0ZtaDBkSEE2THk5eU15NXBMbXhsYm1OeUxtOXkKWnk4d0pRWURWUjBSQkI0d0hJSWFLaTUwYTJjdGQyOXlhMnh2WVdReExuWnRkMmx5WlM1amIyMHdUQVlEVlIwZwpCRVV3UXpBSUJnWm5nUXdCQWdFd053WUxLd1lCQkFHQzN4TUJBUUV3S0RBbUJnZ3JCZ0VGQlFjQ0FSWWFhSFIwCmNEb3ZMMk53Y3k1c1pYUnpaVzVqY25sd2RDNXZjbWN3Z2dFR0Jnb3JCZ0VFQWRaNUFnUUNCSUgzQklIMEFQSUEKZHdCNk1veFUyTGN0dGlEcU9PQlNIdW1FRm5BeUU0Vk5POUlyd1RwWG8xTHJVZ0FBQVljVHlxNTJBQUFFQXdCSQpNRVlDSVFEekZNSklaT3NKMG9GQTV2UVVmNUpZQUlaa3dBMnkxNE92K3ljcTU0ZDZmZ0loQUxOcmNnM0lrNllsCkxlMW1ROHFVZmttNWsxRTZBSDU4OFJhYWZkZlhONTJCQUhjQTZEN1EyajcxQmpVeTUxY292SWxyeVFQVHk5RVIKYSt6cmFlRjNmVzBHdlc0QUFBR0hFOHF1VlFBQUJBTUFTREJHQWlFQW9Wc3ZxbzhaR2o0cmszd1hmL0xlSkNCbApNQkg2UFpBb2UyMVVkbko5aThvQ0lRRGoyS1Q1eWlUOGtRdjFyemxXUWgveHV6VlRpUGtkdlBHL3Zxd3J0SWhjCjJEQU5CZ2txaGtpRzl3MEJBUXNGQUFPQ0FRRUFFczlKSTFwZ3R6T2JyRmd0Vnpsc1FuZC8xMi9QYWQ5WXI2WVMKVE5XM3F1bElhaEZ4UDdVcVRIT0xVSGw0cGdpTThxZ2ZlcmhyTHZXbk1wOUlxQ3JVVElTSnFRblh5bnkyOHA2Zwoyc2NqS2xFSWt2RURvcExoek0ydGpCenc4a1dUYUdYUE8yM0dhcHBHWW14OS9Ma2NkUDVSS0xKMmlRTEJXZlhTCmNQRlNmZWsySEc3dEw1N0s0Uit4eDB4MTdsZ2RLeFdOL1JYQ2RvcHFPY3RyTCtPL0lwWVVWZXNiVzNJbkpFZDkKdjZmS1RmVE84K3JVVnlkajVmUGdFUWJva2Q2L3BDTGdIYS81UVpQMjZ1ZytRa1llUEJvUWRrTkpGOTk4a2NHWQpBZGc0THpJZjdYdU9SNDB4eU90aHIyN1p4Y1FXZnhMM2M4bGJuUlJrMXZNL3pMMDhIdz09Ci0tLS0tRU5EIENFUlRJRklDQVRFLS0tLS0=

k apply -f router-certs-default.yaml

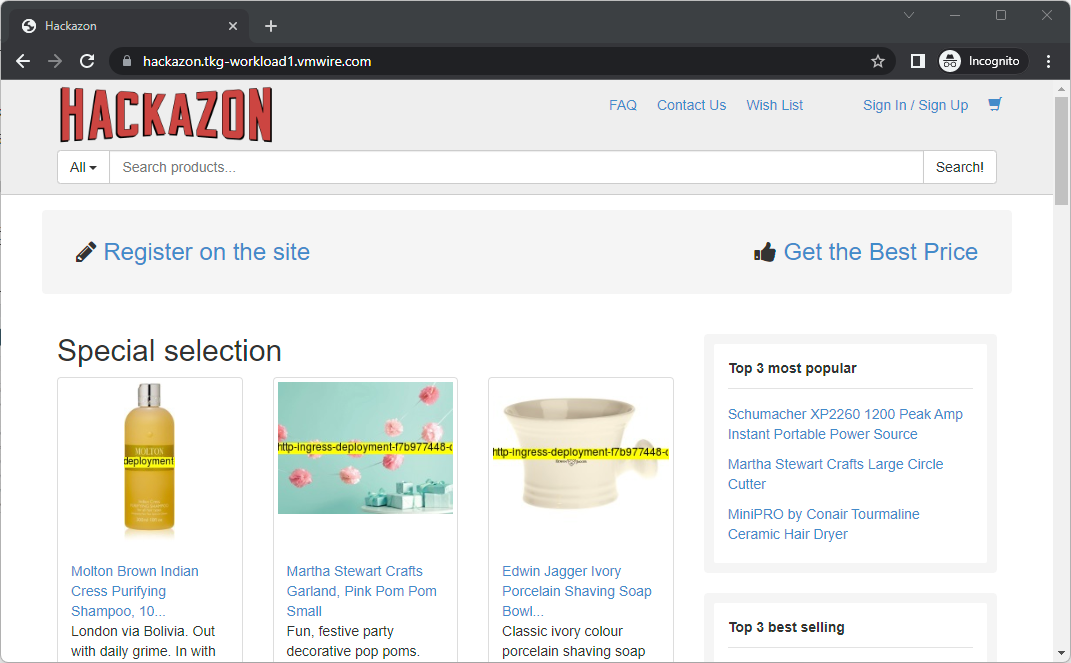
Here is the example online store website deployment using ingress with the certificate. Lets play with this before we get around to exposing Prometheus and Grafana.

sample-ingress.yaml

---
kind: Deployment
apiVersion: apps/v1
metadata:
  name: http-ingress-deployment
  labels:
    app: http-ingress
spec:
  replicas: 1
  selector:
    matchLabels:
      app: http-ingress
  template:
    metadata:
      labels:
        app: http-ingress
    spec:
      containers:
        - name: http-ingress
          image: ianwijaya/hackazon
          ports:
            - name: http
              containerPort: 80
              protocol: TCP
      imagePullSecrets:
      - name: regcred
---
kind: Service
apiVersion: v1
metadata:
  name: ingress-svc
  labels:
    svc: ingress-svc
spec:
  ports:
    - name: http
      port: 80
      targetPort: 80
  selector:
    app: http-ingress
  type: ClusterIP

avisvcingress.yaml

---
apiVersion: networking.k8s.io/v1
kind: Ingress
metadata:
  name: avisvcingress
  annotations:
    ako.vmware.com/enable-tls: "true"
  labels:
    app: avisvcingress
spec:
  ingressClassName: avi-lb
  rules:
    - host: "hackazon.tkg-workload1.vmwire.com"
      http:
        paths:
          - pathType: Prefix
            path: /
            backend:
              service:
                name: ingress-svc
                port:
                  number: 80

Note that the Service uses ClusterIP and the Ingress is annotated with ako.vmware.com/enable-tls: "true" to use the default tls specified in router-certs-default.yaml. Also add the ingressClassName into the Ingress manifest.

k apply -f sample-ingress.yaml

k apply -f avisvcingress.yaml

k get ingress avisvcingress

NAME CLASS HOSTS ADDRESS PORTS AGE
avisvcingress avi-lb hackazone.tkg-workload1.vmwire.com 172.16.4.69 80 13m

Let’s add another host

Append another host to the avisvcingress.yaml file.

---
apiVersion: networking.k8s.io/v1
kind: Ingress
metadata:
  name: avisvcingress
  annotations:
    ako.vmware.com/enable-tls: "true"
  labels:
    app: avisvcingress
spec:
  ingressClassName: avi-lb
  rules:
    - host: "hackazon.tkg-workload1.vmwire.com"
      http:
        paths:
          - pathType: Prefix
            path: /
            backend:
              service:
                name: ingress-svc
                port:
                  number: 80
    - host: "nginx.tkg-workload1.vmwire.com"
      http:
        paths:
          - pathType: Prefix
            path: /
            backend:
              service:
                name: nginx-service
                port:
                  number: 80

k replace -f avisvcingress.yaml

And use the trusty statefulset file to create an nginx webpage. statefulset-topology-aware.yaml

---
apiVersion: v1
kind: Service
metadata:
  name: nginx-service
  namespace: default
  labels:
spec:
  selector:
    app: nginx
  ports:
    - port: 80
      targetPort: 80
      protocol: TCP
  type: ClusterIP
---
apiVersion: apps/v1
kind: StatefulSet
metadata:
  name: web
spec:
  replicas: 3
  selector:
    matchLabels:
      app: nginx
  serviceName: nginx-service
  template:
    metadata:
      labels:
        app: nginx
    spec:
      affinity:
        nodeAffinity:
          requiredDuringSchedulingIgnoredDuringExecution:
            nodeSelectorTerms:
            - matchExpressions:
              - key: failure-domain.beta.kubernetes.io/zone
                operator: In
                values:
                - az-1
                - az-2
                - az-3
        podAntiAffinity:
          requiredDuringSchedulingIgnoredDuringExecution:
          - labelSelector:
              matchExpressions:
              - key: app
                operator: In
                values:
                - nginx
            topologyKey: failure-domain.beta.kubernetes.io/zone
      terminationGracePeriodSeconds: 10
      initContainers:
      - name: install
        image: busybox
        command:
        - wget
        - "-O"
        - "/www/index.html"
        - https://raw.githubusercontent.com/hugopow/cse/main/index.html
        volumeMounts:
        - name: www
          mountPath: "/www"
      containers:
        - name: nginx
          image: k8s.gcr.io/nginx-slim:0.8
          ports:
            - containerPort: 80
              name: web
          volumeMounts:
            - name: www
              mountPath: /usr/share/nginx/html
            - name: logs
              mountPath: /logs
  volumeClaimTemplates:
    - metadata:
        name: www
      spec:
        accessModes: [ "ReadWriteOnce" ]
        storageClassName: tanzu-local-ssd
        resources:
          requests:
            storage: 2Gi
    - metadata:
        name: logs
      spec:
        accessModes: [ "ReadWriteOnce" ]
        storageClassName: tanzu-local-ssd
        resources:
          requests:
            storage: 1Gi

k apply -f statefulset-topology-aware.yaml

k get ingress avisvcingress

NAME            CLASS    HOSTS                                                             ADDRESS       PORTS   AGE
avisvcingress   avi-lb   hackazon.tkg-workload1.vmwire.com,nginx.tkg-workload1.vmwire.com   172.16.4.69   80      7m33s

Notice that another host is added to the same ingress, and both hosts share the same VIP.

Lets add Prometheus to this!

Create a new manifest for Prometheus to use called monitoring-ingress.yaml

---
apiVersion: networking.k8s.io/v1
kind: Ingress
metadata:
  name: monitoring-ingress
  namespace: tanzu-system-monitoring
  annotations:
    ako.vmware.com/enable-tls: "true"
  labels:
    app: monitoring-ingress
spec:
  ingressClassName: avi-lb
  rules:
    - host: "prometheus.tkg-workload1.vmwire.com"
      http:
        paths:
          - pathType: Prefix
            path: /
            backend:
              service:
                name: prometheus-server
                port:
                  number: 80

Note that since Prometheus when deployed by Tanzu Packages is deployed into the namespace tanzu-system-monitoring, we also need to create the new ingress in the same namespace.

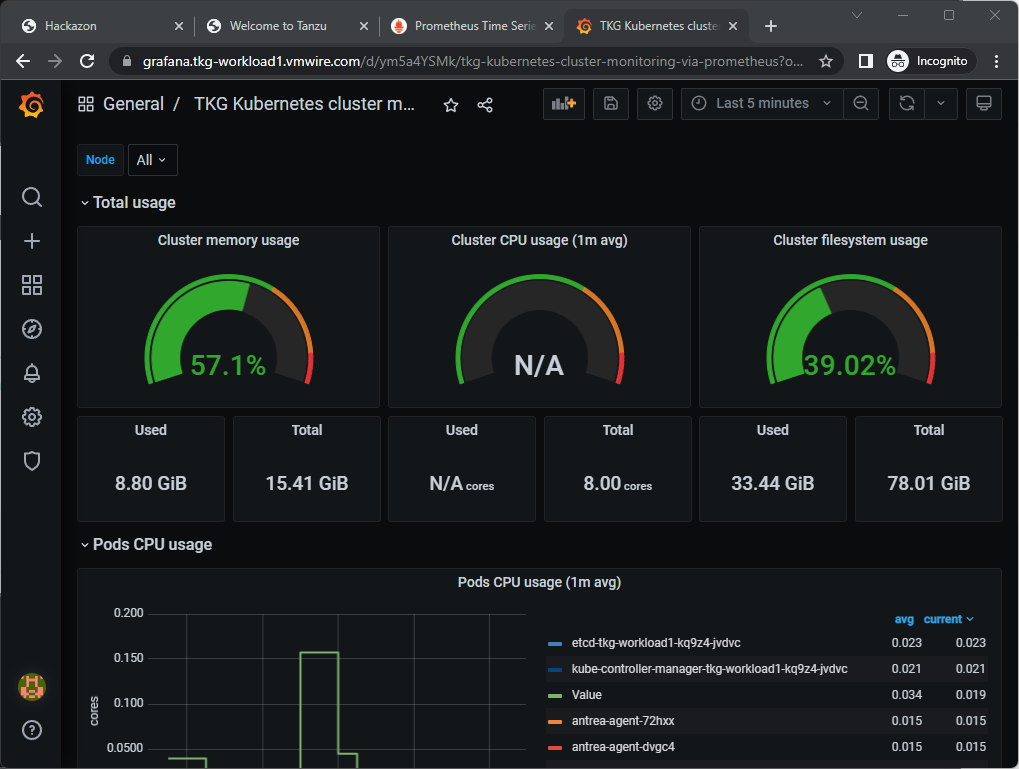
Deploy Prometheus following the documentation here, but do not enable ingress in the prometheus-data-values.yaml file, that uses Contour. We don’t want that as we are using Avi Ingress instead.

Add Grafana too!

Create a new manifest for Grafana to use called dashboard-ingress.yaml.

---
apiVersion: networking.k8s.io/v1
kind: Ingress
metadata:
  name: dashboard-ingress
  namespace: tanzu-system-dashboards
  annotations:
    ako.vmware.com/enable-tls: "true"
  labels:
    app: dashboard-ingress
spec:
  ingressClassName: avi-lb
  rules:
    - host: "grafana.tkg-workload1.vmwire.com"
      http:
        paths:
          - pathType: Prefix
            path: /
            backend:
              service:
                name: grafana
                port:
                  number: 80

Note that since Grafana when deployed by Tanzu Packages is deployed into the namespace tanzu-system-dashboards, we also need to create the new ingress in the same namespace.

Deploy Grafana following the documentation here, but do not enable ingress in the grafana-data-values.yaml file, that uses Contour. We don’t want that as we are using Avi Ingress instead.

Summary

Ingress with Avi is really nice, I like it! A single secret to store the TLS certificates and all hosts are automatically configured to use TLS. You also just need to expose TCP 80 as ClusterIP Services and Avi will do the rest for you and expose the application over TCP 443 using the TLS cert.

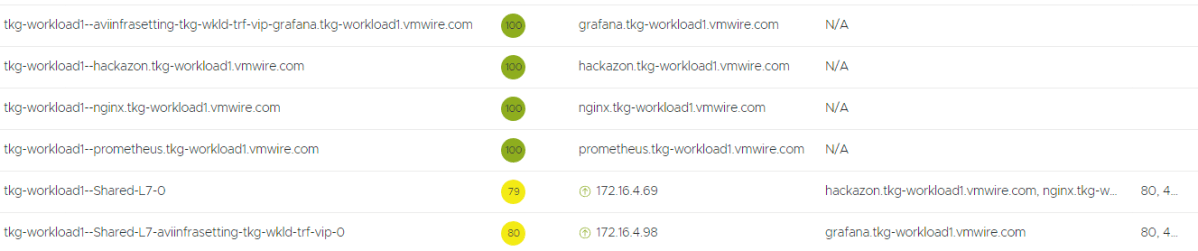
Here you can see that all four of our applications – hackazon, nginx running across three AZs, Grafana and Prometheus all using Ingress and sharing a single IP address.

Very cool indeed!

k get ingress -A

NAMESPACE                 NAME                 CLASS    HOSTS                                                              ADDRESS       PORTS   AGE
default                   avisvcingress        avi-lb   hackazon.tkg-workload1.vmwire.com,nginx.tkg-workload1.vmwire.com   172.16.4.69   80      58m
tanzu-system-dashboards   dashboard-ingress    avi-lb   grafana.tkg-workload1.vmwire.com                                   172.16.4.69   80      3m47s
tanzu-system-monitoring   monitoring-ingress   avi-lb   prometheus.tkg-workload1.vmwire.com                                172.16.4.69   80      14m

Advertisement

Scaling TKG Management Cluster Nodes Vertically

In a previous post I wrote about how to scale workload cluster control plane and worker nodes vertically. This post explains how to do the same for the TKG Management Cluster nodes.

Scaling vertically is increasing or decreasing the CPU, Memory, Disk or changing other things such as the network for the nodes. Using the Cluster API it is possible to make these changes on the fly, Kubernetes will use rolling updates to make the necessary changes.

First change to the TKG Management Cluster context to make the changes.

Scaling Worker Nodes

Run the following to list all the vSphereMachineTemplates.

k get vspheremachinetemplates.infrastructure.cluster.x-k8s.io -A
NAMESPACE    NAME                         AGE
tkg-system   tkg-mgmt-control-plane       20h
tkg-system   tkg-mgmt-worker              20h

These custom resource definitions are immutable so we will need to make a copy of the yaml file and edit it to add a new vSphereMachineTemplate.

k get vspheremachinetemplates.infrastructure.cluster.x-k8s.io -n tkg-system   tkg-mgmt-worker -o yaml > tkg-mgmt-worker-new.yaml

Now edit the new file named tkg-mgmt-worker-new.yaml

apiVersion: infrastructure.cluster.x-k8s.io/v1beta1
kind: VSphereMachineTemplate
metadata:
  annotations:
    kubectl.kubernetes.io/last-applied-configuration: |
      {"apiVersion":"infrastructure.cluster.x-k8s.io/v1beta1","kind":"VSphereMachineTemplate","metadata":{"annotations":{"vmTemplateMoid":"vm-9726"},"name":"tkg-mgmt-worker","namespace":"tkg-system"},"spec":{"template":{"spec":{"cloneMode":"fullClone","datacenter":"/home.local","datastore":"/home.local/datastore/lun01","diskGiB":40,"folder":"/home.local/vm/tkg-vsphere-tkg-mgmt","memoryMiB":8192,"network":{"devices":[{"dhcp4":true,"networkName":"/home.local/network/tkg-mgmt"}]},"numCPUs":2,"resourcePool":"/home.local/host/Management/Resources/tkg-vsphere-tkg-Mgmt","server":"vcenter.vmwire.com","storagePolicyName":"","template":"/home.local/vm/Templates/photon-3-kube-v1.22.9+vmware.1"}}}}
    vmTemplateMoid: vm-9726
  creationTimestamp: "2022-12-23T15:23:56Z"
  generation: 1
  name: tkg-mgmt-worker
  namespace: tkg-system
  ownerReferences:
  - apiVersion: cluster.x-k8s.io/v1beta1
    kind: Cluster
    name: tkg-mgmt
    uid: 9acf6370-64be-40ce-9076-050ab8c6f41f
  resourceVersion: "3069"
  uid: 4a8f305f-0b61-4d33-ba02-7fb3fcc8ba22
spec:
  template:
    spec:
      cloneMode: fullClone
      datacenter: /home.local
      datastore: /home.local/datastore/lun01
      diskGiB: 40
      folder: /home.local/vm/tkg-vsphere-tkg-mgmt
      memoryMiB: 8192
      network:
        devices:
        - dhcp4: true
          networkName: /home.local/network/tkg-mgmt
      numCPUs: 2
      resourcePool: /home.local/host/Management/Resources/tkg-vsphere-tkg-Mgmt
      server: vcenter.vmwire.com
      storagePolicyName: ""
      template: /home.local/vm/Templates/photon-3-kube-v1.22.9+vmware.1

Change the name of the CRD on line 10. Make any other changes you need, such as CPU on line 32 or RAM on line 27. Save the file.

Now you’ll need to create the new vSphereMachineTemplate.

k apply -f tkg-mgmt-worker-new.yaml

Now we’re ready to make the change.

Lets first take a look at the MachineDeployments.

k get machinedeployments.cluster.x-k8s.io -A

NAMESPACE    NAME            CLUSTER    REPLICAS   READY   UPDATED   UNAVAILABLE   PHASE     AGE   VERSION
tkg-system   tkg-mgmt-md-0   tkg-mgmt   2          2       2         0             Running   20h   v1.22.9+vmware.1

Now edit this MachineDeployment.

k edit machinedeployments.cluster.x-k8s.io -n tkg-system   tkg-mgmt-md-0

You need to make the change to the section spec.template.spec.infrastructureRef under line 56.

 53       infrastructureRef:
 54         apiVersion: infrastructure.cluster.x-k8s.io/v1beta1
 55         kind: VSphereMachineTemplate
 56         name: tkg-mgmt-worker

Change line 56 to the new VsphereMachineTemplate CRD we created earlier.

 53       infrastructureRef:
 54         apiVersion: infrastructure.cluster.x-k8s.io/v1beta1
 55         kind: VSphereMachineTemplate
 56         name: tkg-mgmt-worker-new

Save and quit. You’ll notice that a new VM will immediately start being cloned in vCenter. Wait for it to complete, this new VM is the new worker with the updated CPU and memory sizing and it will replace the current worker node. Eventually, after a few minutes, the old worker node will be deleted and you will be left with a new worker node with the updated CPU and RAM specified in the new VSphereMachineTemplate.

Scaling Control Plane Nodes

Scaling the control plane nodes is similar.

k get vspheremachinetemplates.infrastructure.cluster.x-k8s.io -n tkg-system tkg-mgmt-control-plane -o yaml > tkg-mgmt-control-plane-new.yaml

Edit the file and perform the same steps as the worker nodes.

You’ll notice that there is no MachineDeployment for the control plane node for a TKG Management Cluster. Instead we have to edit the CRD named KubeAdmControlPlane.

Run this command

k get kubeadmcontrolplane -A

NAMESPACE    NAME                     CLUSTER    INITIALIZED   API SERVER AVAILABLE   REPLICAS   READY   UPDATED   UNAVAILABLE   AGE   VERSION
tkg-system   tkg-mgmt-control-plane   tkg-mgmt   true          true                   1          1       1         0             21h   v1.22.9+vmware.1

Now we can edit it

k edit kubeadmcontrolplane -n tkg-system   tkg-mgmt-control-plane

Change the section under spec.machineTemplate.infrastructureRef, around line 106.

102   machineTemplate:
103     infrastructureRef:
104       apiVersion: infrastructure.cluster.x-k8s.io/v1beta1
105       kind: VSphereMachineTemplate
106       name: tkg-mgmt-control-plane
107       namespace: tkg-system

Change line 106 to

102   machineTemplate:
103     infrastructureRef:
104       apiVersion: infrastructure.cluster.x-k8s.io/v1beta1
105       kind: VSphereMachineTemplate
106       name: tkg-mgmt-control-plane-new
107       namespace: tkg-system

Save the file. You’ll notice that another VM will start cloning and eventually you’ll have a new control plane node up and running. This new control plane node will replace the older one. It will take longer than the worker node so be patient.

Install Container Service Extension 3.1.1 with VCD 10.3.1

Prepare the Photon OS 3 VM

Deploy the OVA using this link.

Photon OS 3 does not support Linux guest customization unfortunately, so we will use the links below to manually setup the OS with a hostname and static IP address.

Boot the VM, the default credentials are root with password changeme. Change the default password.

Set host name by changing the /etc/hostname file.

Configure a static IP using this guide.

Add DNS server using this guide.

Reboot.

Photon 3 has the older repositories, so we will need to update to newer repositories as detailed in this KB article. I’ve included this in the instructions below.

Copypasta or use create a bash script.

# Update Photon repositories
cd /etc/yum.repos.d/
sed  -i 's/dl.bintray.com\/vmware/packages.vmware.com\/photon\/$releasever/g' photon.repo photon-updates.repo photon-extras.repo photon-debuginfo.repo

# If you get errors with the above command, then copy the command from the KB article.

# Update Photon
tdnf --assumeyes update

# Install dependencies
tdnf --assumeyes install build-essential python3-devel python3-pip git

# Update python3, cse supports python3 version 3.7.3 or greater, it does not support python 3.8 or above.
tdnf --assumeyes update python3

# Prepare cse user and application directories
mkdir -p /opt/vmware/cse
chmod 775 -R /opt
chmod 777 /
groupadd cse
useradd cse -g cse -m -p Vmware1! -d /opt/vmware/cse
chown cse:cse -R /opt

# Run as cse user, add your public ssh key to CSE server
su - cse
mkdir -p ~/.ssh
cat >> ~/.ssh/authorized_keys << EOF
ssh-rsa AAAAB3NzaC1yc2EAAAABJQAAAQEAhcw67bz3xRjyhPLysMhUHJPhmatJkmPUdMUEZre+MeiDhC602jkRUNVu43Nk8iD/I07kLxdAdVPZNoZuWE7WBjmn13xf0Ki2hSH/47z3ObXrd8Vleq0CXa+qRnCeYM3FiKb4D5IfL4XkHW83qwp8PuX8FHJrXY8RacVaOWXrESCnl3cSC0tA3eVxWoJ1kwHxhSTfJ9xBtKyCqkoulqyqFYU2A1oMazaK9TYWKmtcYRn27CC1Jrwawt2zfbNsQbHx1jlDoIO6FLz8Dfkm0DToanw0GoHs2Q+uXJ8ve/oBs0VJZFYPquBmcyfny4WIh4L0lwzsiAVWJ6PvzF5HMuNcwQ== rsa-key-20210508
EOF

cat >> ~/.bash_profile << EOF
# For Container Service Extension
export CSE_CONFIG=/opt/vmware/cse/config/config.yaml
export CSE_CONFIG_PASSWORD=Vmware1!
source /opt/vmware/cse/python/bin/activate
EOF

# Install CSE in virtual environment
python3 -m venv /opt/vmware/cse/python
source /opt/vmware/cse/python/bin/activate
pip3 install container-service-extension==3.1.1

cse version

source ~/.bash_profile

# Prepare vcd-cli
mkdir -p ~/.vcd-cli
cat >  ~/.vcd-cli/profiles.yaml << EOF
extensions:
- container_service_extension.client.cse
EOF

vcd cse version

# Add my Let's Encrypt intermediate and root certs. Use your certificates issued by your CA to enable verify=true with CSE.
cat >> /opt/vmware/cse/python/lib/python3.7/site-packages/certifi/cacert.pem << EOF
-----BEGIN CERTIFICATE-----
MIIFFjCCAv6gAwIBAgIRAJErCErPDBinU/bWLiWnX1owDQYJKoZIhvcNAQELBQAw
TzELMAkGA1UEBhMCVVMxKTAnBgNVBAoTIEludGVybmV0IFNlY3VyaXR5IFJlc2Vh
cmNoIEdyb3VwMRUwEwYDVQQDEwxJU1JHIFJvb3QgWDEwHhcNMjAwOTA0MDAwMDAw
WhcNMjUwOTE1MTYwMDAwWjAyMQswCQYDVQQGEwJVUzEWMBQGA1UEChMNTGV0J3Mg
RW5jcnlwdDELMAkGA1UEAxMCUjMwggEiMA0GCSqGSIb3DQEBAQUAA4IBDwAwggEK
AoIBAQC7AhUozPaglNMPEuyNVZLD+ILxmaZ6QoinXSaqtSu5xUyxr45r+XXIo9cP
R5QUVTVXjJ6oojkZ9YI8QqlObvU7wy7bjcCwXPNZOOftz2nwWgsbvsCUJCWH+jdx
sxPnHKzhm+/b5DtFUkWWqcFTzjTIUu61ru2P3mBw4qVUq7ZtDpelQDRrK9O8Zutm
NHz6a4uPVymZ+DAXXbpyb/uBxa3Shlg9F8fnCbvxK/eG3MHacV3URuPMrSXBiLxg
Z3Vms/EY96Jc5lP/Ooi2R6X/ExjqmAl3P51T+c8B5fWmcBcUr2Ok/5mzk53cU6cG
/kiFHaFpriV1uxPMUgP17VGhi9sVAgMBAAGjggEIMIIBBDAOBgNVHQ8BAf8EBAMC
AYYwHQYDVR0lBBYwFAYIKwYBBQUHAwIGCCsGAQUFBwMBMBIGA1UdEwEB/wQIMAYB
Af8CAQAwHQYDVR0OBBYEFBQusxe3WFbLrlAJQOYfr52LFMLGMB8GA1UdIwQYMBaA
FHm0WeZ7tuXkAXOACIjIGlj26ZtuMDIGCCsGAQUFBwEBBCYwJDAiBggrBgEFBQcw
AoYWaHR0cDovL3gxLmkubGVuY3Iub3JnLzAnBgNVHR8EIDAeMBygGqAYhhZodHRw
Oi8veDEuYy5sZW5jci5vcmcvMCIGA1UdIAQbMBkwCAYGZ4EMAQIBMA0GCysGAQQB
gt8TAQEBMA0GCSqGSIb3DQEBCwUAA4ICAQCFyk5HPqP3hUSFvNVneLKYY611TR6W
PTNlclQtgaDqw+34IL9fzLdwALduO/ZelN7kIJ+m74uyA+eitRY8kc607TkC53wl
ikfmZW4/RvTZ8M6UK+5UzhK8jCdLuMGYL6KvzXGRSgi3yLgjewQtCPkIVz6D2QQz
CkcheAmCJ8MqyJu5zlzyZMjAvnnAT45tRAxekrsu94sQ4egdRCnbWSDtY7kh+BIm
lJNXoB1lBMEKIq4QDUOXoRgffuDghje1WrG9ML+Hbisq/yFOGwXD9RiX8F6sw6W4
avAuvDszue5L3sz85K+EC4Y/wFVDNvZo4TYXao6Z0f+lQKc0t8DQYzk1OXVu8rp2
yJMC6alLbBfODALZvYH7n7do1AZls4I9d1P4jnkDrQoxB3UqQ9hVl3LEKQ73xF1O
yK5GhDDX8oVfGKF5u+decIsH4YaTw7mP3GFxJSqv3+0lUFJoi5Lc5da149p90Ids
hCExroL1+7mryIkXPeFM5TgO9r0rvZaBFOvV2z0gp35Z0+L4WPlbuEjN/lxPFin+
HlUjr8gRsI3qfJOQFy/9rKIJR0Y/8Omwt/8oTWgy1mdeHmmjk7j1nYsvC9JSQ6Zv
MldlTTKB3zhThV1+XWYp6rjd5JW1zbVWEkLNxE7GJThEUG3szgBVGP7pSWTUTsqX
nLRbwHOoq7hHwg==
-----END CERTIFICATE-----
-----BEGIN CERTIFICATE-----
MIIFazCCA1OgAwIBAgIRAIIQz7DSQONZRGPgu2OCiwAwDQYJKoZIhvcNAQELBQAw
TzELMAkGA1UEBhMCVVMxKTAnBgNVBAoTIEludGVybmV0IFNlY3VyaXR5IFJlc2Vh
cmNoIEdyb3VwMRUwEwYDVQQDEwxJU1JHIFJvb3QgWDEwHhcNMTUwNjA0MTEwNDM4
WhcNMzUwNjA0MTEwNDM4WjBPMQswCQYDVQQGEwJVUzEpMCcGA1UEChMgSW50ZXJu
ZXQgU2VjdXJpdHkgUmVzZWFyY2ggR3JvdXAxFTATBgNVBAMTDElTUkcgUm9vdCBY
MTCCAiIwDQYJKoZIhvcNAQEBBQADggIPADCCAgoCggIBAK3oJHP0FDfzm54rVygc
h77ct984kIxuPOZXoHj3dcKi/vVqbvYATyjb3miGbESTtrFj/RQSa78f0uoxmyF+
0TM8ukj13Xnfs7j/EvEhmkvBioZxaUpmZmyPfjxwv60pIgbz5MDmgK7iS4+3mX6U
A5/TR5d8mUgjU+g4rk8Kb4Mu0UlXjIB0ttov0DiNewNwIRt18jA8+o+u3dpjq+sW
T8KOEUt+zwvo/7V3LvSye0rgTBIlDHCNAymg4VMk7BPZ7hm/ELNKjD+Jo2FR3qyH
B5T0Y3HsLuJvW5iB4YlcNHlsdu87kGJ55tukmi8mxdAQ4Q7e2RCOFvu396j3x+UC
B5iPNgiV5+I3lg02dZ77DnKxHZu8A/lJBdiB3QW0KtZB6awBdpUKD9jf1b0SHzUv
KBds0pjBqAlkd25HN7rOrFleaJ1/ctaJxQZBKT5ZPt0m9STJEadao0xAH0ahmbWn
OlFuhjuefXKnEgV4We0+UXgVCwOPjdAvBbI+e0ocS3MFEvzG6uBQE3xDk3SzynTn
jh8BCNAw1FtxNrQHusEwMFxIt4I7mKZ9YIqioymCzLq9gwQbooMDQaHWBfEbwrbw
qHyGO0aoSCqI3Haadr8faqU9GY/rOPNk3sgrDQoo//fb4hVC1CLQJ13hef4Y53CI
rU7m2Ys6xt0nUW7/vGT1M0NPAgMBAAGjQjBAMA4GA1UdDwEB/wQEAwIBBjAPBgNV
HRMBAf8EBTADAQH/MB0GA1UdDgQWBBR5tFnme7bl5AFzgAiIyBpY9umbbjANBgkq
hkiG9w0BAQsFAAOCAgEAVR9YqbyyqFDQDLHYGmkgJykIrGF1XIpu+ILlaS/V9lZL
ubhzEFnTIZd+50xx+7LSYK05qAvqFyFWhfFQDlnrzuBZ6brJFe+GnY+EgPbk6ZGQ
3BebYhtF8GaV0nxvwuo77x/Py9auJ/GpsMiu/X1+mvoiBOv/2X/qkSsisRcOj/KK
NFtY2PwByVS5uCbMiogziUwthDyC3+6WVwW6LLv3xLfHTjuCvjHIInNzktHCgKQ5
ORAzI4JMPJ+GslWYHb4phowim57iaztXOoJwTdwJx4nLCgdNbOhdjsnvzqvHu7Ur
TkXWStAmzOVyyghqpZXjFaH3pO3JLF+l+/+sKAIuvtd7u+Nxe5AW0wdeRlN8NwdC
jNPElpzVmbUq4JUagEiuTDkHzsxHpFKVK7q4+63SM1N95R1NbdWhscdCb+ZAJzVc
oyi3B43njTOQ5yOf+1CceWxG1bQVs5ZufpsMljq4Ui0/1lvh+wjChP4kqKOJ2qxq
4RgqsahDYVvTH9w7jXbyLeiNdd8XM2w9U/t7y0Ff/9yi0GE44Za4rF2LN9d11TPA
mRGunUHBcnWEvgJBQl9nJEiU0Zsnvgc/ubhPgXRR4Xq37Z0j4r7g1SgEEzwxA57d
emyPxgcYxn/eR44/KJ4EBs+lVDR3veyJm+kXQ99b21/+jh5Xos1AnX5iItreGCc=
-----END CERTIFICATE-----
EOF

# Create service account
vcd login vcd.vmwire.com system administrator -p Vmware1!
cse create-service-role vcd.vmwire.com
# Enter system administrator username and password

# Create VCD service account for CSE
vcd user create --enabled svc-cse Vmware1! "CSE Service Role"

# Create config file
mkdir -p /opt/vmware/cse/config

cat > /opt/vmware/cse/config/config-not-encrypted.conf << EOF
mqtt:
  verify_ssl: false

vcd:
  host: vcd.vmwire.com
  log: true
  password: Vmware1!
  port: 443
  username: administrator
  verify: true

vcs:
- name: vcenter.vmwire.com
  password: Vmware1!
  username: administrator@vsphere.local
  verify: true

service:
  enforce_authorization: false
  legacy_mode: false
  log_wire: false
  no_vc_communication_mode: false
  processors: 15
  telemetry:
    enable: true

broker:
  catalog: cse-catalog
  ip_allocation_mode: pool
  network: default-organization-network
  org: cse
  remote_template_cookbook_url: https://raw.githubusercontent.com/vmware/container-service-extension-templates/master/template_v2.yaml
  storage_profile: 'iscsi'
  vdc: cse-vdc
EOF

cse encrypt /opt/vmware/cse/config/config-not-encrypted.conf --output /opt/vmware/cse/config/config.yaml
chmod 600 /opt/vmware/cse/config/config.yaml
cse check /opt/vmware/cse/config/config.yaml

cse template list

# Import TKGm ova with this command
# Copy the ova to /tmp/ first, the ova can be obtained from my.vmware.com, ensure that it has chmod 644 permissions.
cse template import -F /tmp/ubuntu-2004-kube-v1.20.5-vmware.2-tkg.1-6700972457122900687.ova

# You may need to enable 644 permissions on the file if cse complains that the file is not readable.

# Install CSE
cse install -k ~/.ssh/authorized_keys

# Or use this if you've already installed and want to skip template creation again
cse upgrade --skip-template-creation -k ~/.ssh/authorized_keys

# Register the cse extension with vcd if it did not already register
vcd system extension create cse cse cse vcdext '/api/cse, /api/cse/.*, /api/cse/.*/.*'

# Setup cse.sh
cat > /opt/vmware/cse/cse.sh << EOF
#!/usr/bin/env bash
source /opt/vmware/cse/python/bin/activate
export CSE_CONFIG=/opt/vmware/cse/config/config.yaml
export CSE_CONFIG_PASSWORD=Vmware1!
cse run
EOF

# Make cse.sh executable
chmod +x /opt/vmware/cse/cse.sh

# Deactivate the python virtual environment and go back to root
deactivate
exit

# Setup cse.service, use MQTT and not RabbitMQ
cat > /etc/systemd/system/cse.service << EOF
[Unit]
Description=Container Service Extension for VMware Cloud Director

[Service]
ExecStart=/opt/vmware/cse/cse.sh
User=cse
WorkingDirectory=/opt/vmware/cse
Type=simple
Restart=always

[Install]
WantedBy=default.target
EOF

systemctl enable cse.service
systemctl start cse.service

systemctl status cse.service

Enable the CSE UI Plugin for VCD

The new CSE UI extension is bundled with VCD 10.3.1.

Enable it for the tenants that you want or for all tenants.

Enable the rights bundles

Follow the instructions in this other post.

For 3.1.1 you will also need to edit the cse:nativeCluster Entitlement Rights Bundle and add the two following rights:

ACCESS CONTROL, User, Manage user’s own API token

COMPUTE, Organization VDC, Create a Shared Disk

Then publish the Rights Bundle to all tenants.

Enable Global Roles to use CSE or Configure Rights Bundles

The quickest way to get CSE working is to add the relevant rights to the Organization Administrator role. You can create a custom rights bundle and create a custom role for the k8s admin tenant persona if you like. I won’t cover that in this post.

Log in as the /Provider and go to the Administration menu and click on Global Roles on the left.

Edit the Organization Administrator role and scroll all the way down to the bottom and click both the View 8/8 and Manage 12/12, then Save.

Setting up VCD CSI and CPI Operators

You may notice that when the cluster is up you might not be able to deploy any pods, this is because the cluster is not ready and is in a tainted state due to the CSI and CPI Operators not having the credentials.

kubectl get pods -A
NAMESPACE     NAME                                         READY   STATUS    RESTARTS   AGE
kube-system   antrea-agent-lhsxv                           2/2     Running   0          10h
kube-system   antrea-agent-pjwtp                           2/2     Running   0          10h
kube-system   antrea-controller-5cd95c574d-4qb7p           0/1     Pending   0          10h
kube-system   coredns-6598d898cd-9vbzv                     0/1     Pending   0          10h
kube-system   coredns-6598d898cd-wwpk9                     0/1     Pending   0          10h
kube-system   csi-vcd-controllerplugin-0                   0/3     Pending   0          37s
kube-system   etcd-mstr-h8mg                               1/1     Running   0          10h
kube-system   kube-apiserver-mstr-h8mg                     1/1     Running   0          10h
kube-system   kube-controller-manager-mstr-h8mg            1/1     Running   0          10h
kube-system   kube-proxy-2dzwh                             1/1     Running   0          10h
kube-system   kube-proxy-wd7tf                             1/1     Running   0          10h
kube-system   kube-scheduler-mstr-h8mg                     1/1     Running   0          10h
kube-system   vmware-cloud-director-ccm-5489b6788c-kgtsn   1/1     Running   0          13s

To bring up the pods to a ready state, you will need to follow this previous post.

Useful links

https://github.com/vmware/container-service-extension/commit/5d2a60b5eeb164547aef39602f9871c06726863e

https://vmware.github.io/container-service-extension/cse3_1/RELEASE_NOTES.html

Install Container Service Extension 3.1.1 beta with VCD 10.3

Prepare the Photon OS 3 VM

Deploy the OVA using this link.

Photon OS 3 does not support Linux guest customization unfortunately, so we will use the links below to manually setup the OS with a hostname and static IP address.

Boot the VM, the default credentials are root with password changeme. Change the default password.

Set host name by changing the /etc/hostname file.

Configure a static IP using this guide.

Add DNS server using this guide.

Reboot.

Photon 3 has the older repositories, so we will need to update to newer repositories as detailed in this KB article. I’ve included this in the instructions below.

Copypasta or use create a bash script.

# Update Photon repositories
cd /etc/yum.repos.d/
sed  -i 's/dl.bintray.com\/vmware/packages.vmware.com\/photon\/$releasever/g' photon.repo photon-updates.repo photon-extras.repo photon-debuginfo.repo

# Update Photon
tdnf --assumeyes update

# Install dependencies
tdnf --assumeyes install build-essential python3-devel python3-pip git

# Prepare cse user and application directories
mkdir -p /opt/vmware/cse
chmod 775 -R /opt
chmod 777 /
groupadd cse
useradd cse -g cse -m -p Vmware1! -d /opt/vmware/cse
chown cse:cse -R /opt

# Run as cse user
su - cse
mkdir -p ~/.ssh
cat >> ~/.ssh/authorized_keys << EOF
ssh-rsa AAAAB3NzaC1yc2EAAAABJQAAAQEAhcw67bz3xRjyhPLysMhUHJPhmatJkmPUdMUEZre+MeiDhC602jkRUNVu43Nk8iD/I07kLxdAdVPZNoZuWE7WBjmn13xf0Ki2hSH/47z3ObXrd8Vleq0CXa+qRnCeYM3FiKb4D5IfL4XkHW83qwp8PuX8FHJrXY8RacVaOWXrESCnl3cSC0tA3eVxWoJ1kwHxhSTfJ9xBtKyCqkoulqyqFYU2A1oMazaK9TYWKmtcYRn27CC1Jrwawt2zfbNsQbHx1jlDoIO6FLz8Dfkm0DToanw0GoHs2Q+uXJ8ve/oBs0VJZFYPquBmcyfny4WIh4L0lwzsiAVWJ6PvzF5HMuNcwQ== rsa-key-20210508
EOF

cat >> ~/.bash_profile << EOF
# For Container Service Extension
export CSE_CONFIG=/opt/vmware/cse/config/config.yaml
export CSE_CONFIG_PASSWORD=Vmware1!
source /opt/vmware/cse/python/bin/activate
EOF

# Install CSE in virtual environment
python3 -m venv /opt/vmware/cse/python
source /opt/vmware/cse/python/bin/activate
pip3 install git+https://github.com/vmware/container-service-extension.git@3.1.1.0b2

cse version

source ~/.bash_profile

# Prepare vcd-cli
mkdir -p ~/.vcd-cli
cat >  ~/.vcd-cli/profiles.yaml << EOF
extensions:
- container_service_extension.client.cse
EOF

vcd cse version

# Add my Let's Encrypt intermediate and root certs. Use your certificates issued by your CA to enable verify=true with CSE.
cat >> /opt/vmware/cse/python/lib/python3.7/site-packages/certifi/cacert.pem << EOF #ok
-----BEGIN CERTIFICATE-----
MIIFFjCCAv6gAwIBAgIRAJErCErPDBinU/bWLiWnX1owDQYJKoZIhvcNAQELBQAw
TzELMAkGA1UEBhMCVVMxKTAnBgNVBAoTIEludGVybmV0IFNlY3VyaXR5IFJlc2Vh
cmNoIEdyb3VwMRUwEwYDVQQDEwxJU1JHIFJvb3QgWDEwHhcNMjAwOTA0MDAwMDAw
WhcNMjUwOTE1MTYwMDAwWjAyMQswCQYDVQQGEwJVUzEWMBQGA1UEChMNTGV0J3Mg
RW5jcnlwdDELMAkGA1UEAxMCUjMwggEiMA0GCSqGSIb3DQEBAQUAA4IBDwAwggEK
AoIBAQC7AhUozPaglNMPEuyNVZLD+ILxmaZ6QoinXSaqtSu5xUyxr45r+XXIo9cP
R5QUVTVXjJ6oojkZ9YI8QqlObvU7wy7bjcCwXPNZOOftz2nwWgsbvsCUJCWH+jdx
sxPnHKzhm+/b5DtFUkWWqcFTzjTIUu61ru2P3mBw4qVUq7ZtDpelQDRrK9O8Zutm
NHz6a4uPVymZ+DAXXbpyb/uBxa3Shlg9F8fnCbvxK/eG3MHacV3URuPMrSXBiLxg
Z3Vms/EY96Jc5lP/Ooi2R6X/ExjqmAl3P51T+c8B5fWmcBcUr2Ok/5mzk53cU6cG
/kiFHaFpriV1uxPMUgP17VGhi9sVAgMBAAGjggEIMIIBBDAOBgNVHQ8BAf8EBAMC
AYYwHQYDVR0lBBYwFAYIKwYBBQUHAwIGCCsGAQUFBwMBMBIGA1UdEwEB/wQIMAYB
Af8CAQAwHQYDVR0OBBYEFBQusxe3WFbLrlAJQOYfr52LFMLGMB8GA1UdIwQYMBaA
FHm0WeZ7tuXkAXOACIjIGlj26ZtuMDIGCCsGAQUFBwEBBCYwJDAiBggrBgEFBQcw
AoYWaHR0cDovL3gxLmkubGVuY3Iub3JnLzAnBgNVHR8EIDAeMBygGqAYhhZodHRw
Oi8veDEuYy5sZW5jci5vcmcvMCIGA1UdIAQbMBkwCAYGZ4EMAQIBMA0GCysGAQQB
gt8TAQEBMA0GCSqGSIb3DQEBCwUAA4ICAQCFyk5HPqP3hUSFvNVneLKYY611TR6W
PTNlclQtgaDqw+34IL9fzLdwALduO/ZelN7kIJ+m74uyA+eitRY8kc607TkC53wl
ikfmZW4/RvTZ8M6UK+5UzhK8jCdLuMGYL6KvzXGRSgi3yLgjewQtCPkIVz6D2QQz
CkcheAmCJ8MqyJu5zlzyZMjAvnnAT45tRAxekrsu94sQ4egdRCnbWSDtY7kh+BIm
lJNXoB1lBMEKIq4QDUOXoRgffuDghje1WrG9ML+Hbisq/yFOGwXD9RiX8F6sw6W4
avAuvDszue5L3sz85K+EC4Y/wFVDNvZo4TYXao6Z0f+lQKc0t8DQYzk1OXVu8rp2
yJMC6alLbBfODALZvYH7n7do1AZls4I9d1P4jnkDrQoxB3UqQ9hVl3LEKQ73xF1O
yK5GhDDX8oVfGKF5u+decIsH4YaTw7mP3GFxJSqv3+0lUFJoi5Lc5da149p90Ids
hCExroL1+7mryIkXPeFM5TgO9r0rvZaBFOvV2z0gp35Z0+L4WPlbuEjN/lxPFin+
HlUjr8gRsI3qfJOQFy/9rKIJR0Y/8Omwt/8oTWgy1mdeHmmjk7j1nYsvC9JSQ6Zv
MldlTTKB3zhThV1+XWYp6rjd5JW1zbVWEkLNxE7GJThEUG3szgBVGP7pSWTUTsqX
nLRbwHOoq7hHwg==
-----END CERTIFICATE-----
-----BEGIN CERTIFICATE-----
MIIFYDCCBEigAwIBAgIQQAF3ITfU6UK47naqPGQKtzANBgkqhkiG9w0BAQsFADA/
MSQwIgYDVQQKExtEaWdpdGFsIFNpZ25hdHVyZSBUcnVzdCBDby4xFzAVBgNVBAMT
DkRTVCBSb290IENBIFgzMB4XDTIxMDEyMDE5MTQwM1oXDTI0MDkzMDE4MTQwM1ow
TzELMAkGA1UEBhMCVVMxKTAnBgNVBAoTIEludGVybmV0IFNlY3VyaXR5IFJlc2Vh
cmNoIEdyb3VwMRUwEwYDVQQDEwxJU1JHIFJvb3QgWDEwggIiMA0GCSqGSIb3DQEB
AQUAA4ICDwAwggIKAoICAQCt6CRz9BQ385ueK1coHIe+3LffOJCMbjzmV6B493XC
ov71am72AE8o295ohmxEk7axY/0UEmu/H9LqMZshftEzPLpI9d1537O4/xLxIZpL
wYqGcWlKZmZsj348cL+tKSIG8+TA5oCu4kuPt5l+lAOf00eXfJlII1PoOK5PCm+D
LtFJV4yAdLbaL9A4jXsDcCEbdfIwPPqPrt3aY6vrFk/CjhFLfs8L6P+1dy70sntK
4EwSJQxwjQMpoOFTJOwT2e4ZvxCzSow/iaNhUd6shweU9GNx7C7ib1uYgeGJXDR5
bHbvO5BieebbpJovJsXQEOEO3tkQjhb7t/eo98flAgeYjzYIlefiN5YNNnWe+w5y
sR2bvAP5SQXYgd0FtCrWQemsAXaVCg/Y39W9Eh81LygXbNKYwagJZHduRze6zqxZ
Xmidf3LWicUGQSk+WT7dJvUkyRGnWqNMQB9GoZm1pzpRboY7nn1ypxIFeFntPlF4
FQsDj43QLwWyPntKHEtzBRL8xurgUBN8Q5N0s8p0544fAQjQMNRbcTa0B7rBMDBc
SLeCO5imfWCKoqMpgsy6vYMEG6KDA0Gh1gXxG8K28Kh8hjtGqEgqiNx2mna/H2ql
PRmP6zjzZN7IKw0KKP/32+IVQtQi0Cdd4Xn+GOdwiK1O5tmLOsbdJ1Fu/7xk9TND
TwIDAQABo4IBRjCCAUIwDwYDVR0TAQH/BAUwAwEB/zAOBgNVHQ8BAf8EBAMCAQYw
SwYIKwYBBQUHAQEEPzA9MDsGCCsGAQUFBzAChi9odHRwOi8vYXBwcy5pZGVudHJ1
c3QuY29tL3Jvb3RzL2RzdHJvb3RjYXgzLnA3YzAfBgNVHSMEGDAWgBTEp7Gkeyxx
+tvhS5B1/8QVYIWJEDBUBgNVHSAETTBLMAgGBmeBDAECATA/BgsrBgEEAYLfEwEB
ATAwMC4GCCsGAQUFBwIBFiJodHRwOi8vY3BzLnJvb3QteDEubGV0c2VuY3J5cHQu
b3JnMDwGA1UdHwQ1MDMwMaAvoC2GK2h0dHA6Ly9jcmwuaWRlbnRydXN0LmNvbS9E
U1RST09UQ0FYM0NSTC5jcmwwHQYDVR0OBBYEFHm0WeZ7tuXkAXOACIjIGlj26Ztu
MA0GCSqGSIb3DQEBCwUAA4IBAQAKcwBslm7/DlLQrt2M51oGrS+o44+/yQoDFVDC
5WxCu2+b9LRPwkSICHXM6webFGJueN7sJ7o5XPWioW5WlHAQU7G75K/QosMrAdSW
9MUgNTP52GE24HGNtLi1qoJFlcDyqSMo59ahy2cI2qBDLKobkx/J3vWraV0T9VuG
WCLKTVXkcGdtwlfFRjlBz4pYg1htmf5X6DYO8A4jqv2Il9DjXA6USbW1FzXSLr9O
he8Y4IWS6wY7bCkjCWDcRQJMEhg76fsO3txE+FiYruq9RUWhiF1myv4Q6W+CyBFC
Dfvp7OOGAN6dEOM4+qR9sdjoSYKEBpsr6GtPAQw4dy753ec5
-----END CERTIFICATE-----
-----BEGIN CERTIFICATE-----
MIIDSjCCAjKgAwIBAgIQRK+wgNajJ7qJMDmGLvhAazANBgkqhkiG9w0BAQUFADA/
MSQwIgYDVQQKExtEaWdpdGFsIFNpZ25hdHVyZSBUcnVzdCBDby4xFzAVBgNVBAMT
DkRTVCBSb290IENBIFgzMB4XDTAwMDkzMDIxMTIxOVoXDTIxMDkzMDE0MDExNVow
PzEkMCIGA1UEChMbRGlnaXRhbCBTaWduYXR1cmUgVHJ1c3QgQ28uMRcwFQYDVQQD
Ew5EU1QgUm9vdCBDQSBYMzCCASIwDQYJKoZIhvcNAQEBBQADggEPADCCAQoCggEB
AN+v6ZdQCINXtMxiZfaQguzH0yxrMMpb7NnDfcdAwRgUi+DoM3ZJKuM/IUmTrE4O
rz5Iy2Xu/NMhD2XSKtkyj4zl93ewEnu1lcCJo6m67XMuegwGMoOifooUMM0RoOEq
OLl5CjH9UL2AZd+3UWODyOKIYepLYYHsUmu5ouJLGiifSKOeDNoJjj4XLh7dIN9b
xiqKqy69cK3FCxolkHRyxXtqqzTWMIn/5WgTe1QLyNau7Fqckh49ZLOMxt+/yUFw
7BZy1SbsOFU5Q9D8/RhcQPGX69Wam40dutolucbY38EVAjqr2m7xPi71XAicPNaD
aeQQmxkqtilX4+U9m5/wAl0CAwEAAaNCMEAwDwYDVR0TAQH/BAUwAwEB/zAOBgNV
HQ8BAf8EBAMCAQYwHQYDVR0OBBYEFMSnsaR7LHH62+FLkHX/xBVghYkQMA0GCSqG
SIb3DQEBBQUAA4IBAQCjGiybFwBcqR7uKGY3Or+Dxz9LwwmglSBd49lZRNI+DT69
ikugdB/OEIKcdBodfpga3csTS7MgROSR6cz8faXbauX+5v3gTt23ADq1cEmv8uXr
AvHRAosZy5Q6XkjEGB5YGV8eAlrwDPGxrancWYaLbumR9YbK+rlmM6pZW87ipxZz
R8srzJmwN0jP41ZL9c8PDHIyh8bwRLtTcm1D9SZImlJnt1ir/md2cXjbDaJWFBM5
JDGFoqgCWjBH4d1QB7wCCZAA62RjYJsWvIjJEubSfZGL+T0yjWW06XyxV3bqxbYo
Ob8VZRzI9neWagqNdwvYkQsEjgfbKbYK7p2CNTUQ
-----END CERTIFICATE-----
EOF

# Create service account
vcd login vcd.vmwire.com system administrator -p Vmware1!
cse create-service-role vcd.vmwire.com
# Enter system administrator username and password

# Create VCD service account for CSE
vcd user create --enabled svc-cse Vmware1! "CSE Service Role"

# Create config file
mkdir -p /opt/vmware/cse/config

cat > /opt/vmware/cse/config/config-not-encrypted.conf << EOF
mqtt:
  verify_ssl: false

vcd:
  host: vcd.vmwire.com
  log: true
  password: Vmware1!
  port: 443
  username: administrator
  verify: true

vcs:
- name: vcenter.vmwire.com
  password: Vmware1!
  username: administrator@vsphere.local
  verify: true

service:
  enforce_authorization: false
  legacy_mode: false
  log_wire: false
  processors: 15
  telemetry:
    enable: true

broker:
  catalog: cse-catalog
  ip_allocation_mode: pool
  network: default-organization-network
  org: cse
  remote_template_cookbook_url: https://raw.githubusercontent.com/vmware/container-service-extension-templates/master/template_v2.yaml
  storage_profile: 'truenas-iscsi-luns'
  vdc: cse-vdc
EOF

cse encrypt /opt/vmware/cse/config/config-not-encrypted.conf --output /opt/vmware/cse/config/config.yaml
chmod 600 /opt/vmware/cse/config/config.yaml
cse check /opt/vmware/cse/config/config.yaml

cse template list

mkdir -p ~/.ssh

# Add your public key(s) here
cat >> ~/.ssh/authorized_keys << EOF
ssh-rsa AAAAB3NzaC1yc2EAAAABJQAAAQEAhcw67bz3xRjyhPLysMhUHJPhmatJkmPUdMUEZre+MeiDhC602jkRUNVu43Nk8iD/I07kLxdAdVPZNoZuWE7WBjmn13xf0Ki2hSH/47z3ObXrd8Vleq0CXa+qRnCeYM3FiKb4D5IfL4XkHW83qwp8PuX8FHJrXY8RacVaOWXrESCnl3cSC0tA3eVxWoJ1kwHxhSTfJ9xBtKyCqkoulqyqFYU2A1oMazaK9TYWKmtcYRn27CC1Jrwawt2zfbNsQbHx1jlDoIO6FLz8Dfkm0DToanw0GoHs2Q+uXJ8ve/oBs0VJZFYPquBmcyfny4WIh4L0lwzsiAVWJ6PvzF5HMuNcwQ== rsa-key-20210508
EOF

# Import TKGm ova with this command
# Copy the ova to /home/ first, the ova can be obtained from my.vmware.com, ensure that it has chmod 644 permissions.
cse template import -F /home/ubuntu-2004-kube-v1.20.5-vmware.2-tkg.1-6700972457122900687.ova

# Install CSE
cse install -k ~/.ssh/authorized_keys

# Or use this if you've already installed and want to skip template creation again
cse upgrade --skip-template-creation -k ~/.ssh/authorized_keys

# Setup cse.sh
cat > /opt/vmware/cse/cse.sh << EOF
#!/usr/bin/env bash
source /opt/vmware/cse/python/bin/activate
export CSE_CONFIG=/opt/vmware/cse/config/config.yaml
export CSE_CONFIG_PASSWORD=Vmware1!
cse run
EOF

# Make cse.sh executable
chmod +x /opt/vmware/cse/cse.sh

# Deactivate the python virtual environment and go back to root
deactivate
exit

# Setup cse.service, use MQTT and not RabbitMQ
cat > /etc/systemd/system/cse.service << EOF
[Unit]
Description=Container Service Extension for VMware Cloud Director

[Service]
ExecStart=/opt/vmware/cse/cse.sh
User=cse
WorkingDirectory=/opt/vmware/cse
Type=simple
Restart=always

[Install]
WantedBy=default.target
EOF

systemctl enable cse.service
systemctl start cse.service

systemctl status cse.service

Install and enable the CSE UI Plugin for VCD

Download the latest version from https://github.com/vmware/container-service-extension/raw/master/cse_ui/3.0.4/container-ui-plugin.zip.

Enable it for the tenants that you want or for all tenants.

Enable the rights bundles

Follow the instructions in this other post.

Enable Global Roles to use CSE or Configure Rights Bundles

The quickest way to get CSE working is to add the relevant rights to the Organization Administrator role. You can create a custom rights bundle and create a custom role for the k8s admin tenant persona if you like. I won’t cover that in this post.

Log in as the /Provider and go to the Administration menu and click on Global Roles on the left.

Edit the Organization Administrator role and scroll all the way down to the bottom and click both the View 8/8 and Manage 12/12, then Save.

Useful links

https://github.com/vmware/container-service-extension/commit/5d2a60b5eeb164547aef39602f9871c06726863e

https://vmware.github.io/container-service-extension/cse3_1/RELEASE_NOTES.html

Tanzu Bootstrap using Photon OS 4.0

This topic explains how to install and initialize the Tanzu command line interface (CLI) on a bootstrap machine. I’ve found that using Photon OS 4.0 is the fastest and most straightforward method to get going with Tanzu.

A quick post on how to setup a Tanzu Kubernetes Grid bootstrap VM using Photon OS.

This topic explains how to install and initialize the Tanzu command line interface (CLI) on a bootstrap machine. I’ve found that using Photon OS 4.0 is the fastest and most straightforward method to get going with Tanzu. I’ve tried Ubuntu and CentOS but these require a lot more preparation with pre-requisites and dependencies such as building a VM from an ISO, and installing Docker which Photon OS already comes with. The other thing I’ve noticed with Linux distros such as Ubuntu is that other things might interfere with your Tanzu deployment. Apparmor and the ufw firewall come to mind.

The Tanzu bootstrap machine is the laptop, host, or server that you deploy management and workload clusters from, and that keeps the Tanzu and Kubernetes configuration files for your deployments. The bootstrap machine is typically local, but it can also be a physical machine or VM that you access remotely. We will be using a ready built Photon OS OVA that is supported by VMware.

Photon OS, is an open-source minimalist Linux operating system from VMware that is optimized for cloud computing platforms, VMware vSphere deployments, and applications native to the cloud.

Photon OS is a Linux container host optimized for vSphere and cloud-computing platforms such as Amazon Elastic Compute and Google Compute Engine. As a lightweight and extensible operating system, Photon OS works with the most common container formats, including Docker, Rocket, and Garden. Photon OS includes a yum-compatible, package-based lifecycle management system called tdnf.

Once the Tanzu CLI is installed, the second and last step to deploying Tanzu Kubernetes Grid is using the Tanzu CLI to create or designate a management cluster on each cloud provider that you use. The Tanzu CLI then communicates with the management cluster to create and manage workload clusters on the cloud provider.

Tanzu bootstrap high-level architecture

Download the Photon OS OVA from this direct link.

Deploy that ova using vCenter Linux Guest Customization and ensure that you deploy it on the same network as the TKG management cluster network that you intend to use. This is important as the bootstrap will set up a temporary kind cluster on Docker that will then be moved over to the TKG management cluster.

Ensure your VM has a minimum of 6GB of RAM. You can read up on other pre-requisites here.

Login using root, with password of changeme, you will be asked to update the root password. All the steps below are done using the root account, if you wish to use a non root account with Photon OS, ensure that you add that account to the docker group, more details in this link here.

Install the tar package, which we will need later to extract the Tanzu CLI.

tdnf install tar

First thing to do is create a new directory called /tanzu.

mkdir /tanzu

and then go into that directory, we will be performing most tasks in this director

cd /tanzu

Copy the following files to the /tanzu directory. You can get these files from my.vmware.com under the Tanzu Kubernetes Grid product listing.

kubectl-linux-v1.20.5-vmware.1.gz, this is the kubectl tool.

tanzu-cli-bundle-v1.3.1-linux-amd64.tar, this is the tanzu CLI.

Unpack the Tanzu CLI

tar -xvf tanzu-cli-bundle-v1.3.1-linux-amd64.tar

Unzip the kubectl tool

gunzip kubectl-linux-v1.20.5-vmware.1.gz

Install kubectl

install kubectl-linux-v1.20.5-vmware.1 /usr/local/bin/kubectl

Now go to the /cli directory

cd /tanzu/cli

Install Tanzu CLI

install core/v1.3.1/tanzu-core-linux_amd64 /usr/local/bin/tanzu

Install Tanzu CLI Plugins

Now go back to the /tanzu directory

tanzu plugin clean
tanzu plugin install --local cli all
tanzu plugin list

Enable bash auto completion for tanzu cli

source <(tanzu completion bash)

Enable bash auto completion for kubectl

source <(kubectl completion bash)

Install Carvel Tools – ytt, kapp, kgld and imgpkg

Install ytt

gunzip ytt-linux-amd64-v0.31.0+vmware.1.gz
chmod ugo+x ytt-linux-amd64-v0.31.0+vmware.1
mv ./ytt-linux-amd64-v0.31.0+vmware.1 /usr/local/bin/ytt

Install kapp

gunzip kapp-linux-amd64-v0.36.0+vmware.1.gz
chmod ugo+x kapp-linux-amd64-v0.36.0+vmware.1
mv ./kapp-linux-amd64-v0.36.0+vmware.1 /usr/local/bin/kapp

Install kbld

gunzip kbld-linux-amd64-v0.28.0+vmware.1.gz
chmod ugo+x kbld-linux-amd64-v0.28.0+vmware.1
mv ./kbld-linux-amd64-v0.28.0+vmware.1 /usr/local/bin/kbld

Install imgpkg

gunzip imgpkg-linux-amd64-v0.5.0+vmware.1.gz
chmod ugo+x imgpkg-linux-amd64-v0.5.0+vmware.1
mv ./imgpkg-linux-amd64-v0.5.0+vmware.1 /usr/local/bin/imgpkg

Stop Docker

systemctl stop docker

Upgrade software on Photon OS

tdnf -y upgrade docker

Start Docker

systemctl start docker

Add your SSH public key to login with your private key. Please see this link for a guide. Logout and use your private key to login.

vi ~/.ssh/authorized_keys

Start TKG UI Installer

tanzu management-cluster create --ui --bind <ip-of-your-photon-vm>:8080 --browser none