A quick note on the Rights Bundles for Container Service Extension when enabling native, TKGm or TKGs clusters.
The rights bundle named vmware:tkgcluster Entitlement are for TKGs clusters and NOT for TKGm.
The rights bundle named cse:nativeCluster Entitlement are for native clusters AND also for TKGm clusters.
Yes, this is very confusing and will be fixed in an upcoming release.
You can see a brief note about this on the release notes here.
Users deploying VMware Tanzu Kubernetes Grid clusters should have the rights required to deploy exposed native clusters and additionally the right Full Control: CSE:NATIVECLUSTER. This right is crucial for VCD CPI to work properly.
So in summary, for a user to be able to deploy TKGm clusters they will need to have the cse:nativeCluster Entitlement rights.
To publish these rights, go to the Provider portal and navigate to Administration, Rights Bundles.
Click on the radio button next to cse:nativeCluster Entitlement and click on Publish, then publish to the desired tenant or to all tenants.
In this post I show how to deploy the Kubernetes Dashboard onto a Tanzu Kubernetes Grid cluster.
Dashboard provides information on the state of Kubernetes resources in your cluster and on any errors that may have occurred.
Dashboard is a web-based Kubernetes user interface. You can use Dashboard to deploy containerized applications to a Kubernetes cluster, troubleshoot your containerized application, and manage the cluster resources. You can use Dashboard to get an overview of applications running on your cluster, as well as for creating or modifying individual Kubernetes resources (such as Deployments, Jobs, DaemonSets, etc). For example, you can scale a Deployment, initiate a rolling update, restart a pod or deploy new applications using a deploy wizard.
Dashboard also provides information on the state of Kubernetes resources in your cluster and on any errors that may have occurred.
In the previous post I prepared NSX ALB for Tanzu Kubernetes Grid ingress services. In this post I will deploy a new TKG cluster and use if for Tanzu Shared Services.
Tanzu Kubernetes Grid includes binaries for tools that provide in-cluster and shared services to the clusters running in your Tanzu Kubernetes Grid instance. All of the provided binaries and container images are built and signed by VMware.
A shared services cluster, is just a Tanzu Kubernetes Grid workload cluster used for shared services, it can be provisioned using the standard cli command tanzu cluster create, or through Tanzu Mission Control.
You can add functionalities to Tanzu Kubernetes clusters by installing extensions to different cluster locations as follows:
The Harbor service runs on a shared services cluster, to serve all the other clusters in an installation. The Harbor service requires the Contour service to also run on the shared services cluster. In many environments, the Harbor service also benefits from External DNS running on its cluster, as described in Harbor Registry and External DNS.
Some extensions require or are enhanced by other extensions deployed to the same cluster:
Contour is required by Harbor, External DNS, and Grafana
Prometheus is required by Grafana
External DNS is recommended for Harbor on infrastructures with load balancing (AWS, Azure, and vSphere with NSX Advanced Load Balancer), especially in production or other environments in which Harbor availability is important.
Each Tanzu Kubernetes Grid instance can only have one shared services cluster.
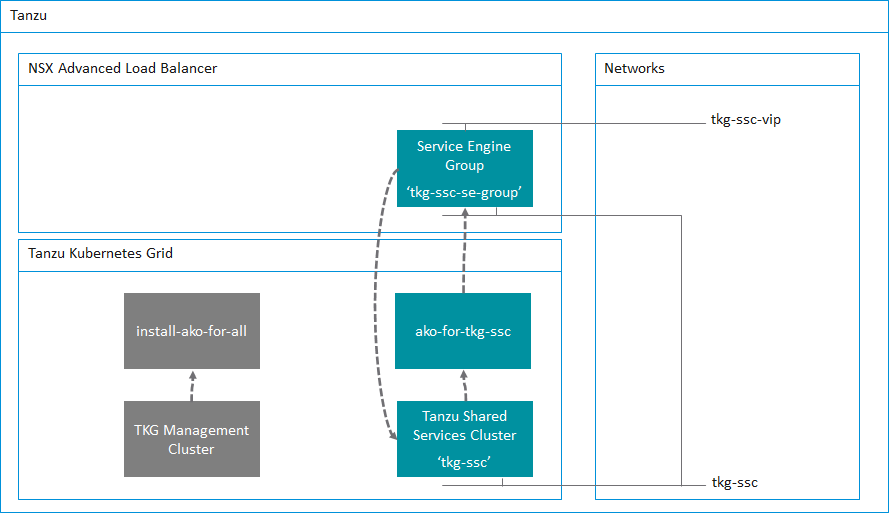
Relationships
The following table shows the relationships between the NSX ALB system, the TKG cluster deployment config and the AKO config. It is important to get these three correct.
Avi Controller
TKG cluster deployment file
AKO Config file
Service Engine Group name tkg-ssc-se-group
AVI_LABELS
'cluster': 'tkg-ssc'
clusterSelector:
  matchLabels:
   cluster: tkg-ssc

serviceEngineGroup: tkg-ssc-se-group
TKG Cluster Deployment Config File – tkg-ssc.yaml
Lets first take a look at the deployment configuration file for the Shared Services Cluster.
I’ve highlighted in bold the two key value pairs that are important in this file. You’ll notice that
AVI_LABELS: |
    'cluster': 'tkg-ssc'
We are labeling this TKG cluster so that Avi knows about it. In addition the other key value pair
AVI_SERVICE_ENGINE_GROUP: tkg-ssc-se-group
This ensures that this TKG cluster will use the service engine group named tkg-ssc-se-group.
While we have this file open you’ll notice that the long certificate under AVI_CA_DATA_B64 is the copy and paste of the Avi Controller certificate that I copied from the previous post.
Take some time to review my cluster deployment config file for the Shared Services Cluster below. You’ll see that you will need to specify the VIP network for NSX ALB to use
AVI_DATA_NETWORK: tkg-ssc-vip
AVI_DATA_NETWORK_CIDR: 172.16.4.32/27
Basically, any key that begins with AVI_ needs to have the corresponding setting configured in NSX ALB. This is what we prepared in the previous post.
The next file we need to configure is the AKODeploymentConfig file, this file is used by Kubernetes to ensure that the L4 load balancing is using NSX ALB.
I’ve highlighted some settings that are important.
clusterSelector:
  matchLabels:
    cluster: tkg-ssc
Here we are specifying a cluster selector for AKO that will use the name of the cluster, this corresponds to the following setting in the tkg-ssc.yaml file.
AVI_LABELS: |
  'cluster': 'tkg-ssc'
The next key value pair specifies what Service Engines to use for this TKG cluster. This is of course what we configured within Avi in the previous post.
Setup the new AKO configuration before deploying the new TKG cluster
Before deploying the new TKG cluster, we have to setup a new AKO configuration. To do this run the following command under the TKG Management Cluster context.
kubectl apply -f <Path_to_YAML_File>
Which in my example is
kubectl apply -f tkg-ssc-akodeploymentconfig.yaml
You can use the following to check that that was successful.
kubectl get akodeploymentconfig
root@photon-manager [ ~/.tanzu/tkg/clusterconfigs ]# kubectl get akodeploymentconfig
NAME AGE
ako-for-tkg-ssc 3d19h
You can also show additional details by using the kubectl describe command
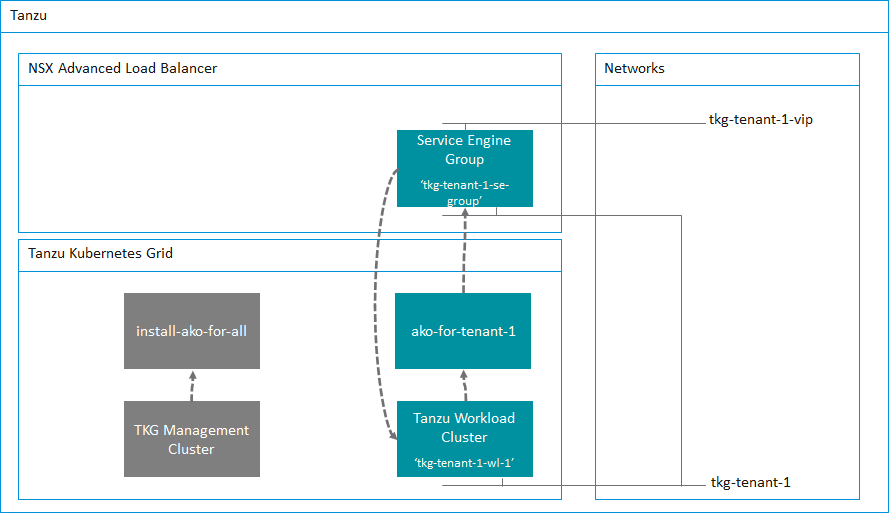
For any new AKO configs that you need, just take a copy of the .yaml file and edit the contents that correspond to the new AKO config. For example, to create another AKO config for a new tenant, take a copy of the tkg-ssc-akodeploymentconfig.yaml file and give it a new name such as tkg-tenant-1-akodeploymentconfig.yaml, and change the following highlighted key value pairs.
root@photon-manager [ ~/.tanzu/tkg/clusterconfigs ]# tanzu cluster list --include-management-cluster NAME NAMESPACE STATUS CONTROLPLANE WORKERS KUBERNETES ROLES PLAN tkg-ssc default running 1/1 1/1 v1.20.5+vmware.2 tanzu-services dev tkg-mgmt tkg-system running 1/1 1/1 v1.20.5+vmware.2 management dev
Add the key value pair of cluster=tkg-ssc to label this cluster and complete the setup of AKO.
kubectl label cluster tkg-ssc cluster=tkg-ssc
Once the cluster is labelled, switch to the tkg-ssc context and you will notice a new namespace named “avi-system” being created and a new pod named “ako-0” being started.
root@photon-manager [ ~/.tanzu/tkg/clusterconfigs ]# kubectl get ns
NAME STATUS AGE
avi-system Active 3d18h
cert-manager Active 3d15h
default Active 3d19h
kube-node-lease Active 3d19h
kube-public Active 3d19h
kube-system Active 3d19h
kubernetes-dashboard Active 3d16h
tanzu-system-monitoring Active 3d15h
tkg-system Active 3d19h
tkg-system-public Active 3d19h
root@photon-manager [ ~/.tanzu/tkg/clusterconfigs ]# kubectl get pods -n avi-system
NAME READY STATUS RESTARTS AGE
ako-0 1/1 Running 0 3d18h
Summary
We now have a new TKG Shared Services Cluster up and running and configured for Kubernetes ingress services with NSX ALB.
In the next post I’ll deploy the Kubernetes Dashboard onto the Shared Services Cluster and show how this then configures the NSX ALB for ingress services.
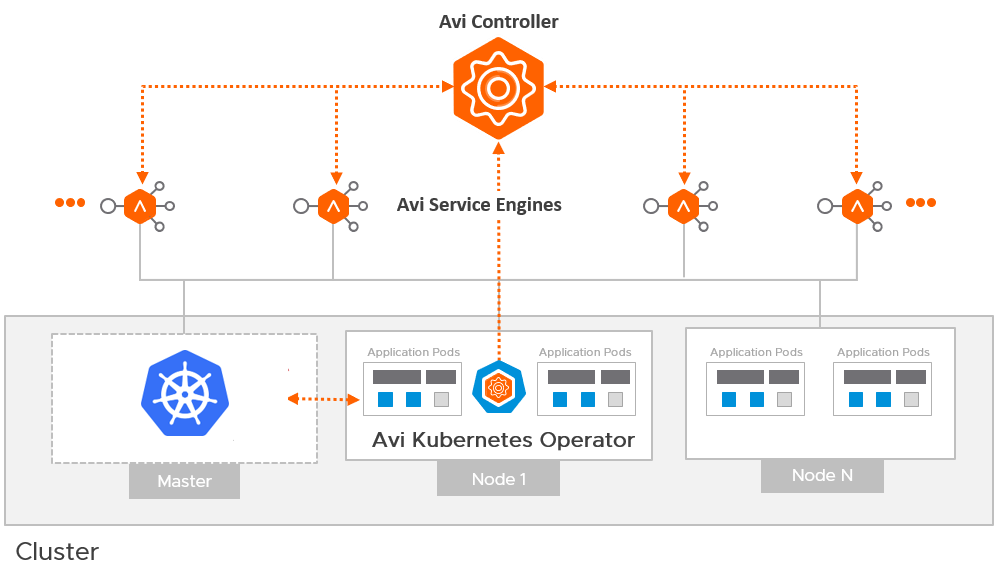
In this post I describe how to setup NSX ALB (Avi) in preparation for use with Tanzu Kubernetes Grid, more specifically, the Avi Kubernetes Operator (AKO).
AKO is a Kubernetes operator which works as an ingress controller and performs Avi-specific functions in a Kubernetes environment with the Avi Controller. It runs as a pod in the cluster and translates the required Kubernetes objects to Avi objects and automates the implementation of ingresses/routes/services on the Service Engines (SE) via the Avi Controller.
Avi Kubernetes Operator Architecture
First lets describe the architecture for TKG + AKO.
For each tenant that you have, you will have at least one AKO configuration.
A tenant can have one or more TKG workload clusters and more than one TKG workload cluster can share an AKO configuration. This is important to remember for multi-tenant services when using Tanzu Kubernetes Grid. However, you can of course configure an AKO config for each TKG workload cluster if you wish to provide multiple AKO configurations. This will require more Service Engines and Service Engine Groups as we will discuss further below.
So as a minimum, you will have several AKO configs. Let me summarize in the following table.
AKO Config
Description
Specification
install-ako-for-all
The default ako configuration used for the TKG Management Cluster and deployed by default
Provider side ako configuration for the TKG Management Cluster only.
ako-for-tkg-ssc
The ako configuration for the Tanzu Shared Services Cluster
Provider side AKO configuration for the Tanzu Shared Services Cluster only.
tkg-ssc-akodeploymentconfig.yaml
ako-for-tenant-1
The ako configuration for Tenant 1
AKO configuration prepared by the Provider and deployed for the tenant to use.
tkg-tenant-1-akodeploymentconfig.yaml
ako-for-tenant-x
The ako configuration for Tenant x
Although TKG deploys a default AKO config, we do not use any ingress services for the TKG Management Cluster. Therefore we do not need to deploy a Service Engine Group and Service Engines for this cluster.
Service Engine Groups and Service Engines are only required if you need ingress services to your applications. We of course need this for the Tanzu Shared Services and any applications deployed into a workload cluster.
I will go into more detail in a follow-up post where I will demonstrate how to setup the Tanzu Shared Services Cluster that uses the preparation steps described in this post.
Lets start the Avi Controller configuration. Although I am using the Tanzu Shared Services Cluster as an example for this guide, the same steps can be repeated for all additional Tanzu Kubernetes Grid workload clusters. All that is needed is a few changes to the .yaml files and you’re good to go.
Clouds
I prefer not to use the Default-Cloud, and will always create a new cloud.
The benefit to using NSX ALB in write mode (Orchestration mode) is that NSX ALB will orchestrate the creation of service engines for you and also scale out more service engines if your applications demand more capacity. However, if you are using VMware Cloud on AWS, this is not possible due to restrictions with the RBAC constraints within VMC so only non-orchestration mode is possible with VMC.
In this post I’m using my home lab which is running vSphere.
Navigate to Infrastructure, Clouds and click on the CREATE button and select the VMware vCenter/VMware vSphere ESX option. This post uses vCenter as a cloud type.
Fill in the details as my screenshots show. You can leave the IPAM Profile settings empty for now, we will complete these in the next step.
Select the Data Center within your vSphere hierarchy. I’m using my home lab for this example. Again leave all the other settings on the defaults.
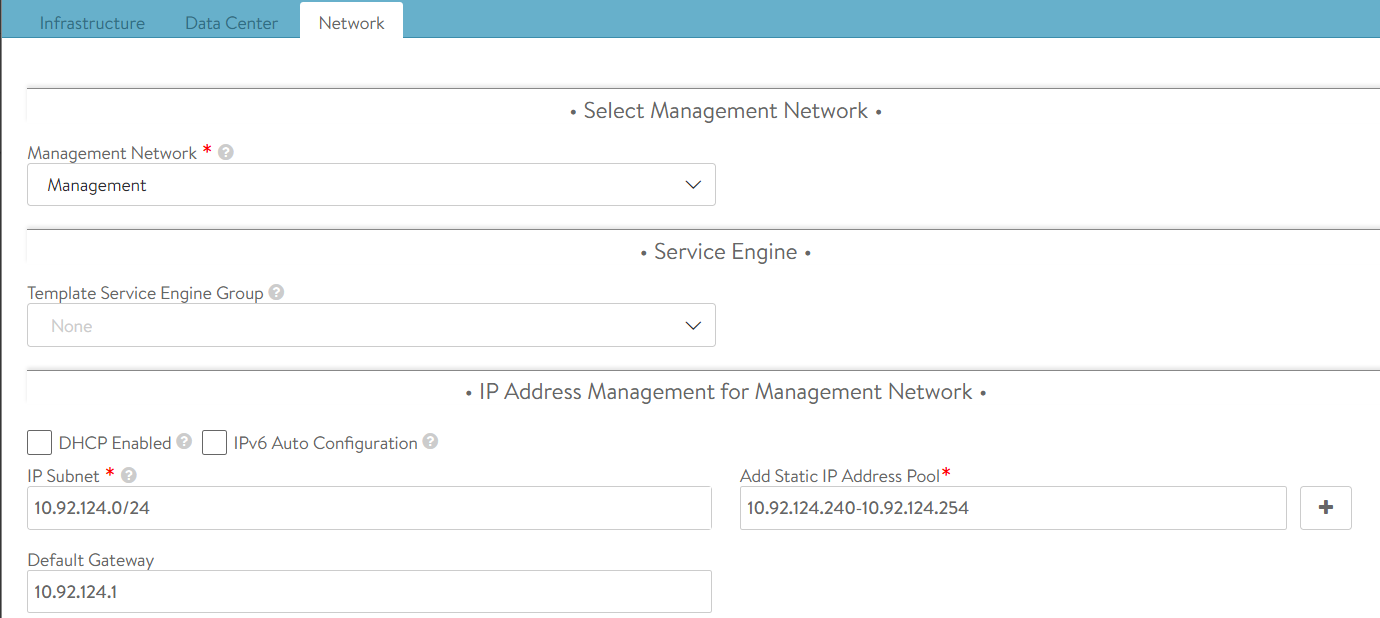
The next tab will take you to the network options for the management network to use for the service engines. This network needs to be routable between the Avi Controller(s) and the service engines.
The network tab will show you the networks that it finds from the vCenter connection, I am using my management network. This network is where I run all of the management appliances, such as vCenter, NSX-T, Avi Controllers etc.
Its best to configure a static IP pool for the service engines. Generally, you’ll need just a handful of IP addresses as each service engine group will have two service engines and each service engine will only need one management IP. A service engine group can provide Kubernetes load balancing services for the entire Kubernetes cluster. This of course depends on your sizing requirements, and can be reviewed here. For my home lab, fourteen IP addresses is more than sufficient for my needs.
Service Engine Group
While we’re in the Infrastructure settings lets proceed to setup a new Service Engine Group. Navigate to Infrastructure, Service Engine Group, select the new cloud that we previously setup and then click on the CREATE button. Its important that you ensure you select your new cloud from that drop down menu.
Give your new service engine group a name, I tend to use a naming format such as tkg-<cluster-name>-se-group. For this example, I am setting up a new SE group for the Tanzu Shared Services Cluster.
Reduce the maximum number of service engines down if you wish. You can leave all other settings on defaults.
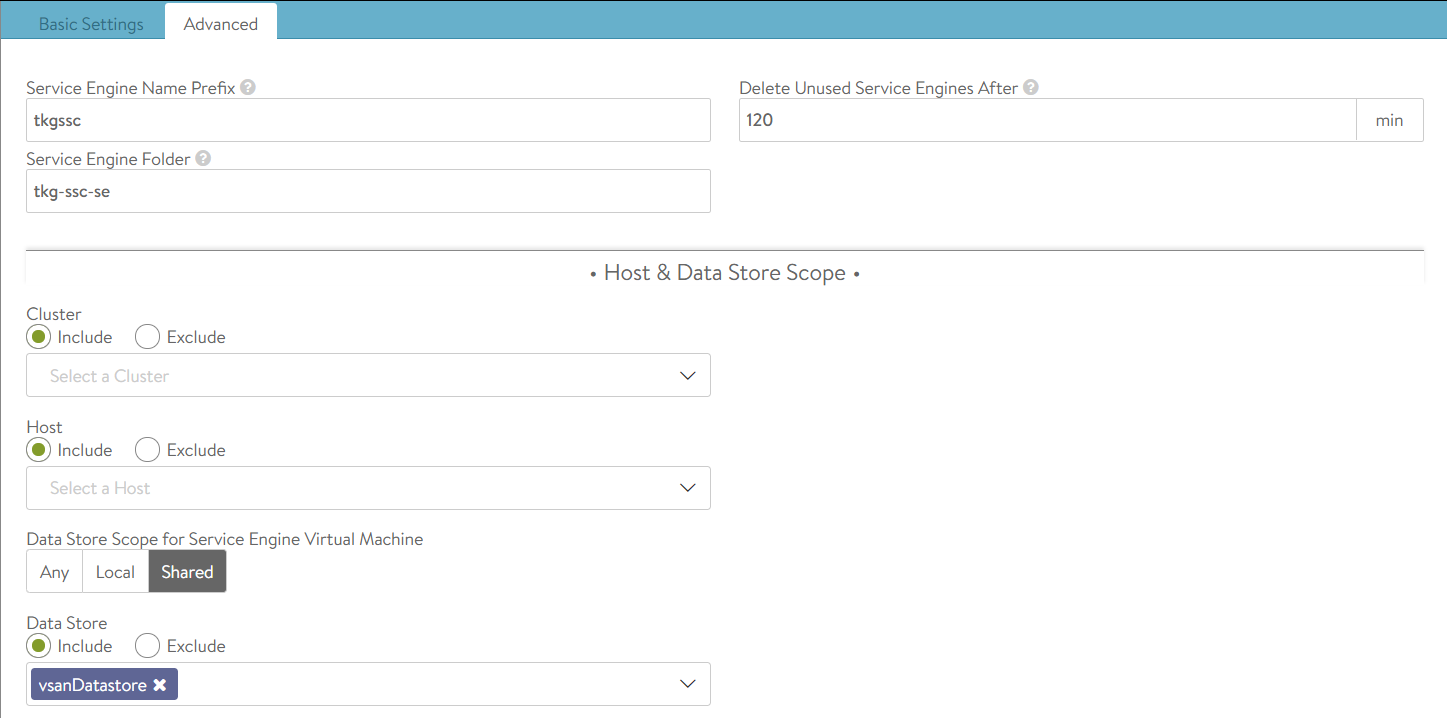
Click on the Advanced tab to setup some vSphere specifics. Here you can setup some options that will help you identify the SEs in the vSphere hierarchy as well as placing the SEs into a VM folder and options to include or exclude compute clusters or hosts and even an option to include or exclude a datastore.
Service Engine groups are important as they are the boundary with which TKG clusters will use for L4 services. Each SE Group needs to have a unique name, this is important as each TKG workload cluster will use this name for its AKODeploymentConfig file, this is the config file that maps a TKG cluster to NSX ALB for L4 load balancing services.
With TKG, when you create a TKG workload cluster you must specify some key value pairs that correspond to service engine group names and this is then applied in the AKODeploymentConfig file.
The following table shows where these relationships lie and I will go into more detail in a follow-up post where I will demonstrate how to setup the Tanzu Shared Services Cluster.
Avi Controller
TKG cluster deployment file
AKO Config file
Service Engine Group name tkg-ssc-se-group
AVI_LABELS
'cluster': 'tkg-ssc'
clusterSelector:
  matchLabels:
   cluster: tkg-ssc

serviceEngineGroup: tkg-ssc-se-group
Networks
Navigate to Infrastructure, Networks, again ensure that you select your new cloud from the drop down menu.
The Avi Controller will show you all the networks that it has detected using the vCenter connection that you configured. What we need to do in this section is to configure the networks that NSX ALB will use when configuring a service for Kubernetes to use. Generally, depending on how you setup your network architecture for TKG, you will have one network that the TKG cluster will use and another for the front-end VIP. This network is what you will use to expose the pods on. Think of it as a load balancer DMZ network.
In my home lab, I use the following setup.
Network
Description
Specification
tkg-mgmt
TKG Management Cluster
Network: 172.16.3.0/27 Static IP Pools: 172.16.3.26 – 172.16.3.29
tkg-ssc
TKG Shared Services Cluster
Network: 172.16.3.32/27 Static IP Pools: 172.16.3.59 – 172.16.3.62
tkg-ssc-vip
TKG Shared Services Cluster front-end VIPs
Network: 172.16.4.32/27 Static IP Pools: 172.16.4.34 – 172.16.4.62
IPAM Profile
Create an IPAM profile by navigating to Templates, Profiles, IPAM/DNS Profiles and clicking on the CREATE button and select IPAM Profile.
Select the cloud that you setup above and select all of the usable networks that you will use for applications that will use the load balancer service from NSX ALB. You want to select the networks that you configured in the step above.
Avi Controller Certificate
We also need the SSL certificate used by the Avi Controller, I am using a signed certificate in my home lab from Let’s Encrypt, which I wrote about in a previous post.
Navigate to Templates, Security, SSL/TLS Certificates, click on the icon with a downward arrow in a circle next to the certificate for your Avi Controller, its normally the first one in the list.
Click on the Copy to clipboard button and paste the certificate into Notepad++ or similar.
At this point we have NSX ALB setup for deploying a new TKG workload cluster using the new Service Engine Group that we have prepared. In the next post, I’ll demonstrate how to setup the Tanzu Shared Services Cluster to use NSX ALB for ingress services.
Deploying your first pod with a persistent volume claim and service on vSphere with Tanzu. With sample code for you to try.
Learning the k8s ropes…
This is not a how to article to get vSphere with Tanzu up and running, there are plenty of guides out there, here and here. This post is more of a “lets have some fun with Kubernetes now that I have a vSphere with Tanzu cluster to play with“.
Answering the following question would be a good start to get to grips with understanding Kubernetes from a VMware perspective.
How do I do things that I did in the past in a VM but now do it with Kubernetes in a container context instead?
For example building the certbot application in a container instead of a VM.
Lets try to create an Ubuntu deployment that deploys one Ubuntu container into a vSphere Pod with persistent storage and a load balancer service from NSX-T to get to the /bin/bash shell of the deployed container.
Let’s go!
I created two yaml files for this, accessible from Github. You can read up on what these objects are here.
Filename
Whats it for?
What does it do?
Github link
certbot-deployment.yaml
k8s deployment specification
Deploys one ubuntu pod, claims a 16Gb volume and mounts it to /dev/sdb and creates a load balancer to enable remote management with ssh.
Creates a persistent volume of 16Gb size from the underlying vSphere storage class named tanzu-demo-storage. The PVC is then consumed by the deployment.
kubectl get deployments
NAME        READY   UP-TO-DATE   AVAILABLE   AGE
certbot     1/1     1            1           47m


kubectl get pods
NAME                         READY   STATUS    RESTARTS   AGE
certbot-68b4747476-pq5j2     1/1     Running   0          47m


kubectl get pvc
NAME          STATUS   VOLUME                                     CAPACITY   ACCESS MODES   STORAGECLASS         AGE
certbot-pvc   Bound    pvc-418a0d4a-f4a6-4aef-a82d-1809dacc9892   16Gi       RWO            tanzu-demo-storage   84m
Let’s log into our pod, note the name from the kubectl get pods command above.
certbot-68b4747476-pq5j2
Its not yet possible to log into the pod using SSH since this is a fresh container that does not have SSH installed, lets log in first using kubectl and install SSH.
You will then be inside the container at the /bin/bash prompt.
root@certbot-68b4747476-pq5j2:/# ls
bin   dev  home  lib32  libx32  mnt  proc  run   srv  tmp  var
boot  etc  lib   lib64  media   opt  root  sbin  sys  usr
root@certbot-68b4747476-pq5j2:/#
Before we can log into the container over an SSH connection, we need to find out what the external IP is for the SSH service that the NSX-T load balancer configured for the deployment. You can find this using the command:
kubectl get services
kubectl get services
NAME        TYPE           CLUSTER-IP   EXTERNAL-IP   PORT(S)        AGE
certbot     LoadBalancer   10.96.0.44   172.16.2.3    22:31731/TCP   51m
The IP that we use to get to the Ubuntu container over SSH is 172.16.2.3. Lets try that with a putty/terminal session…
login as: root
certbot@172.16.2.3's password:
Welcome to Ubuntu 20.04.2 LTS (GNU/Linux 4.19.126-1.ph3-esx x86_64)

 * Documentation:  https://help.ubuntu.com
 * Management:     https://landscape.canonical.com
 * Support:        https://ubuntu.com/advantage

This system has been minimized by removing packages and content that are
not required on a system that users do not log into.

To restore this content, you can run the 'unminimize' command.

The programs included with the Ubuntu system are free software;
the exact distribution terms for each program are described in the
individual files in /usr/share/doc/*/copyright.

Ubuntu comes with ABSOLUTELY NO WARRANTY, to the extent permitted by
applicable law.


The programs included with the Ubuntu system are free software;
the exact distribution terms for each program are described in the
individual files in /usr/share/doc/*/copyright.

Ubuntu comes with ABSOLUTELY NO WARRANTY, to the extent permitted by
applicable law.

$ ls
bin   dev  home  lib32  libx32  mnt  proc  run   srv  tmp  var
boot  etc  lib   lib64  media   opt  root  sbin  sys  usr
$ df
Filesystem     1K-blocks   Used Available Use% Mounted on
overlay           258724 185032     73692  72% /
/mnt/sdb        16382844  45084  16321376   1% /mnt/sdb
tmpfs             249688     12    249676   1% /run/secrets/kubernetes.io/servic                         eaccount
/dev/sda          258724 185032     73692  72% /dev/termination-log
$
You can see that there is a 16Gb mount point at /mnt/sdb just as we specified in the specifications and remote SSH access is working.