Configure NFS Storage on the VMware vCenter Server Appliance

This post highlights some best practices on the management of the vCSA log and core files. VMware recommends that these files are stored on an NFS share external to the vCSA due to the possibility of the default log and core locations filling up.

When this happens, vCenter services will be impacted.

For more information about the vCSA, please see the resources listed here https://vmwire.com/vmware-vcenter-server-virtual-appliance-vcsa/.

There may be trouble ahead

This screenshot shows what happens when this is not done, the partitions for /storage/core will fill up over time and will impact the availability of vCenter Server.

Figure 1 – Local core storage full!

Configuring NFS storage on the vCSA

You can add the NFS shares for the log and core files by logging into the VMware Studio management interface of the vCSA, normally https://<vcsa>:5480.

The default username and password is root | vmware.

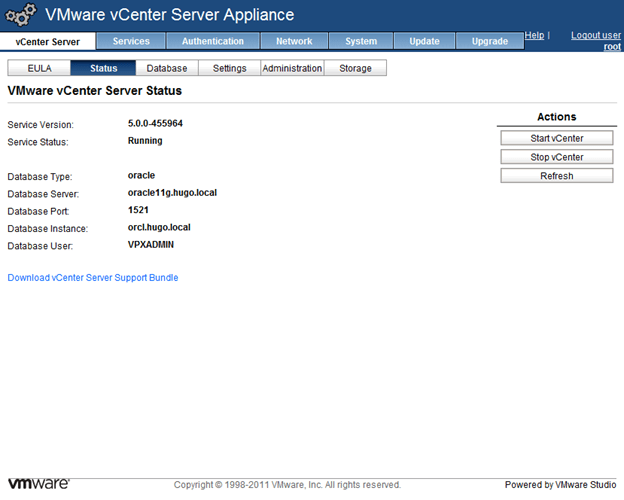
Click on the vCenter Server tab, and then click on Storage.

Figure 2 – Configuring NFS storage on the vCSA

Using the correct syntax for the NFS storage

The correct syntax for adding the storage is

<NFS_Server>:<NFS_Export>

So if my NFS_Server is 192.168.200.21 and my NFS_Export is /mnt/vg01/vcsa_core/vcsa_core/, I would enter the following in the box for NFS share for core files:

192.168.200.21:/mnt/vg01/vcsa_core/vcsa_core/

Make sure that the NFS export on the NFS Server is configured with a UID/GID mapping of no_root_squash. For example, use the command on the NFS server:

exportfs -vo rw,no_root_squash,sync :/mnt/vg01/vcsa_core/vcsa_core/

Once done, click on Test Settings to verify that the vCSA can successfully store files to the specified NFS shares, then click on Save Settings, then restart the vCSA.

Browsing to the NFS storage

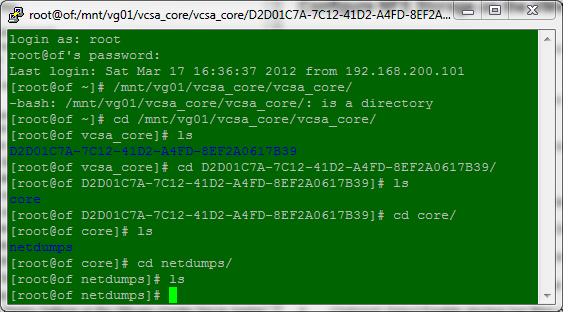
You can also see what is created in the NFS share if you listed the contents of the core files share.

Figure 3 – Core logs

You can also see what is created in the NFS share if you listed the contents of the log files share. The screenshots below show the directory structure on the NFS server. On the vCSA the directories are mounted at /storage.

Figure 4 – All other Logs

Adding sysprep packages to the VMware vCenter Server Virtual Appliance

The VMware vCenter Server Appliance (vCSA) is a Linux version of the vCenter Server, this post discusses the placement of the System Preparation tools (sysprep) packages within the vCSA and how to make the contents of the DEPLOY.CAB file available. Once configured, it is possible to use Guest Operating System Customizations with the vCSA.

My previous posts provide further detail around the features and benefitsfeature parity with the Windows vCenter Server, how to quickly deploy the vCSA and how to configure an external Oracle database for larger deployments.

For more information about the vCSA, please see the resources listed here https://vmwire.com/vmware-vcenter-server-virtual-appliance-vcsa/.

The location of the sysprep directory on the vCSA is located in

/etc/vmware/vmware-vpx/sysprep/

To get to this location, use a SSH client like WinSCP or FileZilla. The vCSA comes pre-configured with sshd, so no further action needs to be taken here.

Login as root | vmware

You’ll see the following folder structure within the /etc/vmware-vpx/sysprep/ directory:

1.1

2k

svr2003

svr2003-64

xp

xp-64

Note that Vista, Windows 2008 and Windows 7 are not listed, this is because sysprep is built into those operating systems and vCenter can already leverage this. Guest Operating System Customizations with the vCSA is also supported with Linux operating systems out of the box (no configuration to the vCSA is required), although sysprep is obviously not required, please see the Guest OS Customization Support Matrix for supported Linux distributions.

Follow the vSphere Virtual Machine Administration Guide for instructions on extracting the necessary sysprep files, these files can be found in the DEPLOY.CAB file. If you’re migrating from the Windows vCenter Server to the vCSA, just copy the above directories over.

To obtain the sysprep files, you can use the installation CD/DVDs for each operating system or use the following links to download them (these links are detailed in VMware KB1005593):

Windows Version vCSA Sysprep Directory Sysprep Version
Windows 2000 Server SP4 with Update Rollup 1

http://www.microsoft.com/downloads/details.aspx?FamilyID=0c4bfb06-2824-4d2b-abc1-0e2223133afb

Or

The updated Deployment Tools are available in the Support\Tools\Deploy.cab file on the Windows 2000 SP4 CD-ROM. To download this file, visit the following Microsoft Web site:

http://technet.microsoft.com/en-us/windowsserver/2000/bb735341.aspx

/etc/vmware-vpx/sysprep/2k 5.0.2195.2104
Windows XP Pro SP2

http://www.microsoft.com/downloads/details.aspx?FamilyId=3E90DC91-AC56-4665-949B-BEDA3080E0F6

/etc/vmware-vpx/sysprep/xp 5.1.2600.2180
Windows 2003 Server SP1

http://www.microsoft.com/downloads/details.aspx?familyid=A34EDCF2-EBFD-4F99-BBC4-E93154C332D6

/etc/vmware-vpx/sysprep/svr2003

5.2.3790.1830

(srv03_sp1_rtm.050324-1447)

Windows 2003 Server SP2

http://www.microsoft.com/downloads/details.aspx?FamilyID=93f20bb1-97aa-4356-8b43-9584b7e72556

/etc/vmware-vpx/sysprep/svr2003

5.2.3790.3959

(srv03_sp2_rtm.070216-1710)

Windows 2003 Server R2

http://www.microsoft.com/downloads/details.aspx?FamilyID=93f20bb1-97aa-4356-8b43-9584b7e72556&displaylang=en

/etc/vmware-vpx/sysprep/svr2003

5.2.3790.3959

(srv03_sp2_rtm.070216-1710)

Windows 2003 x64http://www.microsoft.com/downloads/details.aspx?familyid=C2684C95-6864-4091-BC9A-52AEC5491AF7&displaylang=en /etc/vmware-vpx/sysprep/svr2003-64

5.2.3790.3959

(srv03_sp2_rtm.070216-1710)

Windows XP x64http://www.microsoft.com/downloads/details.aspx?familyid=C2684C95-6864-4091-BC9A-52AEC5491AF7&displaylang=en /etc/vmware-vpx/sysprep/xp-64

5.2.3790.3959

(srv03_sp2_rtm.070216-1710)

Windows XP Pro SP3

http://www.microsoft.com/downloads/details.aspx?familyid=673a1019-8e3e-4be0-ac31-70dd21b5afa7&displaylang=en

/etc/vmware-vpx/sysprep/xp 5.1.2600.5512

Guest Operating System Customization Requirements

Guest operating system customization is supported only if a number of requirements are met.

VMware Tools Requirements

The most current version of VMware Tools must be installed on the virtual machine or template to customize the guest operating system during cloning or deployment.

Virtual Disk Requirements

The guest operating system being customized must be installed on a disk attached as SCSI node 0:0 in the virtual machine configuration.

Windows Requirements

Customization of Windows guest operating systems requires the following conditions:

  • Microsoft Sysprep tools must be installed on the vCenter Server system.
  • The ESXi host that the virtual machine is running on must be 3.5 or later.

Linux Requirements

Customization of Linux guest operating systems requires that Perl is installed in the Linux guest operating system.

Guest operating system customization is supported on multiple Linux distributions.

Verifying Customization Support for a Guest Operating System

To verify customization support for Windows operating systems or Linux distributions, see the Guest OS Customization Support Matrix.

Configuring vCenter Server Virtual Appliance to use an Oracle database

In previous posts I blogged about what the vCenter Server Virtual Appliance (vCSA) is, its features and benefits, feature parity with the Windows vCenter Server and also how to quickly deploy the vCSA. For more information about the vCSA, please see the resources listed here https://vmwire.com/vmware-vcenter-server-virtual-appliance-vcsa/.

This post extends the series with how to configure an external Oracle database for use by the vCSA.

Why use an Oracle database?

The vCSA comes preinstalled with an embedded DB2 database which has similar use cases as the Windows vCenter Server when configured with SQL Express – intended for small deployments of 5 ESX/ESXi servers or less. The ability for the vCSA to utilise an external Oracle database allows customers to scale and manage larger vSphere infrastructures equivalent to environments with Windows vCenter Servers backed by SQL or Oracle databases.

This post shows how quickly and easily it is to use an external Oracle database instead of the embedded DB2 database. Hopefully you’ll see the benefits of how much quicker it is to configure the Oracle connectivity between the vCSA and the Oracle server vs installing the Oracle 64-bit Client onto a Window Server and configuring tnsnames.ora, followed by configuration of ODBC settings.

Configure an Oracle Database and User

  1. Log into SQL*Plus session with the system account. I’m using Oracle 11g R2 x64 on Windows Server 2008.
    C:`>sqlplus sys/<password> as SYSDBA
  2. Run the following SQL commands to create a vCenter Server database. Note that your directory structure may be different.

    CREATE SMALLFILE TABLESPACE “VPX” DATAFILE ‘e:/app/oracle/oradata/orcl/vpx01.dbf’ SIZE 1G AUTOEXTEND ON NEXT 10M MAXSIZE UNLIMITED LOGGING EXTENT MANAGEMENT LOCAL SEGMENT SPACE MANAGEMENT AUTO;

  3. Run the following SQL command to create a vCenter Server database user with the correct permissions. I will create a new user named “VPXADMIN” with a password of “oracle”.
    CREATE USER "VPXADMIN" PROFILE "DEFAULT" IDENTIFIED BY "oracle" DEFAULT TABLESPACE "VPX" ACCOUNT UNLOCK;
    grant connect to VPXADMIN;
    grant resource to VPXADMIN;
    grant create view to VPXADMIN;
    grant create sequence to VPXADMIN; 
    grant create table to VPXADMIN; 
    grant create materialized view to VPXADMIN;
    grant execute on dbms_lock to VPXADMIN;
    grant execute on dbms_job to VPXADMIN;
    grant select on dba_tablespaces to VPXADMIN;
    grant select on dba_temp_files to VPXADMIN;
    grant select on dba_data_files to VPXADMIN;
    grant unlimited tablespace to VPXADMIN;

Configure the vCSA

  1. Log into the vCSA VMware Studio management interface at https://<vcsa>:5480/
  2. Navigate to the vCenter Server tab, then click on Database.
  3. Select oracle as the Database Type using the drop-down menu and enter your environment information into the fields and then click on Save Settings. Note how easy that was, no messing about with installing the Oracle Client, no need to configure tnsnames.ora and no need for any ODBC configuration either.

  4. Wait for around 5 minutes for the vCSA to create the database schema.
  5. Now it’s safe to start the vCenter services, navigate to the Status tab and click on Start vCenter.

  6. You can then start using vCenter when the Service Status reports as Running.

Cleaning up the Oracle configuration

After you’ve tested that everything is working, you can revoke the following privileges using SQL*Plus again.

revoke select on dba_tablespaces from VPXADMIN;
revoke select on dba_temp_files from VPXADMIN;
revoke select on dba_data_files from VPXADMIN;

Total configuration time ~approx 10 minutes.

References

vSphere Installation and Setup Guide

VMware vCenter Server Virtual Appliance (vCSA) Feature Parity

In a previous article I wrote about the vCSA’s features and benefits.  This post lists the interoperability or feature parity of the vCSA and the Windows vCenter Server.  For more information about the vCSA, please see the resources listed here https://vmwire.com/vmware-vcenter-server-virtual-appliance-vcsa/.

A few readers have asked what works with the vCSA and what does not.

The vCSA supports all vCenter features – DRS, SDRS, HA, Host Profiles, dvSwitches, etc.

Secondary architecture features like supported DB, View Composer are not yet at feature parity with the Windows vCenter Server.

Not supported yet:

  • Microsoft SQL as the database for vCenter – requires stable ODBC driver for Linux that can scale.
  • vCenter Server Linked Mode – requires ADAM.
  • vCenter Server Heartbeat – requires Windows.
  • IPv6.
  • Single sign-on using Windows session credentials.
  • VMware View Composer (Linked Clones) – installed on Windows vCenter Server only.
  • vSphere Storage Appliance – VSA Manager & VSA Cluster Server installed on Windows vCenter Server.
  • VIX Plugin for vCenter Orchestrator – VMware Tools API only works with Windows vCenter Server.

Other VMware products that work with the vCSA:

  • vCenter Operations.
  • vCenter Orchestrator.
  • vCenter CapacityIQ.
  • SRM5.
  • VMware View 5 (no Linked Clones).
  • Auto Deploy.
  • vCenter Update Manager.
  • vMA.
  • vSphere Client.
  • vSphere Web Client.
  • VMware vCloud Director.
  • PowerCLI.
  • vSphere Client for iPad & vCMA.

If I find anything else, I’ll update the article.

VMware vCenter Server Virtual Appliance (vCSA) features and benefits

The VMware vCenter Server Virtual Appliance (vCSA) provides an alternative option for organizations that chose not to run the Windows vCenter Server but still require centralised management of VMware vSphere deployments in the enterprise.

It provides exactly the same functionality as the traditional Windows vCenter Server but packaged in a Linux distribution. I know that some of my pure UNIX and LINUX customers have been asking for this for a while.

It’s been available as a technology preview since 2009 as “vCenter 2.5 on Linux” but has finally arrived with vSphere 5 to give customers’ an alternative to the Windows vCenter Server. Expect to see it available for download when vSphere 5 goes GA.

*UPDATE* vSphere5 is now GA, and the vCSA is available to download here.

For more information about the vCSA, please see the resources listed here https://vmwire.com/vmware-vcenter-server-virtual-appliance-vcsa/.

I’ve been using it for a while now in the lab and have found it very easy to deploy and use. vCenter services start a lot quicker and the user experience with the VMware vSphere Client is exactly the same.

vCenter Server Virtual Appliance features and benefits

  • Installed on SUSE Linux Enterprise Server 11 x64.
  • OVF when deployed is configured with 2vCPUs and 8Gb memory, LSI Logic Parallel, VMXNET 3, 15Gb and 60Gb VMDKs and VMware Tools.
  • Includes embedded DB2 database that is suitable for evaluation or for environments with less than 5 ESXi hosts or 50 virtual machines (equivalent to Windows vCenter Server + MSSQL Express).
  • Supports external Oracle database for large environments.
  • Includes Active Directory (AD) and Network Information Services (NIS) authentication.
  • vSphere Web Client support is built into the vCenter Server Virtual Appliance. vSphere Web Client is OS agnostic and the interface is highly customisable.
  • Windows vSphere Client is still supported.
  • Includes a pre-configured Auto Deploy server therefore reducing operational costs with the installation of Auto Deploy.
  • Can use NFS mounts to store vCenter Server Virtual Appliance core and log files.
  • vCSA can act as a syslog server for ESXi system logs.
  • Can be used as a network collector for ESXi kernel core dumps.
  • Simplified and rapid deployment, approximately 15 minutes deployment time.
  • Lower TCO by eliminating Windows OS dependency and licenses.
  • Reduces operational costs – vCSA is easier to upgrade – just deploy a new appliance and connect to the external Oracle database or
  • Import configuration data from previous installation.
  • Patches can be installed using the vCSA web interface.

Not yet feature parity with Windows vCenter Server

vCenter Server Virtual Appliance provides all features as the Windows vCenter Server but does not support the following features:

  • Microsoft SQL as the database for vCenter.
  • vCenter Server Linked Mode.
  • vCenter Server Heartbeat.
  • IPv6.

For details on what products are supported with the vCSA please see this post.

I’ve provided a quick start guide including a 10-minute how-to video demonstrating the deployment and administration in this post.

vSphere 5 vCenter Server Virtual Appliance Quick-Start Guide

The vCenter Server Linux Virtual Appliance (vCSA) is a preconfigured Linux-based virtual machine that is optimized for running vCenter Server and associated services.

This article provides a step-by-step guide on how to deploy the vCSA, configure networking, authentication, database and vCenter services.  For further information regarding the vCSA please refer to this post and this post.  To use an external Oracle database instead of the embedded DB2 database, please see this post.

For more information about the vCSA, please see the resources listed here https://vmwire.com/vmware-vcenter-server-virtual-appliance-vcsa/.

Note: This article was written using the release candidate version of the software so your experience with the GA version may differ slightly.

The following table lists the required files that you will need, gather these files before proceeding.

Description Filename Location Size (KB)
vCenter Appliance .cert file VMware-vCenter-Server-Appliance-5.0.0.2968-380565_OVF10.cert 2
vCenter Appliance .mf file VMware-vCenter-Server-Appliance-5.0.0.2968-380565_OVF10.mf 1
vCenter Appliance .ovf file that is used to import the appliance onto a vSphere server VMware-vCenter-Server-Appliance-5.0.0.2968-380565_OVF10.ovf 9
vCenter Appliance data disk VMware-vCenter-Server-Appliance-5.0.0.2968-380565-data 43,365
vCenter Appliance system disk VMware-vCenter-Server-Appliance-5.0.0.2968-380565-system 4,029,063
vSphere 5 Client VMware-viclient-en-5.0.0-380461 310,475

Watch the 10-minute video (Optimised for iPad)

Deploy the vCenter Server Linux Virtual Appliance

  1. Launch your vSphere Client and navigate to File | Deploy OVF Template.
  2. Browse to the location of the vCenter Appliance .ovf file, then click on Open.
  3. On the following screen click on Next.
  4. Then click on Next again on the OVF Template Details page.
  5. Under Name and Location, give your vCenter Appliance a name then click Next.
  6. Choose a datastore then click Next.
  7. Select a disk format on the next page then click on Next to continue.
  8. Click on Finish to start deploying.

Configuring the vCenter Server Linux Virtual Appliance

  1. Boot the appliance.
  2. Open a vSphere Client console session to the virtual appliance and configure the network and timezone.
  3. Now open up a browser and type https://<ip_of_appliance&gt;:5480 to continue the configuration.
  4. Accept the certificate error to continue.
  5. Login as root, the default password is vmware.

  1. Now read through every single word of the EULA and click on Accept EULA to continue. Please be patient whilst the vCenter is configured. If you look at the appliance remote console you’ll see the services being configured and started.

  1. You can start using the web interface again once the console screen returns to default.

  1. Next click on Status, and view the current status of the vCenter Server. The service should be on a Stopped state and the Database Type should show not configured.
  2. Click on the 
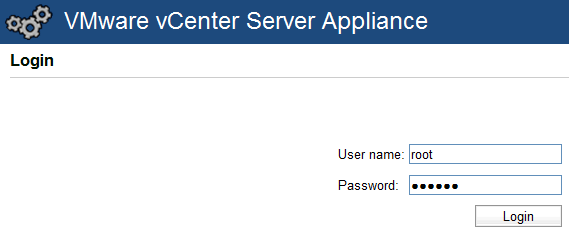
tab, you will notice that there are no DNS Servers configured and the appliance’s hostname is the standard localhost.localdom, lets change this.
  3. Click on and change to your relevant values and click on to complete the network configuration.
  4. Now setup authentication by clicking on and then on either NIS or Active Directory. My lab environment uses AD.
  5. Click on the tick box and then fill in your domain details and then click on Save Settings. You should receive an Operation is successful message to confirm that the authentication settings has worked.
  6. We now need to configure a database for vCenter to use, for this article, let’s use the embedded DB2 database. Click on to continue.
  7. When using the embedded database, there is no need to enter any details, just click on . This will take a while to complete, once done click on . After some time the database will complete configuration.
  8. Now reboot the virtual appliance one last time. To reboot click on and then click on . Click Reboot again to confirm.
  9. This time the vCenter Appliance will successfully start the vpxd daemon and initialize the database, eventually vCenter 5.0 will be ready for you to use.

Connecting to vCenter 5.0 for the first time

With all VMware vSphere Clients, when you start the vSphere Client and connect to either a vCenter Server or an ESX/ESXi host, it will check whether the vSphere Client is compatible. This is still the case with vSphere 5.0 and you will need to update your vSphere Client if you haven’t already done so. You can update by connecting to vCenter Server or ESX/ESXi or you can download the vSphere Client executable from the VMware Downloads website.

  1. Launch the vSphere Client and connect to your newly configured vCenter Server.
  2. You must use root | vmware to login, domain credentials will not work until the permissions are added to vCenter.

  1. Update the vSphere Client as necessary.
  2. Add an AD group into vCenter permissions and set the role as Administrator. [See video].
  3. Now you will be able to log in with domain credentials.
  4. You will need to enter your username in DOMAIN\Username or username@DOMAIN format.

It is also possible to just use the vSphere Web Client by opening up a browser session to https://&lt;ip_of_vCSA>:9443/vsphere-client/