In the previous post, I described how to install Harbor using Helm to utilize ChartMuseum for running Harbor as a Helm chart repository.
The Harbor registry that comes shipped with TKG 1.5.1 uses Tanzu Packages to deploy Harbor into a TKG cluster. This version of Harbor does not support Helm Charts using ChartMuseum. VMware dropped support for ChartMuseum in TKG and are adopting OCI registries instead. This post describes how to deploy Harbor using the Tanzu Packages (KApp) and use Harbor as an OCI registry that fully supports Helm charts. This is the preferred way to use chart and image registries.
The latest versions as of TKG 1.5.1 packages, February 2022.
| Package | Version |
| cert-manager | 1.5.3+vmware.2-tkg.1 |
| contour | 1.18.2+vmware.1-tkg.1 |
| harbor | 2.3.3+vmware.1-tkg.1 |
Or run the following to see the latest available versions.
tanzu package available list harbor.tanzu.vmware.com -A
Pre-requisites
Before installing Harbor, you need to install Cert Manager and Contour. You can follow this other guide here to get started. This post uses Ingress, which requires NSX Advanced Load Balancer (Avi). The previous post will show you how to install these pre-requisites.
Deploy Harbor
Create a configuration file named harbor-data-values.yaml. This file configures the Harbor package. Follow the steps below to obtain a template file.
image_url=$(kubectl -n tanzu-package-repo-global get packages harbor.tanzu.vmware.com.2.3.3+vmware.1-tkg.1 -o jsonpath='{.spec.template.spec.fetch[0].imgpkgBundle.image}')

imgpkg pull -b $image_url -o /tmp/harbor-package-2.3.3+vmware.1-tkg.1

cp /tmp/harbor-package-2.3.3+vmware.1-tkg.1/config/values.yaml harbor-data-values.yaml
Set the mandatory passwords and secrets in the harbor-data-values.yaml file by automatically generating random passwords and secrets:
bash /tmp/harbor-package-2.3.3+vmware.1-tkg.1/config/scripts/generate-passwords.sh harbor-data-values.yaml
Specify other settings in the harbor-data-values.yaml file.
Set the hostname setting to the hostname you want to use to access Harbor via ingress. For example, harbor.yourdomain.com.
To use your own certificates, update the tls.crt, tls.key, and ca.crt settings with the contents of your certificate, key, and CA certificate. The certificate can be signed by a trusted authority or be self-signed. If you leave these blank, Tanzu Kubernetes Grid automatically generates a self-signed certificate.
The format of the tls.crt and tls.key looks like this:
tlsCertificate:
  tls.crt: |
    -----BEGIN CERTIFICATE-----
    ---snipped---
    -----END CERTIFICATE-----
  tls.key: |
    -----BEGIN PRIVATE KEY-----
    ---snipped---
    -----END PRIVATE KEY-----
If you used the generate-passwords.sh script, optionally update the harborAdminPassword with something that is easier to remember.
Optionally update other persistence settings to specify how Harbor stores data.
If you need to store a large quantity of container images in Harbor, set persistence.persistentVolumeClaim.registry.size to a larger number.
If you do not update the storageClass under persistence settings, Harbor uses the cluster’s default storageClass.
Remove all comments in the harbor-data-values.yaml file:
yq -i eval '... comments=""' harbor-data-values.yaml
Install the Harbor package:
tanzu package install harbor \
--package-name harbor.tanzu.vmware.com \
--version 2.3.3+vmware.1-tkg.1 \
--values-file harbor-data-values.yaml \
--namespace my-packages
Obtain the address of the Envoy service load balancer.
kubectl get svc envoy -n tanzu-system-ingress -o jsonpath='{.status.loadBalancer.ingress[0]}'
Update your DNS record to point the hostname to the IP address above.
Update Harbor
Update the Harbor installation in any way, such as updating the TLS certificate, make your changes to the harbor-data-values.yaml file then run the following to update Harbor.
tanzu package installed update harbor --version 2.3.3+vmware.1-tkg.1 --values-file harbor-data-values.yaml --namespace my-packagesUsing Harbor as an OCI Registry for Helm Charts
Login to the registry
helm registry login -u admin harbor2.vmwire.com
Package a helm chart if you haven’t got one already packaged
helm package buildachart
Upload a chart to the registry
helm push buildachart-0.1.0.tgz oci://harbor2.vmwire.com/chartrepo
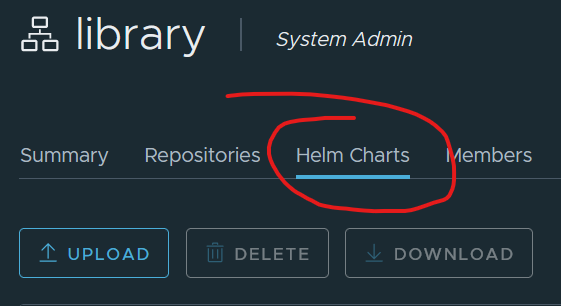
The chart can now be seen in the Harbor UI in the view as where normal Docker images are.

Notice that this is an OCI registry and not a Helm repository that is based on ChartMuseum, thats why you won’t see the ‘Helm Charts’ tab next to the ‘Repositories’ tab.
Deploy an application with Helm
Let’s deploy the buildachart application, this is a simple nginx application that can use TLS so we have a secure site with HTTPS.
Create a new namespace and the TLS secret for the application. Copy the tls.crt and tls.key files in pem format to $HOME/certs/
# Create a new namespace for cherry
k create ns cherry

# Create a TLS secret with the contents of tls.key and tls.crt in the cherry namespace
kubectl create secret tls cherry-tls --key $HOME/certs/tls.key --cert $HOME/certs/tls.crt -n cherry
Deploy the app using Harbor as the Helm chart repository
helm install buildachart oci://harbor2.vmwire.com/chartrepo/buildachart --version 0.1.0 -n cherry
If you need to install Helm
Follow this link here.
Useful links
https://helm.sh/docs/topics/registries/
https://opensource.com/article/20/5/helm-charts
https://itnext.io/helm-3-8-0-oci-registry-support-b050ff218911
