Feature gates are a set of key=value pairs that describe Kubernetes features. You can turn these features on or off using the a ytt overlay file or by editing KubeadmControlPlane or VSphereMachineTemplate. This post, shows you how to enable a feature gate by enabling the MixedProtocolLBService to the TKG kube-apiserver. It can be used to enable other feature gates as well, however, I am using the MixedProtocolLBService to test this at one of my customers.
Note that enabling feature gates on TKG clusters is unsupported.
The customer has a requirement to test mixed protocols in the same load balancer service (multiple ports and protocols on the same load balancer IP address). This feature is currently in alpha and getting a head start on alpha features is always a good thing to do to stay ahead.
For example to do this in a LoadBalancer service (with the MixedProtocolLBService feature gate enabled):
apiVersion: v1
kind: Service
metadata:
  name: mixed-protocol-dns
spec:
  type: LoadBalancer
  ports:
    - name: dns-udp
      port: 53
      protocol: UDP
    - name: dns-tcp
      port: 53
      protocol: TCP
  selector:
    app: my-dns-server
Today, without enabling this feature gate, can only be achieved using the Gateway API. The gateway object would look something like this:
apiVersion: networking.x-k8s.io/v1alpha1
kind: Gateway
metadata:
  name: gateway-tkg-dns
  namespace: default
spec:
  gatewayClassName: gatewayclass-tkg-workload
  listeners:
  - protocol: TCP
    port: 53
    routes:
      selector:
        matchLabels:
          ako.vmware.com/gateway-name: gateway-tkg-dns
          ako.vmware.com/gateway-namespace: default
      group: v1
      kind: Service
  - protocol: UDP
    port: 53
    routes:
      selector:
        matchLabels:
          ako.vmware.com/gateway-name: gateway-tkg-dns
          ako.vmware.com/gateway-namespace: default
      group: v1
      kind: Service
And the service would look something like this.
apiVersion: v1
kind: Service
metadata:
  name: mixed-protocol-dns
  namespace: default
  labels:
    ako.vmware.com/gateway-name: gateway-tkg-dns
    ako.vmware.com/gateway-namespace: default
spec:
  selector:
    app: nginx
  ports:
    - port: 53
      targetPort: 53
      protocol: TCP
    - port: 53
      targetPort: 53
      protocol: UDP
  type: ClusterIP
Let’s assume that you want to enable this feature gate before deploying a new TKG cluster. I’ll show you how to enable this on an existing cluster further down the post.
Greenfield – before creating a new TKG cluster
Create a new overlay file named kube-apiserver-feature-gates.yaml. Place this file in your ~/.config/tanzu/tkg/providers/infrastructure-vsphere/ytt/ directory. For more information on ytt overlays, please read this link.
#! Please add any overlays specific to vSphere provider under this file.

#@ load("@ytt:overlay", "overlay")
#@ load("@ytt:data", "data")

#! Enable MixedProtocolLBService feature gate on kube api.
#@overlay/match by=overlay.subset({"kind":"KubeadmControlPlane"})
---
spec:
  kubeadmConfigSpec:
    clusterConfiguration:
      apiServer:
        extraArgs:
          #@overlay/match missing_ok=True
          feature-gates: MixedProtocolLBService=true
Deploy the TKG cluster.
Inspect the kube-apiserver pod for feature gate
k get po -n kube-system kube-apiserver-tkg-test-control-plane-##### -o yamlYou should see on line 44 that the overlay has enabled the feature gate.
kind: Pod
metadata:
  annotations:
    kubeadm.kubernetes.io/kube-apiserver.advertise-address.endpoint: 172.16.3.66:6443
    kubernetes.io/config.hash: 15fb674a0f0f4d8b5074593f74365f98
    kubernetes.io/config.mirror: 15fb674a0f0f4d8b5074593f74365f98
    kubernetes.io/config.seen: "2022-03-08T22:05:59.729647404Z"
    kubernetes.io/config.source: file
    seccomp.security.alpha.kubernetes.io/pod: runtime/default
  creationTimestamp: "2022-03-08T22:06:00Z"
  labels:
    component: kube-apiserver
    tier: control-plane
  name: kube-apiserver-tkg-test-control-plane-fmpw2
  namespace: kube-system
  ownerReferences:
  - apiVersion: v1
    controller: true
    kind: Node
    name: tkg-test-control-plane-fmpw2
    uid: 9fa5077e-4802-46ac-bce7-0cf62252e0e6
  resourceVersion: "2808"
  uid: fe22305b-5be1-48b3-b4be-d660d1d307b6
spec:
  containers:
  - command:
    - kube-apiserver
    - --advertise-address=172.16.3.66
    - --allow-privileged=true
    - --audit-log-maxage=30
    - --audit-log-maxbackup=10
    - --audit-log-maxsize=100
    - --audit-log-path=/var/log/kubernetes/audit.log
    - --audit-policy-file=/etc/kubernetes/audit-policy.yaml
    - --authorization-mode=Node,RBAC
    - --client-ca-file=/etc/kubernetes/pki/ca.crt
    - --cloud-provider=external
    - --enable-admission-plugins=NodeRestriction
    - --enable-bootstrap-token-auth=true
    - --etcd-cafile=/etc/kubernetes/pki/etcd/ca.crt
    - --etcd-certfile=/etc/kubernetes/pki/apiserver-etcd-client.crt
    - --etcd-keyfile=/etc/kubernetes/pki/apiserver-etcd-client.key
    - --etcd-servers=https://127.0.0.1:2379
    - --feature-gates=MixedProtocolLBService=true
    - --kubelet-client-certificate=/etc/kubernetes/pki/apiserver-kubelet-client.crt
    - --kubelet-client-key=/etc/kubernetes/pki/apiserver-kubelet-client.key
    - --kubelet-preferred-address-types=InternalIP,ExternalIP,Hostname
    - --proxy-client-cert-file=/etc/kubernetes/pki/front-proxy-client.crt
    - --proxy-client-key-file=/etc/kubernetes/pki/front-proxy-client.key
    - --requestheader-allowed-names=front-proxy-client
    - --requestheader-client-ca-file=/etc/kubernetes/pki/front-proxy-ca.crt
    - --requestheader-extra-headers-prefix=X-Remote-Extra-
    - --requestheader-group-headers=X-Remote-Group
    - --requestheader-username-headers=X-Remote-User
    - --secure-port=6443
    - --service-account-issuer=https://kubernetes.default.svc.cluster.local
    - --service-account-key-file=/etc/kubernetes/pki/sa.pub
    - --service-account-signing-key-file=/etc/kubernetes/pki/sa.key
    - --service-cluster-ip-range=100.64.0.0/13
    - --tls-cert-file=/etc/kubernetes/pki/apiserver.crt
Inspect kubeadmcontrolplane, this is the control plane template for the master node, and all subsequent master nodes that are deployed. You can see on line 32, that the feature gate flag is enabled.
k get kubeadmcontrolplane tkg-test-control-plane -o yaml
apiVersion: controlplane.cluster.x-k8s.io/v1beta1
kind: KubeadmControlPlane
metadata:
  creationTimestamp: "2022-03-08T22:03:12Z"
  finalizers:
  - kubeadm.controlplane.cluster.x-k8s.io
  generation: 1
  labels:
    cluster.x-k8s.io/cluster-name: tkg-test
  name: tkg-test-control-plane
  namespace: default
  ownerReferences:
  - apiVersion: cluster.x-k8s.io/v1beta1
    blockOwnerDeletion: true
    controller: true
    kind: Cluster
    name: tkg-test
    uid: b0d75a37-9968-4119-bc56-c9fa2347be55
  resourceVersion: "8160318"
  uid: 72d74b68-d386-4f75-b54b-b1a8ab63b379
spec:
  kubeadmConfigSpec:
    clusterConfiguration:
      apiServer:
        extraArgs:
          audit-log-maxage: "30"
          audit-log-maxbackup: "10"
          audit-log-maxsize: "100"
          audit-log-path: /var/log/kubernetes/audit.log
          audit-policy-file: /etc/kubernetes/audit-policy.yaml
          cloud-provider: external
          feature-gates: MixedProtocolLBService=true
Now if you created a service with mixed protocols, the kube-apiserver will accept the service and will tell the load balancer to deploy the service.
Brownfield – enable feature gates on an existing cluster
Enabling feature gates on an already deployed cluster is a little bit harder to do, as you need to be extra careful that you don’t break your current cluster.
Let’s edit the KubeadmControlPlane template, you need to do this in the tkg-mgmt cluster context
kubectl config use-context tkg-mgmt-admin@tkg-mgmt
kubectl edit kubeadmcontrolplane tkg-hugo-control-plane
Find the line:
spec.kubeadmConfigSpec.apiServer.extraArgs
Add in the following line:
feature-gates: MixedProtocolLBService=trueso that section now looks like this:
spec:
  kubeadmConfigSpec:
    clusterConfiguration:
      apiServer:
        extraArgs:
          feature-gates: MixedProtocolLBService=true
          audit-log-maxage: "30"
          audit-log-maxbackup: "10"
          audit-log-maxsize: "100"
          audit-log-path: /var/log/kubernetes/audit.log
          audit-policy-file: /etc/kubernetes/audit-policy.yaml
          cloud-provider: external
Save the changes with :wq!
You’ll see that TKG has immediately started to clone a new control plane VM. Wait for the new VM to replace the current one.
If you inspect the new control plane VM, you’ll see that it has the feature gate applied. You need to do this in the worker cluster context that you want the feature gate enabled on, in my case tkg-hugo.
Note that enabling the feature gate to spec.kubeadmconfigspec.clusterconfiguration.apiserver.extraargs actually, enables the feature gate on the kube-apiserver, which in TKG runs in a pod.
kubectl config use-context tkg-hugo-admin@tkg-hugo
k get po kube-apiserver-tkg-hugo-control-plane-#### -n kube-system -o yaml
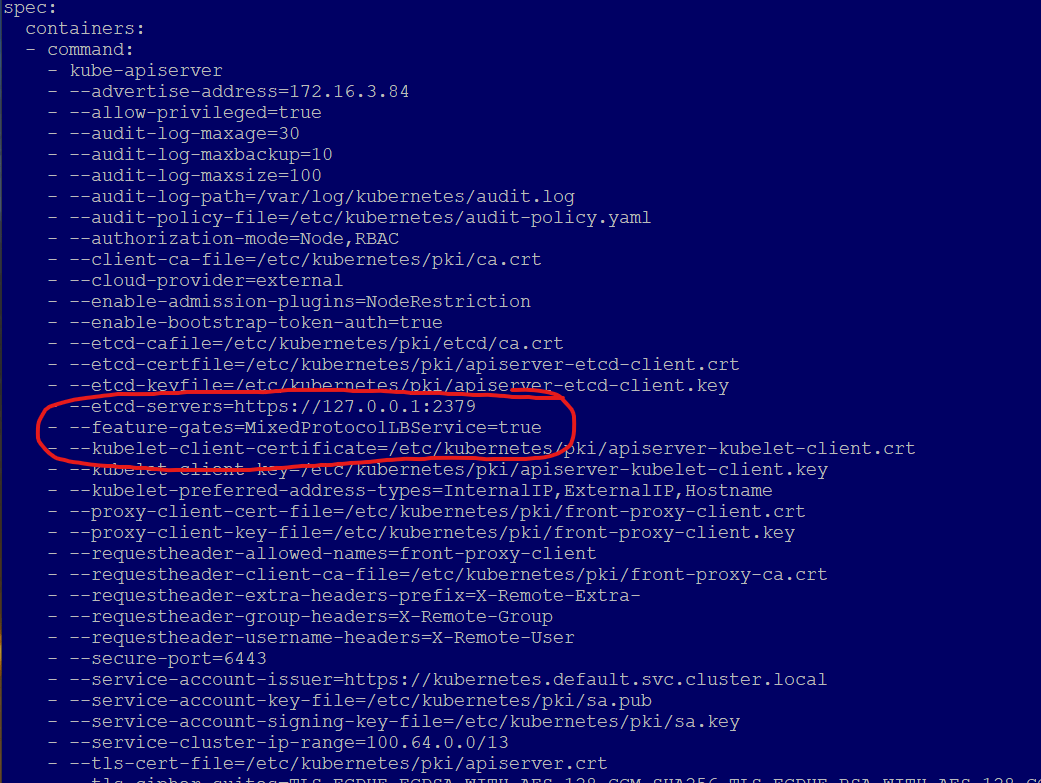
Go to the line spec.containers.command.kubeapiserver. You’ll see something like the following:
spec:
  containers:
  - command:
    - kube-apiserver
    - --advertise-address=172.16.3.82
    - --allow-privileged=true
    - --audit-log-maxage=30
    - --audit-log-maxbackup=10
    - --audit-log-maxsize=100
    - --audit-log-path=/var/log/kubernetes/audit.log
    - --audit-policy-file=/etc/kubernetes/audit-policy.yaml
    - --authorization-mode=Node,RBAC
    - --client-ca-file=/etc/kubernetes/pki/ca.crt
    - --cloud-provider=external
    - --enable-admission-plugins=NodeRestriction
    - --enable-bootstrap-token-auth=true
    - --etcd-cafile=/etc/kubernetes/pki/etcd/ca.crt
    - --etcd-certfile=/etc/kubernetes/pki/apiserver-etcd-client.crt
    - --etcd-keyfile=/etc/kubernetes/pki/apiserver-etcd-client.key
    - --etcd-servers=https://127.0.0.1:2379
    - --feature-gates=MixedProtocolLBService=true
Congratulations, the feature gate is now enabled!
