The Use Case
What is an SSL VPN?
An SSL VPN (Secure Sockets Layer virtual private network) is a form of VPN that can be used with a standard Web browser. In contrast to the traditional Internet Protocol Security (IPsec) VPN, an SSL VPN does not require the installation of specialised client software on the end user’s computer. -www.bitpipe.com
Why?
- SSL VPN is not an available feature by the Management Gateway or Compute Gateway in VMware Cloud on AWS
- Enable client VPN connections over SSL to an SDDC in VMware Cloud on AWS for secure access to the resources
- Avoid site-to-site VPN configurations between on-premises and the Management Gateway
- Avoid opening vCenter to the Internet
Not all customers want to setup site-to-site VPNs using IPSEC or Route-based VPNs between their on-premises data centre to an SDDC on VMware Cloud on AWS. Using a client VPN such as an SSL VPN to enable a client-side device to setup an SSL VPN tunnel to the SDDC.
Benefits
- Improve remote administrative security
- Enable users to access SDDC resource including vCenter over a secure SSL VPN from anywhere with an Internet connection
Summary
This article goes through the requirements and steps needed to get OpenVPN up and running. Of course, you can use any SSL VPN software, OpenVPN is a freely available open source alternative that is quick and easy to setup and is used in this article as a working example.
Review the following basic requirements before proceeding:
- Access to your VMware Cloud on AWS SDDC
- Basic knowledge of Linux
- Basic knowledge of VMware vSphere
- Basic knowledge of firewall administration
Steps
vCenter Server
In this section you’ll deploy the OpenVPN appliance. The steps can be summarised below:
- Download the OpenVPN appliance to the SDDC. The latest VMware version is available with this link:
https://openvpn.net/downloads/openvpn-as-latest-vmware.ova
- Deploy the OpenVPN appliance into a logical network.
- Configure the appliance.
-
Follow the OpenVPN guide for the OpenVPN VMware appliance version.
https://openvpn.net/vpn-server-resources/deploying-the-access-server-appliance-on-vmware-esxi/
Make a note of the IP address of the appliance, you’ll need this to NAT a public IP to this internal IP using the HTTPS service later. My appliance is using an IP of 192.168.1.201.
- Log in as root with password of openvpnas to change a password for the openvpn user. This user is used for administering the admin web interface for OpenVPN.

VMware Cloud on AWS
In this section you’ll need to create a number of firewall rules as summarised in the tables further below.
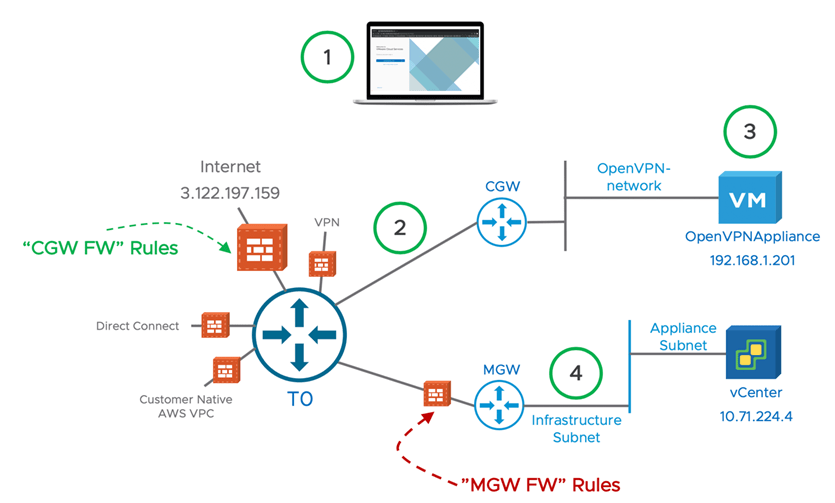
Here’s a quick diagram to show how the components relate.

What does the workflow look like?
- A user connects to the SSL VPN to OpenVPN using the public IP address 3.122.197.159.
- HTTPS (TCP 443) is NAT’d from 3.122.197.159 to the OpenVPNAppliance with an IP of 192.168.1.201 also to the HTTPS service.
- OpenVPN is configured with subnets that VPN users are allowed to access. 192.168.1.0/24 and 10.71.0.0/16 are the two allowed subnets. OpenVPN configures the SSL VPN tunnel to route to these two subnets.
- The user can open up a browser session on his laptop and connect to vCenter server using https://10.71.224.4.
Rules Configured on Management Gateway
| Rule # | Rule name | Source | Destination | Services | Action |
| 1 | Allow the OpenVPN appliance to access vCenter only on port 443 | OpenVPN appliance | vCenter | HTTPS | Allow |
The rule should look similar to the following.

Rules Configured on Compute Gateway
| Rule # | Rule name | Source | Destination | Services | Action |
| 2 | Allow port 443 access to the OpenVPN appliance | Any | OpenVPN appliance | HTTPS | Allow |
| 3 | Allow the OpenVPN-network outbound access to any destination | OpenVPN-network | Any | Any | Allow |
The two rules should look similar to the following.

I won’t go into detail on how to create these rules. However, you will need to create a few User Defined Groups for some of the Source and Destination objects.
NAT Rules
| Rule name | Public IP | Service | Public Ports | Internal IP | Internal Ports |
| NAT HTTPS Public IP to OpenVPN appliance | 3.122.197.159 | HTTPS | 443 | 192.168.1.201 | 443 |
You’ll need to request a new Public IP before configuring the NAT rule.

The NAT rule should look similar to the following.

OpenVPN Configuration
We need to configure OpenVPN before it will accept SSL VPN connections. Ensure you’ve gone through the initial configuration detailed in this document
https://openvpn.net/vpn-server-resources/deploying-the-access-server-appliance-on-vmware-esxi/
- Connect to the OpenVPNAppliance VM using a web browser. The URL is for my appliance is https://192.168.1.201:943
- Login using openvpn and use the password you set earlier.

- Click on the Admin button

Configure Network Settings
- Click on Network Settings and enter the public IP that was issued by VMware Cloud on AWS earlier.
- Also, only enable the TCP daemon.

- Leave everything else on default settings.
- Press Save Settings at the bottom.
- Press the Update Running Server button.
Configure Routing
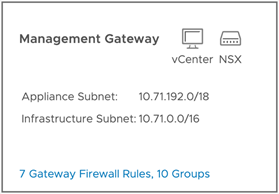
- Click on VPN Settings and enter the subnet that vCenter runs on under the Routing section. I use the Infrastructure Subnet. 10.71.0.0/16.

- Leave all other settings default, however this depends on what you configured when you deployed the OpenVPN appliance initially. My settings are below:

- Press Save Settings at the bottom.
- Press the Update Running Server button.
Configure Users and Users’ access to networks
- Click on User Permissions and add a new user
- Click on the More Settings pencil icon and configure a password and add in the subnets that you want this user to be able to access. I am using 192.168.1.0/24 – this is the OpenVPN-network subnet and also 10.71.0.0/16 – this is the Infrastructure Subnet for vCenter, ESXi in the SDDC. This will allow clients connected through the SSL VPN to connect directly to vCenter.
If you don’t know the Infrastructure Subnet you can obtain it by going to Network & Security > Overview

- Press Save Settings at the bottom.
- Press the Update Running Server button.
Installing the OpenVPN SSL VPN client onto a client device
The desktop client is only required if you do not want to use the web browser to initiate the SSL VPN. Unfortunately, we need signed certificates configured on OpenVPN to use the browser. I don’t have any for this example, so we will use the desktop client to connect instead.
For this section I will use my laptop to connect to the VPN.
- Open up a HTTPS browser session to the public IP address that was provisioned by VMware Cloud on AWS earlier. For me this is https://3.122.197.159.
- Accept any certificates to proceed. Of course, you can use real signed certificates with your OpenVPN configuration.
- Enter the username of the user that was created earlier, the password and select the Connect button.

- Click on the continue link to download the SSL VPN client

- Once downloaded, launch the installation file.
- Once complete you can close the browser as it won’t connect automatically as we are not using signed certificates.
Connecting to the OpenVPN SSL VPN client from a client device
Now that the SSL VPN client is installed we can open an SSL VPN tunnel.
- Launch the OpenVPNConnect client, I’m on OSX, so SPACEBAR “OpenVPNConnect” will bring up the client.
- Once launched, you can click on the small icon at the top of your screen.
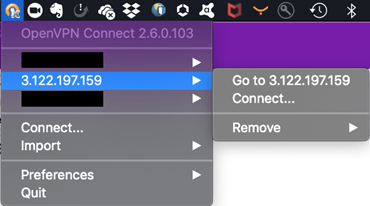
- Connect to the public IP relevant to your OpenVPN configuration.
- Enter the credentials then click on Connect.
- Accept all certificate prompts and the VPN should now be connected.
Connect to vCenter
Open up a HTTPS browser session and use the internal IP address of vCenter. You may need to add a hosts file entry for the public FQDN for vCenter to redirect to the internal IP instead. That’s it! You’re now accessing vCenter over an SSL VPN.
It’s also possible to use this method to connect to other network segments. Just follow the procedures above to add additional network segments and rules in the Compute Gateway and also add additional subnets to the Access Control section when adding/editing users to OpenVPN.
Call to Action
Learn more with these resources:
