
I’m a big fan of Let’s Encrypt as its a great service that provides free TLS certificates for your applications and websites. This post summarizes the steps to setup Let’s Encrypt as the cluster issuer for certificate manager.
A Cluster Issuer enables your applications to automatically request TLS certificates from Let’s Encrypt. It basically avoids having to do the following manually:
- Typing
certbot certonly --manual --cert-name something.domain.com --preferred-challenge=dnsto create a manual TLS request. - Then going to your DNS service and creating the TXT record.
- Then downloading the cert.pem and privkey.pem.
- Then creating a secret to use the new certificate.
Pre-requisites
- A Kubernetes cluster, I’m using a TKG cluster
- A domain name managed by a well-known domain registrar (I’m using Cloud Flare, but Route 53 and others can also be used)
Step 1. Install Cert Manager into your Kubernetes cluster
# Install Tanzu Standard Repository
tanzu package repository add tanzu-standard --url projects.registry.vmware.com/tkg/packages/standard/repo:v2024.2.1 --namespace tkg-system

# Create namespace for cert-manager tanzu packages
k create ns my-packages

# Install cert-manager
tanzu package install cert-manager --package cert-manager.tanzu.vmware.com --namespace my-packages --version 1.12.2+vmware.2-tkg.2

# Install cert-manager custom resource definitions
kubectl apply -f https://github.com/cert-manager/cert-manager/releases/download/v1.14.4/cert-manager.crds.yaml
Step 2. Create a Secret for Cloud Flare
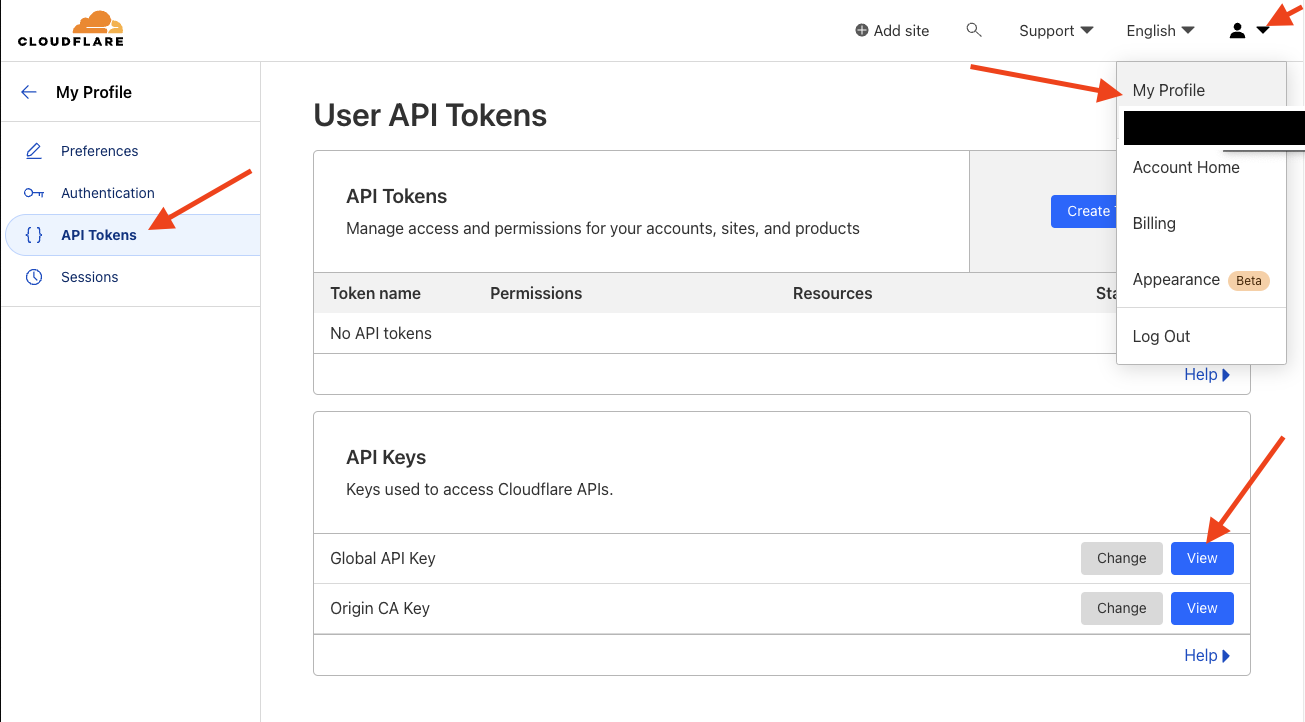
I am using Cloud Flare as my DNS provider. Cloud Flare has an API that can be used with an API Token or an API Key. I am using an API Key to allow Let’s Encrypt to verify domain ownership with Cloud Flare.
You can get your API Key by following this screenshot.
Then create the following file secret-cloudflare.yaml.
apiVersion: v1
kind: Secret
metadata:
  name: cloudflare-api-key-secret
  namespace: cert-manager
type: Opaque
stringData:
  api-key: <your-cloud-flare-api-key>
  # - or -
  # api-token: your-api-token
Step 3. Create the Let’s Encrypt Cluster Issuer
I am using Let’s Encrypt as the certificate issuer and it will check the validity of the certificate request against the domain ownership in Cloud Flare using the Secret created in Step 2.
Create another file named cluster-issuer-production.yaml.
apiVersion: cert-manager.io/v1
kind: ClusterIssuer
metadata:
  name: letsencrypt-production
spec:
  acme:
    email: <your-email-address>
    # Letsencrypt Production
    server: https://acme-v02.api.letsencrypt.org/directory
    # - or -
    # Letsencrypt Staging
    # server: https://acme-staging-v02.api.letsencrypt.org/directory
    privateKeySecretRef:
      name: example-issuer-account-key
    solvers:
    - dns01:
        cloudflare:
          email: <your-cloudflare-email-account>
          apiKeySecretRef:
            name: cloudflare-api-key-secret
            key: api-key
Step 4. Apply both files to create the Secret containing the Cloud Flare API Key and the Cluster Issuer.
kubectl apply -f secret-cloudflare.yaml
kubectl apply -f cluster-issuer-production.yaml
Your cluster is now ready for automatically issuing TLS certificates using Certificate Manager.
Example Application
The following is an example application manifest that uses the letsencrypt-production ClusterIssuer to request a TLS certificate from Let’s Encrypt named nginx.k8slabs.com.
My test domain k8slabs.com is running in Cloud Flare.
The manifest has the following sections:
- namespace – creates the nginx namespace for all of the resources below
- service – ClusterIP service for nginx to expose the nginx pod created by the
- statefulset – creates the statefulset that will deploy the nginx pods
- certificate – issued by the ClusterIssuer using Let’s Encrypt and checks validity against the DNS records in CloudFlare
- httpproxy (ingress) – creates an ingress and uses the certificate created by the ClusterIssuer to expose the nginx application over secure TLS
Sample application nginx-statefulset-contour-tls.yaml
---
apiVersion: v1
kind: Namespace
metadata:
  name: nginx
  labels:
    name: nginx
---
apiVersion: v1
kind: Service
metadata:
  name: nginx-service
  namespace: nginx
spec:
  selector:
    app: nginx
  ports:
    - name: http
      port: 80
      targetPort: 80
      protocol: TCP
  type: ClusterIP
---
apiVersion: apps/v1
kind: StatefulSet
metadata:
  name: nginx
  namespace: nginx
spec:
  selector:
    matchLabels:
      app: nginx
  serviceName: "nginx-service"
  replicas: 1
  template:
    metadata:
      labels:
        app: nginx
    spec:
      terminationGracePeriodSeconds: 10
      containers:
      - name: nginx
        image: k8s.gcr.io/nginx-slim:0.8
        ports:
        - containerPort: 80
          name: nginx
---
apiVersion: cert-manager.io/v1
kind: Certificate
metadata:
  name: nginx
  namespace: nginx
spec:
  secretName: nginx
  issuerRef:
    name: letsencrypt-production
    kind: ClusterIssuer
  dnsNames:
    - 'nginx.k8slabs.com'
---
apiVersion: projectcontour.io/v1
kind: HTTPProxy
metadata:
  annotations:
  labels:
    app: nginx
  name: nginx-httpproxy
  namespace: nginx
spec:
  routes:
  - conditions:
    - prefix: /
    pathRewritePolicy:
      replacePrefix:
      - prefix: /
        replacement: /
    services:
    - name: nginx-service
      port: 80
  virtualhost:
    fqdn: nginx.k8slabs.com
    tls:
      secretName: nginx
Visual View

