A quick post on how to enable the import of vShield Manager 5.0.1 OVA as a vApp Template into vCloud Director. This will allow you to spin up vCloud Director labs inside of vCloud Director for some crazy inception action.
Note: that this method can be used for other appliances.
As you know if you downloaded vShield Manager from VMware, the file format would be in OVA format, which is not compatible with vCloud Director.
This post goes through some of the steps required to
Once you’ve downloaded the VMware-vShield-Manager-5.0.1-638924.ova file, use the VMWare OVFTool to convert it to OVF format.
Open up the command prompt and run the following, assuming that the ova file is saved in C:\Users\Hugo Phan\Downloads\
C:\Program Files\VMware\VMware OVF Tool>ovftool.exe “c:\users\Hugo Phan\Downloads\VMware-vShield-Manager-5.0.1-638924.ova” “C:\Users\Hugo Phan\Downloads\VMware-vShield-Manager-5.0.1-638924.ovf”

The following files will then be extracted within the directory
VMware-vShield-Manager-5.0.1-638924.mf
VMware-vShield-Manager-5.0.1-638924.ovf
VMware-vShield-Manager-5.0.1-638924-disk1.vmdk
If you now tried to use the current .ovf file to upload vShield Manager into VCD as a vApp Template, you will see the following error:

We need to remove the vmw:ExtraConfig elements from the .ovf file. To do this follow these instructions:


In a previous post I blogged about creating a vanilla vSphere 5 ESXi USB drive using the VMware .iso file from VMware. This post shows how to create one using the HP version of vSphere ESXi (5.0_Oct_2011_ESXi_HD-USB-SDImgeInstlr_Z7550-00253.iso).
Note: (You can use any vendor customized vSphere ESXi .iso file: VMware, Dell and IBM).
The HP version comes pre-installed with all the HP CIM providers which work very well with HP servers, including the HP MicroServer. Using the HP version gives you the more details in the Hardware Status tab.
I’m going to be using a different method, recommended by Will Rodbard (thanks Will), who is a colleague of mine at VMware, you can see his comments from the previous post. In summary the steps are:
Once completed your USB drive will boot into the ESXi 5 installer. Once booted, install the ESXi 5 Hypervisor to the USB drive (overwriting the installer). This will then leave you with the installed ESXi Hypervisor on the USB.
Note that using this method creates a brand new bootable USB key for use in a new installation of vSphere ESXi. You will have to go through the process of installing ESXi onto the USB key, or another disk or LUN on the target server. If you want a USB key that is already installed with ESXi which saves you from going through the installation wizard, you can use the other method in this post.
I coincidently left an older USB key in my laptop and booted. Here’s a picture of my Macbook Pro running vSphere ESXi, and it all works by the way, including networking!
This post highlights some best practices on the management of the vCSA log and core files. VMware recommends that these files are stored on an NFS share external to the vCSA due to the possibility of the default log and core locations filling up.
When this happens, vCenter services will be impacted.
For more information about the vCSA, please see the resources listed here http://vmwire.com/vmware-vcenter-server-virtual-appliance-vcsa/.
This screenshot shows what happens when this is not done, the partitions for /storage/core will fill up over time and will impact the availability of vCenter Server.
Figure 1 – Local core storage full!

You can add the NFS shares for the log and core files by logging into the VMware Studio management interface of the vCSA, normally https://<vcsa>:5480.
The default username and password is root | vmware.
Click on the vCenter Server tab, and then click on Storage.
Figure 2 – Configuring NFS storage on the vCSA

The correct syntax for adding the storage is
<NFS_Server>:<NFS_Export>
So if my NFS_Server is 192.168.200.21 and my NFS_Export is /mnt/vg01/vcsa_core/vcsa_core/, I would enter the following in the box for NFS share for core files:
192.168.200.21:/mnt/vg01/vcsa_core/vcsa_core/
Make sure that the NFS export on the NFS Server is configured with a UID/GID mapping of no_root_squash. For example, use the command on the NFS server:
exportfs -vo rw,no_root_squash,sync :/mnt/vg01/vcsa_core/vcsa_core/
Once done, click on Test Settings to verify that the vCSA can successfully store files to the specified NFS shares, then click on Save Settings, then restart the vCSA.
You can also see what is created in the NFS share if you listed the contents of the core files share.
Figure 3 – Core logs

You can also see what is created in the NFS share if you listed the contents of the log files share. The screenshots below show the directory structure on the NFS server. On the vCSA the directories are mounted at /storage.
Figure 4 – All other Logs

The VMware vCenter Server Appliance (vCSA) is a Linux version of the vCenter Server, this post discusses the placement of the System Preparation tools (sysprep) packages within the vCSA and how to make the contents of the DEPLOY.CAB file available. Once configured, it is possible to use Guest Operating System Customizations with the vCSA.
My previous posts provide further detail around the features and benefits, feature parity with the Windows vCenter Server, how to quickly deploy the vCSA and how to configure an external Oracle database for larger deployments.
For more information about the vCSA, please see the resources listed here http://vmwire.com/vmware-vcenter-server-virtual-appliance-vcsa/.
The location of the sysprep directory on the vCSA is located in
/etc/vmware/vmware-vpx/sysprep/
To get to this location, use a SSH client like WinSCP or FileZilla. The vCSA comes pre-configured with sshd, so no further action needs to be taken here.
Login as root | vmware

You’ll see the following folder structure within the /etc/vmware-vpx/sysprep/ directory:
1.1
2k
svr2003
svr2003-64
xp
xp-64
Note that Vista, Windows 2008 and Windows 7 are not listed, this is because sysprep is built into those operating systems and vCenter can already leverage this. Guest Operating System Customizations with the vCSA is also supported with Linux operating systems out of the box (no configuration to the vCSA is required), although sysprep is obviously not required, please see the Guest OS Customization Support Matrix for supported Linux distributions.
Follow the vSphere Virtual Machine Administration Guide for instructions on extracting the necessary sysprep files, these files can be found in the DEPLOY.CAB file. If you’re migrating from the Windows vCenter Server to the vCSA, just copy the above directories over.
To obtain the sysprep files, you can use the installation CD/DVDs for each operating system or use the following links to download them (these links are detailed in VMware KB1005593):
| Windows Version | vCSA Sysprep Directory | Sysprep Version |
| Windows 2000 Server SP4 with Update Rollup 1 http://www.microsoft.com/downloads/details.aspx?FamilyID=0c4bfb06-2824-4d2b-abc1-0e2223133afb Or The updated Deployment Tools are available in the Support\Tools\Deploy.cab file on the Windows 2000 SP4 CD-ROM. To download this file, visit the following Microsoft Web site: http://technet.microsoft.com/en-us/windowsserver/2000/bb735341.aspx |
/etc/vmware-vpx/sysprep/2k | 5.0.2195.2104 |
| Windows XP Pro SP2 http://www.microsoft.com/downloads/details.aspx?FamilyId=3E90DC91-AC56-4665-949B-BEDA3080E0F6 |
/etc/vmware-vpx/sysprep/xp | 5.1.2600.2180 |
| Windows 2003 Server SP1 http://www.microsoft.com/downloads/details.aspx?familyid=A34EDCF2-EBFD-4F99-BBC4-E93154C332D6 |
/etc/vmware-vpx/sysprep/svr2003 |
5.2.3790.1830 (srv03_sp1_rtm.050324-1447) |
| Windows 2003 Server SP2 http://www.microsoft.com/downloads/details.aspx?FamilyID=93f20bb1-97aa-4356-8b43-9584b7e72556 |
/etc/vmware-vpx/sysprep/svr2003 |
5.2.3790.3959 (srv03_sp2_rtm.070216-1710) |
| Windows 2003 Server R2 |
/etc/vmware-vpx/sysprep/svr2003 |
5.2.3790.3959 (srv03_sp2_rtm.070216-1710) |
| Windows 2003 x64http://www.microsoft.com/downloads/details.aspx?familyid=C2684C95-6864-4091-BC9A-52AEC5491AF7&displaylang=en | /etc/vmware-vpx/sysprep/svr2003-64 |
5.2.3790.3959 (srv03_sp2_rtm.070216-1710) |
| Windows XP x64http://www.microsoft.com/downloads/details.aspx?familyid=C2684C95-6864-4091-BC9A-52AEC5491AF7&displaylang=en | /etc/vmware-vpx/sysprep/xp-64 |
5.2.3790.3959 (srv03_sp2_rtm.070216-1710) |
| Windows XP Pro SP3 |
/etc/vmware-vpx/sysprep/xp | 5.1.2600.5512 |
Guest operating system customization is supported only if a number of requirements are met.
VMware Tools Requirements
The most current version of VMware Tools must be installed on the virtual machine or template to customize the guest operating system during cloning or deployment.
Virtual Disk Requirements
The guest operating system being customized must be installed on a disk attached as SCSI node 0:0 in the virtual machine configuration.
Windows Requirements
Customization of Windows guest operating systems requires the following conditions:
Linux Requirements
Customization of Linux guest operating systems requires that Perl is installed in the Linux guest operating system.
Guest operating system customization is supported on multiple Linux distributions.
Verifying Customization Support for a Guest Operating System
To verify customization support for Windows operating systems or Linux distributions, see the Guest OS Customization Support Matrix.
VMware vCloud Director can use three different authentication mechanisms for subscriber authentication to the VCD portal. The portal is accessed using the URL https://<cloud-url>/cloud/org/<organisation>. In this post, I’ll try to highlight some of the authentication options that a subscriber can use to access the VCD portal.
| Platform | LDAP Server | Authentication Methods |
| Windows Server 2003 | Active Directory | Simple, Simple SSL, Kerberos, Kerberos SSL |
| Windows Server 2008 | Active Directory | Simple |
| Windows 7 (2008 R2) | Active Directory | Simple, Simple SSL, Kerberos, Kerberos SSL |
| Linux | OpenLDAP | Simple, Simple SSL |
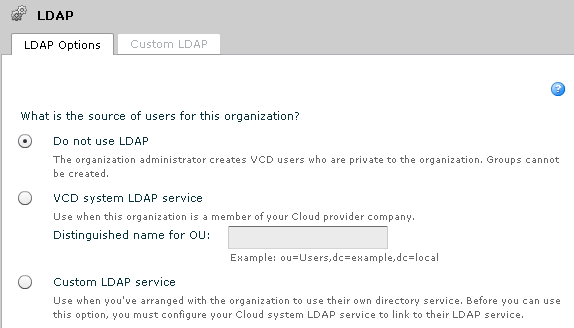
A provider can configure a subscriber to use three different authentication mechanisms as highlighted by Figure 1.
Figure 1 – VCD LDAP Options

This is the simplest authentication method, selecting this radio button when configuring a new Organization will not use any kind of LDAP service. Instead, new users will need to be configured using the VCD GUI or the VCD API, and these users will be stored within the VCD database. Some of the disadvantages when using the local authentication are:
Selecting this will force the Organization to use the same LDAP service as the LDAP service that is used by the VCD system (Provider). Although, a separate OU can be used for each Organization, this is not the ideal model to use for large cloud deployments. Some of the disadvantages when using the VCD system LDAP service are:
Selecting this will allow the Organization to use its own private LDAP service. What this means is for each Organization, a completely separate and unique LDAP service can be used for that Organization, an Organization does not need to use the same service as the VCD system but can use its own LDAP service. This can be a completely separate unique Active Directory Forest for example, with no network links to any other AD Forest.
Consider this following example:
I run a Public Cloud so I am a Provider of cloud services, my VCD system authenticates to a Microsoft Active Directory Forest with a domain name of HUGO.LOCAL. This allows me as a System Administrator to log into my VCD portal as a user on HUGO.LOCAL.
As the System Administrator, I first configure an LDAP service for the VCD System:
Figure 2 – VCD System LDAP

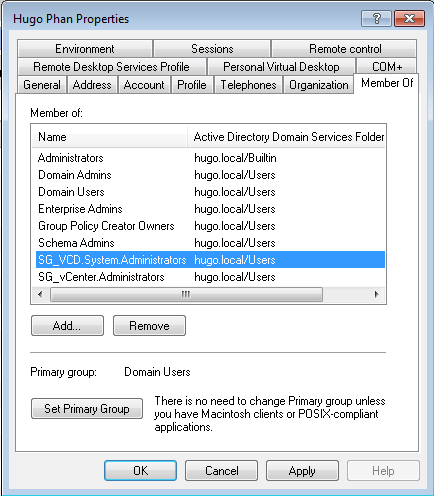
Then, a new Security Group called SG_VCD.System.Administrators is created in the HUGO.LOCAL domain, with the user HUGO.LOCAL\HPhan as a member of that group.
Figure 3 – VCD System Administrators Group

The new Security Group SG_VCD.System.Administrators is then added to the System Administrator role in VCD.
Figure 4 – Import LDAP group into VCD role

Now I can log into my cloud as a System Administrator with my domain user HUGO\HPhan.
Figure 5 – System LDAP

So pretty easy and straightforward so far right? What happens when a subscriber comes along and wants to use my cloud services? Let’s do another example.
A new organization let’s say Coke, wish to use their own LDAP service to authenticate with the VCD portal. In much the same way as how the System LDAP was configured, an Organization LDAP service is configured in similar ways.
As a System Administrator, I first configure a LDAP service for the Coke Organization, instead of using the HUGO.LOCAL LDAP service, I now direct this Organization’s LDAP service to a unique LDAP service for Coke. This can be a LDAP service hosted by me (the Provider) and managed by Coke (think co-lo), or a LDAP service managed by Coke in Coke’s datacentres (think MPLS/IPVPN):
Figure 6 – Organization LDAP

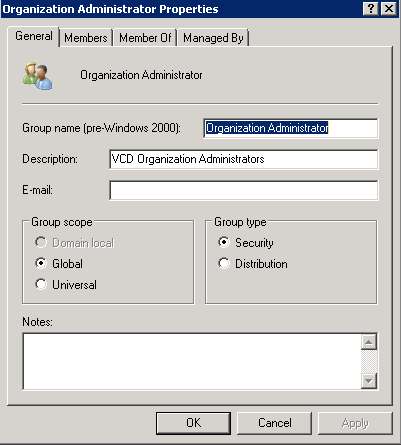
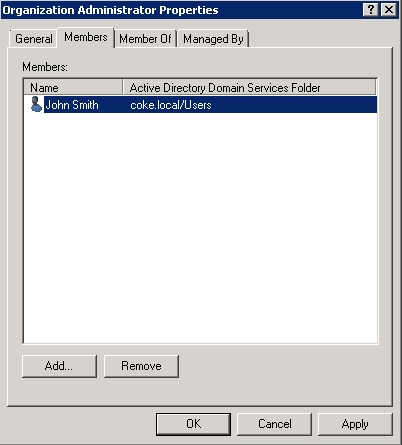
Then a new Security Group called Organization Administrators is created in the COKE.LOCAL domain, with the user COKE.LOCAL\John.Smith as a member of that group.
Figure 7 – VCD Organization Administrators Group and Members


The new Security Group Organization Administrator is then added to the Organization Administrator role in Coke’s Organization.
Figure 8 – Assign LDAP Group to VCD Role

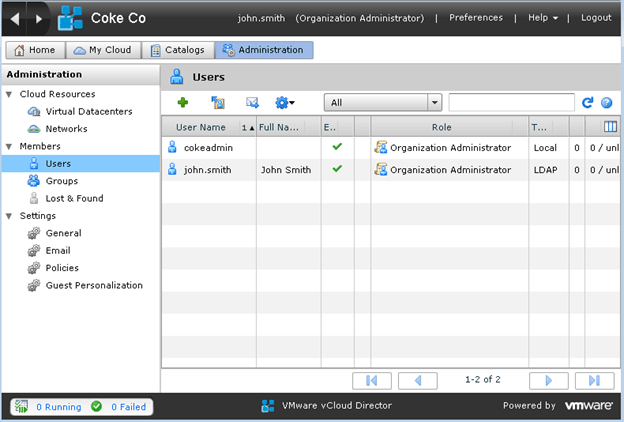
John Smith can log into the Coke Organization as an Organization Administrator with the domain user COKE\John.Smith.
Figure 9 – LDAP User logged into VCD

So what happens when another Organization joins the party? Extending our example above, let’s say Pepsi also want to use my cloud services. In much the same way that the Coke Organization is configured to use its own LDAP service, we do the same for the Pepsi Organization – an Organization Administrator group is created in the PEPSI.LOCAL domain, and a user named Peter.Smith is a member of that group, Peter Smith can also log into Pepsi’s Organization as an Organization Administrator.
Figure 10 – Another LDAP User logged into VCD

In summary the provider will use the System LDAP, all other (subscribers) Organizations could also use the System LDAP (either with a separate OU or not) if required, however, you can also configure each Organization to use its own LDAP Service.
For each Organization, a single LDAP Service for that Organization will need to be configured as a Custom LDAP to authenticate to. To enable this functionality, the vCloud Director Cell must be able to connect to ALL LDAP servers over TCP 389 or 636. The VMware vCloud Security Hardening Guide gives good recommendations on how Service Providers can host Subscribers’ LDAP servers and also how to maintain connectivity to Subscribers’ LDAP servers if hosted remotely over MPLS/VPN etc.
It is therefore important that the vCD Cell is secured and network connectivity to each organization’s LDAP services are also secured. The following extract from the VMware vCloud Security Hardening Guide explains the connectivity options for subscriber’s LDAP services:
Connectivity from the VMware vCloud Director cells to the system LDAP server and any Organization LDAP servers must be enabled for the software to properly authenticate users. As recommended in this document, the system LDAP server must be located on the private management network, separated from the DMZ by a firewall. Some cloud providers and most IT organizations will run any Organization LDAP servers required, and those too would be on a private network, not the DMZ. Another option for an Organization LDAP server is to have it hosted and managed outside of the cloud provider’s environment and under the control of the Organization. In that case, it must be exposed to the VMware vCloud Director cells, potentially through the enterprise datacenter’s own DMZ (see Shared Resource Cloud Service Provider Deployment above).
In all of these circumstances, opening the appropriate ports through the various firewalls in the path between the cells and the LDAP server is required. By default, this port is 389/TCP for LDAP and 636/TCP for LDAPS; however, this port is customizable with most servers and in the LDAP settings in the Web UI. Also, a concern that arises when the Organization is hosting their own LDAP server is exposing it through their DMZ. It is not a service that needs to be accessible to the general public, so steps should be taken to limit access only to the VMware vCloud Director cells. One simple way to do that is to configure the LDAP server and/or the external firewall to only allow access from IP addresses that belong to the VMware vCloud Director cells as reported by the cloud provider. Other options include systems such as per-Organization site-to-site VPNs connecting those two sets of systems, hardened LDAP proxies or virtual directories, or other options, all outside the scope of this document.
Figure 11 – Multiple Custom LDAP in VCD

Note: The use of Coke and Pepsi are used as an example of multi tenancy within a public cloud and the use of the names on this blog are for information purposes only.
In previous posts I blogged about what the vCenter Server Virtual Appliance (vCSA) is, its features and benefits, feature parity with the Windows vCenter Server and also how to quickly deploy the vCSA. For more information about the vCSA, please see the resources listed here http://vmwire.com/vmware-vcenter-server-virtual-appliance-vcsa/.
This post extends the series with how to configure an external Oracle database for use by the vCSA.
The vCSA comes preinstalled with an embedded DB2 database which has similar use cases as the Windows vCenter Server when configured with SQL Express – intended for small deployments of 5 ESX/ESXi servers or less. The ability for the vCSA to utilise an external Oracle database allows customers to scale and manage larger vSphere infrastructures equivalent to environments with Windows vCenter Servers backed by SQL or Oracle databases.
This post shows how quickly and easily it is to use an external Oracle database instead of the embedded DB2 database. Hopefully you’ll see the benefits of how much quicker it is to configure the Oracle connectivity between the vCSA and the Oracle server vs installing the Oracle 64-bit Client onto a Window Server and configuring tnsnames.ora, followed by configuration of ODBC settings.
C:`>sqlplus sys/<password> as SYSDBA
CREATE SMALLFILE TABLESPACE “VPX” DATAFILE ‘e:/app/oracle/oradata/orcl/vpx01.dbf’ SIZE 1G AUTOEXTEND ON NEXT 10M MAXSIZE UNLIMITED LOGGING EXTENT MANAGEMENT LOCAL SEGMENT SPACE MANAGEMENT AUTO;
CREATE USER "VPXADMIN" PROFILE "DEFAULT" IDENTIFIED BY "oracle" DEFAULT TABLESPACE "VPX" ACCOUNT UNLOCK; grant connect to VPXADMIN; grant resource to VPXADMIN; grant create view to VPXADMIN; grant create sequence to VPXADMIN; grant create table to VPXADMIN; grant create materialized view to VPXADMIN; grant execute on dbms_lock to VPXADMIN; grant execute on dbms_job to VPXADMIN; grant select on dba_tablespaces to VPXADMIN; grant select on dba_temp_files to VPXADMIN; grant select on dba_data_files to VPXADMIN; grant unlimited tablespace to VPXADMIN;


After you’ve tested that everything is working, you can revoke the following privileges using SQL*Plus again.
revoke select on dba_tablespaces from VPXADMIN;
revoke select on dba_temp_files from VPXADMIN;
revoke select on dba_data_files from VPXADMIN;
Total configuration time ~approx 10 minutes.